Beginner Friendly! Ready To Wear 13X6 Real Hd Swiss Lace Wig Install Tutorial | Myfirstwig
- Posted on 17 May, 2022
- HD Lace Wig
- By Anonymous
Shop the same #LaceFrontwig:
https://www.myfirstwig.com/touchedbyay...
√ Real HD Swiss Lace - Skin Melt Invisible
√ 100% Human Hair - Soft & Smooth
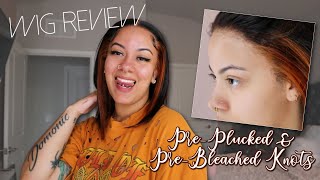
√ Pre-plucked, Pre-bleached - Beginner Friendly
√ 13x6 AVAILABLE
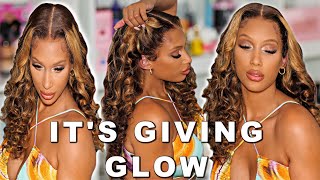
--- TOUCHEDBYAYE - Malaysian Human Hair Yaki Blunt Straight With Brown Highlight Lace Front Wig - LFS010
Hair Length - 20 Inch
Hair Texture - Silky
Cap Construction - 13x6 Lace Front Wig
------
Shop more LaceFrontwig: https://www.myfirstwig.com/malaysian-v...
* Protective Styles & Pre-Customized Lace Wig For Wig Beginners *
Website Link: https://www.myfirstwig.com
Instagram: https://www.instagram.com/myfirstwig_c...
Facebook: https://www.facebook.com/myfirstwig
My Socials let’s be friends! (literally) :)
IG: @kamanijeann
Twitter: @kamanijeann
TikTok: @manijean777
Snap: @manijean
Wig IG: @wigssoldbymani
Email me for business inquiries only [email protected]
Hey everybody welcome to my channel and welcome if you are a returning viewer, hey guys what's up so if you guys would like to see our installed this week from my first wig, i did not pluck this wig. I did not bleach this wig. It came ready to wear so yes, stay tuned for the detailed tutorial on this week. If you'd like to see how i achieve this complete look. So first i'm going to take my wig cap. I have my edges slicked back and my hair in braids and some flat braids, i'm just going to stretch that cap out onto my head and then take my shirts and cut around my ears so that i can get started on spraying. The spray on this cap. So that it can get nice and molded down and have us looking bald, as so now that that is done, i'm going to be taking my ebb and wonder: lace spray. It is in the black bottle. I think this is a extreme mega holder, something like that, but yeah, that's the one in the black hand and i'm just spreading that spray. With my finger all around my hairline, where i want the cap to be and where i want the wig to be mainly now that that's in place, i'm going to take my blow dryer on a high cool setting and blow dry it until it is completely dry. Because if it's even a little bit of wet, it's a risk of the wig cap, folding back when you start cutting it. So now i'm taking my shears and i'm trying to cut it in the middle first and then go around and just really just shred that off. You know what i'm saying but yeah. Actually i lied. I forgot in this tutorial. I took my razor, my eyebrow razor, which is what i cut my lace with and tried it on my cap. Just because i wanted to do something something different out of boredom but yeah. I pretty much got the same results. It was just a little bit more. It was less straight with me using the razor hey. The cap is looking good. It is flat, so i'm going to take my makeup brush in my ruby, kisses cream foundation in the color rd15 and i'm basically tapping and smoothing the product into this cap and i'm going in back and forth with the palette, because i really want it to be Pigmented, this is what it looks like guys. I wanted to make sure you guys seen it and then the brush that i was using, which yeah i was putting it in a middle part like focusing the makeup in the middle part, because it was going to be in the middle part. I didn't really need to be anywhere else, but this is the lace i tinted it already with the same cream foundation. Also, this is the inside of the wig. I have combed it back but, like i said in the beginning, i did not bleach this wig bleach. The knots on this wig, i did not cut the lace. This came ready to wear okay, but now that the wig is on my head, i'm just going to be cleaning off my skin before i apply glue because you don't want the glue to interfere with any residue or oils that could be on your skin because it Will not stick? Okay, trust me, it will not stick. It will not dry it. Just it's not going to be good, so make sure you clean your skin with a simple sixty percent or ninety percent or seven percent, whatever percent alcohol, okay, but anyway, now that the glue is on our hairline - and this is going really bad. Oh, my gosh, that the glue is on our hairline. I am going to tell you guys what glue i'm using, which is the ghost bond xl glue and i usually have popsicle sticks to smooth out my glue but um i ran out and every time i go to the hair store. I forget to get them so i use the back of my comb, but nevertheless i'm blow drying that first layer and then i went in with three layers. I want to show you guys up close what it looks like because i really get up close to see exactly where i should put the glue, but this was the last layer. You just want to make sure you really smooth out your glue. You guys really smooth it out, pay attention to where you're applying it, so it won't get confusing when it's time to actually pull the lace down. You know what i'm saying smooth it out, really really good, but the glue is nice and tacky and dry. So now it is the perfect time to apply this slice. Okay, you don't want to do it when the glue is wet or completely dry, because both of those ways, the lace is not going to lay it needs to be tacky, okay, but yeah. So i'm taking my fingers and this lace, i'm pressing it down, pulling it down and placing it exactly where that glue was applied. Okay and like i say it is needed to have good light in your video, so you can see where that glue is because going off memory. Just thinking where you put the glue that ain't gon na work, you have to see where that glue is but anyways. I'M taking my fine tooth comb in my blow, dryer on the cool high setting and i'm melting that lace even further by pulling all that hair back, getting it nice and near that blow dryer. So they did send me a little packet with some clips and a comb. So i was like. Let me go ahead and use this. I can apply my um elastic band, so here i am applying my elastic band and while this lace is melting, i'm going to be flattening out this wig because it is getting very lumpy, humpy and bumpy. So i'm going to be taking my luscious re-nutrient swag stick! Y'All i have to get my hands on the cure. Stick like i don't know why i need to make a hair store list, so i can get everything i aspire to get matter of fact, just a hairless, a hair list period, because i want to try erika j products. I just want to try a whole lot. Different, that's neither here nor there. I am um hot, coming all of the hair back, especially in the back, because i like the back to be really flat. So i'm really working my hot comb through. I do it many many times and then i'm going to go in sections using some flat iron heat serum. It'S not even fire and serum. It'S just heat serum heat, protecting serum by icy fantasia, and i'm going to go in section by section with my hot comb and flattening this hair out section by section to get this wig super flat. Because that's what we want. I hate a humpy wig like got ta, be giving scalp all the way around, so i'm just taking the sections out by using my fingers, nothing crazy. So i did the same process on the other side, but i didn't want it to be repetitive, so i just cut that part out, but nevertheless, now that the lace is laid a little bit because we are going to tie that back down again, i'm going to Be cutting around the ear tabs before oh well, really i'll be cut off the ear tabs. Before i install my wigs, but i forgot this time. I was moving kind of quick, so yeah i forgot, but it didn't really make no difference. I went ahead and just cut them off after i had it tied down, but now i'm taking my eyebrow razor and i'm shaving off the excess lace that we do not need. Now i'm going to be pulling out my baby hairs to get it ready to get tied back down. I just like to pull them out and then re-tie them back down so that it can be super flat and the lace can be even more laid. But i'm not taking a middle piece or anything i like to just have two on the sides for the most part and then the sideburns, so yeah, that's what it's looking like! It'S pretty much giving scalp! I want to make sure that they were even as well. That'S why i looked at it like that, but um yeah, i'm pulling out these baby hairs going to a hot comb them out because yeah. This is also what helps getting them to be super flat and, looking like you feel me, they're really on your skin, especially because we're going to be flat, ironing them. So it's just best to have the hair, nice and pressed out now that the hair is giving scalp for real we're going to tie that back down. So it can give a major scalp, and while it is tied down, i'm going to just go over this hair with a flat iron. This hair wasn't washed or anything. It came already straight and silky, but i'm going to press it out even more just so. You know i can style it or whatever give it a finished. Look a final touch but yeah. Now i'm showing off these baby hairs, the laces melted for sure and yeah, i'm just shaving those off you know pretty simple, just getting them shorter. The length that i desire now, i'm taking my half inch kiss pro flat iron, it's a pencil flat iron and i'm curling, my baby hairs upwards and then on my sideburns, i'm going to curl them under just because i like the way that it leaves like a Curly fluffy look and it's the same thing when you curl upwards, but i just prefer to curl inwards, so yeah. So so now i'm going to be taking the got to be glue gel in the black version and putting those around my baby hairs and using the comb side of my edge brush and just swooping them. These were pretty easy to do. Usually i have to redo them, hello time, not hell is times, but they just be taking a long time sometimes, but these were pretty simple and straight to the point, but anytime i do my baby hairs. I cut them shorter as i go for the most part, because i don't like when they're too short at first, so i'd rather than be too long and something that i can fix. But i'm going to be repeating this all the way around and yeah. These are pretty simple to do. Foreign me, baby hairs are completed so now it's time for the final touches, i'm using my red 11 creme foundation by ruby kisses and this small makeup brush and i'm cleaning up this part. When i tell y'all this is like my favorite part, because this really brings install all together because it just really be giving scalp at that point, but yeah it's even scalp. I love the way that the sweet comb came out. I love that this wig was ready to wear straight out the box like so i know y'all gon na be able to install this, and do it just like this, because i gave you all the t on how to get it this flat, and all of that Thank you guys so much for watching. I hope you guys enjoyed and to learn something from this video. I love you guys, as always thank you for tuning in make sure to check the description box for the information on this hair. Leave a like comment and subscribe and i'll see you guys in my next
Comments
Spotlight Forever: Currently following this tutorial for my wig !!
aliayah: No bc the way that your installs look like straight scalp is sickening. I love it.
xoxor3nn: this wig looks bomb on you but can you pls show us how to safely remove our wig
Shay z: This is gonna help me so much, I just bought a wig for the first time and I'm installing it, I'm scared
Trae Aliyee: love your videos as usual. I think you should think about creating an amazon store thingy with links so you can get commission when we buy the products you recommend. Because I just bought a cart for $300 and everything I got from watching your videos.
Abby Márie: yessss girlll, you never disappoint
Mini DIOR: I love the color
ashley: can you do a video on maintaining a wig in the summer? i’m going to aruba and girll i’m struggling
bri bri:): yea you did tf outta that
Della Cook: I stay watching your videos and I love
Beautiful & Blessed TV :
patrice r.: Period
Lávelle: ATEEEEE
Johnae' Dansby: ATEEEE PURRRR