Omg The Most Flawless Wig Install Ever!! 10Min Install (Pre Plucked Wig) Ft Xrsbeauty | Yunnierose
- Posted on 29 June, 2022
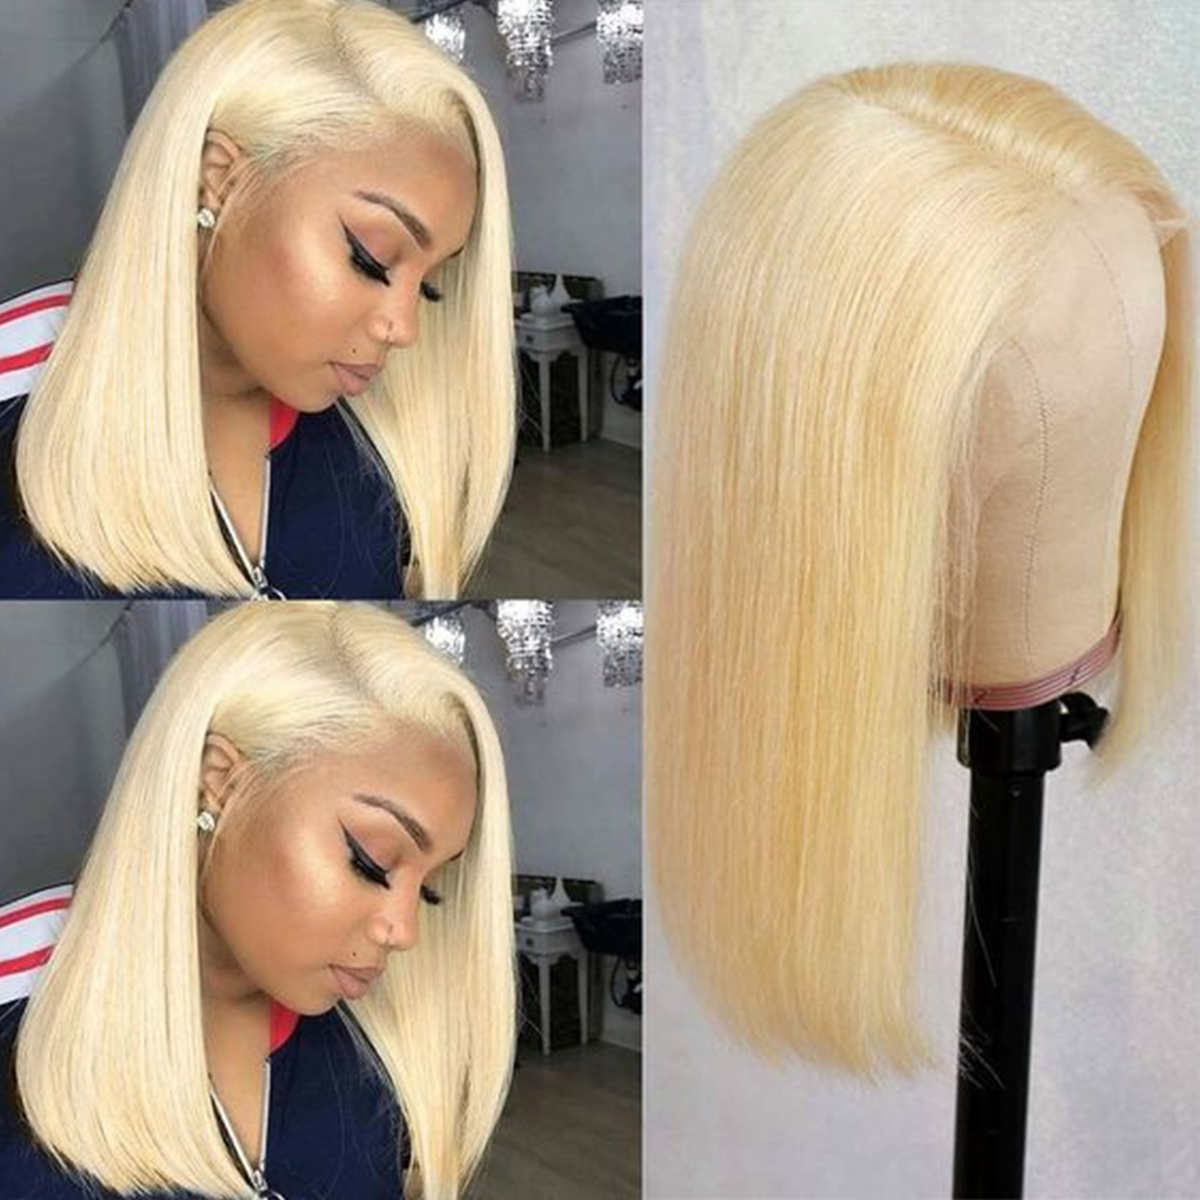
- HD Lace Wig
- By Anonymous
Hey rosettes! I hope you enjoy this flawless wig install no baby hairs by yunnie rose
●▬▬▬▬▬▬▬▬▬♛ Xrsbeauty Hair ♛▬▬▬▬▬▬▬▬▬●
►Now use 15% OFF Coupon Code(Always Valid):XRS484
❤The Wig is from XrsBeautyHair,use coupon code buy it here:https://bit.ly/3NFELjk
☛SKU:LFW12
☛Length:22in
☛Density:200%
*New* CLEAR LACE is real clear lace, it’s undetectable on your head.
*New* CLEAN HAIRLINE is much more natural than regular pre-plucked hairline, we customized this natural hairline to make it melt skin much perfectly.
Follow xrsbeautyhair.com
YouTube: http://bit.ly/2KXjerD
Instagram: https://www.instagram.com/xrsbeautyhai...
Facebook: https://www.facebook.com/Xrsbeauty
Pinterest: http://bit.ly/38VFY3a
-------
*C O N N E C T W I T H M E *
INSTAGRAM → @yunnierose
TIK TOK → @yunnierose_
TWITTER → @yunnierose
FACEBOOK → yunnierose
SNAPCHAT → @YunnieRose _
*B U S I N E S S I N Q U I R E S*
*P R O D U C T S M E N T I O N E D*
Amazon StoreFront: https://www.amazon.com/shop/msyunniero...
Hey rosettes, so if you want to know how i got this wig laid and slayed then keep on watching this wig is a pre-plucked. The knots are bleached and it is ready to go. So if you want to know how i installed this wig in only 10 minutes in real time and how easy it was to install this is perfect for beginners then go ahead and keep watching guess who's back back again, yami's back what tell a friend hit what Hit subscribe, hit subscribe, hit, subscribe, hit subscribe here was this young rose and we're gon na make me back to my channel. So today's gon na be a quick little wig install um. This will be my first time trying like a wig that is pre-plugged pre-bleached, like just ready to go and i'm actually like getting ready to go somewhere. So we're going to put this little wig to the test. So this video is sponsored by xrs beauty, um, i'm gon na show you guys what's in the box and how the wig came. Alright, you guys so here is the box, and here is everything that came in. It came with a comb, a wig cap, elastic band and also some flexi rods and an air edge brush, and then here is the actual wig. So, as i said, this wig is pre-plucked. They actually bleach the knots. It comes with three combs and an adjustable band, and it also comes with those little hooks where you can put like attach um elastic band, but you can, you know, adjust it to how wide your head is and, as you can see, the hairline is so realistic. Like you should be able to just pop it on so that is what we're going to do so, as you can see right now, i'm just showing you how in the lace is and we're just going to apply it as is and just hope for the best. So right now i did the ball cap method and i am adding some bronzer. I like to add my bronzer, because i noticed that adding a slightly darker like tone to your ball cap just makes it look more realistic once the wig is all the way down. I notice, if you use your same color um like foundation or too close to your skin tone. It may look, it may make the lace look a little light and it's not going to blend in as naturally, then. You also want to take that same bronzer or powder or foundation, whatever you're, using make sure you actually put that on the lace as well, because that way, it's just going to blend in a little better once you um, apply the lace so right now, as you Can see it comes like this bra strap like technique, which i kind of like, because it's not just set in stone, and it has three rows of hooks, so you can really adjust it to your head shape, which i thought was genius uh, most hair brands that Do the elastic band is just a regular elastic band, so you would literally have to like cut it and tighten it if it's too big, but if it's too small you don't have any other thing to do like you just got to deal with it. So i like the fact that they added um the option to adjust that and, as you can see, this is like pre-cut right now, i'm just laying down the hair, so it doesn't get in the way of the glue. But as you guys can see, it looks so natural, like i have all my years doing, wigs i've been doing wigs for the last like seven eight years. This is literally the most natural like straight out the box wig i've ever tried in my life, like it looks so so so so good um. So i would definitely recommend this if you don't know how to pluck or if you're, looking just for a ready to go wig. So if you've been watching my wig tutorials lately, one thing i like to do is cut the lace before i glue it down. Um i've been kind of getting used to this technique and i do actually like it um, but i think i may go back to like just putting it like cutting it after i do it down, because i notice, when you do it this way, you have to Go back and do some like cleanups that sometimes i just don't feel like doing, but it is really good for beginners in my eyes so right now, i'm just cutting off the ear tabs. So i'm really just making sure i cut and customize the lace as much as possible before i glue it down, so i don't have to do so. Many cleanups once i um, lay it down, and that is the best option. So, as you can see, i haven't even glued this wig down and it already looks like amazing, like it's giving scalp and i haven't even laid it down. So, as you can see, this is me lifting it up to show you guys. I was like super impressed. Y'All, like i, was really really impressed so right now we're going to go ahead and apply the wig, so i'm using bold hold and i did three thin layers. You can do between three and five layers, but it just really depends on your preference um. Some people like to work in sections i like to just do my like whole perimeter of my head just three times, but you want to make sure that you do a thin layer and you want to make sure that you actually make sure the glue is very Thin and smooth the glue out so, as you can see right now, i'm taking like a rat tail comb and really making sure that that glue is really really smooth. So really take your time with this process and make sure that it dries clear between each layers. You can just let it just sit there and let it dry naturally on its own or you can go in with a blow dryer. But if you go in with a blow dryer make sure that you are blow drying it on cool, because you want it to get stuck sticky and tacky. I notice, if you blow dry it on hot it just it gets gummy. If that makes sense like it's kind of like gooey and gummy, and that's not what you want, you want it to be like extremely tacky and sticky. So if you're going to blow dry, it make sure you blow dry it on cool, alright, y'all, so we're on a different camera, because my camera, i don't know what happened to it but yeah. So we're going to be on this camera right now. So this video is going to be a little more casual all right. So now that it's clear i'm going to go ahead and bring it this down and push it back a little bit and hold it in the middle and i'm going to take this kind of press it in and grab the side here. The side pull it down. Press it in there pull this out, oh okay, before what i'm gon na do is just tie it down. But before i tie it down, i'm gon na go ahead and do my little sideburns first, so i'm going to pluck them just to make them a little thinner, all right y'all. So i'm about to um just kind of bump the i did pluck it a little bit. I plucked it a little bit because i think it was just kind of plucked in the front like you know how you pluck in like two layers. I think it was just plugged in the front, so i did have to pluck it a little bit just to like make it fit my natural hairline, but it's all like glued down right now. I haven't added any powder, so it has that little white cast to it um, but what i'm gon na do is go in with the flat iron just to get it all sit back all right. So now i'm going to use that same bronzer that i used to tint the lace - i'm just going to put this all up in here and then we're going to tie it down just to like really it's going to really melt once that's tied down. So, okay, all right, so i'm gon na tie down and i'll be back alrighty guys. So i styled the wig. This is how it came out. It came out perfect. This is the most easiest wig i ever applied, so i will leave everything down in the description box for your viewing pleasures, go ahead and thumbs up and subscribe, and i will see you in my next video love. You you


Comments
Sahara Coleman: Forget the install, girl the way you styled it with that half up half down with the swoop is elite! I have to recreate. We need a makeup tutorial with this hairstyle!
sarah glover: U made that look so easy, girl!
Ms Lynn: This unit is gorgeous ❤ and of course you look amazing
Carle Rae: XrsBeautyHair alwaysssss come through for me! They literally have some of the best quality hair
Berkah Mulyo: This is amazingI want to have one.
Verlincia Jones: This is very beautiful I need to learn how to lay these wigs and I can't braid lol....
sarah glover: So pretty!
BLACK CREATER 11STUDIO: so so so beautiful!!OMG!
AVENGERS: WOw,you and this hair are so beautiful!!! ❤❤
A 4 G : Oooohweeee That unit is
HATE EDITS: That hair is fire .
JaeCole tv: YESSSSSSS GORGEOUSSSSS
Hacker 999: The melttt!