Beginner Friendly Install 26" Hd Lace Wig & Wand Curls Using Oval Wand Ft. Westkiss Hair
- Posted on 02 August, 2021
- HD Lace Wig
- By Anonymous
▬▬▬▬▬▬▬▬▬♛#westkiss♛▬▬▬▬▬▬▬▬●
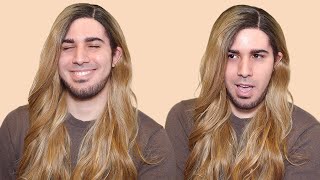
Hair details:200% density HD body wave wig 13*6 lace frontal wig 26 inches (HD, small cap)
Video Hair Direct Link ➤https://bit.ly/3BOOxdL
Hot selling HD lace wigs ➤https://bit.ly/3BQAiFo
★ westkiss official hair store ➤https://bit.ly/3BQApki
Up to 43% off Lace Wigs ➤https://bit.ly/3f3F7RJ
Hot curly lace wigs➤https://bit.ly/3zLNj0Z
#westkisshdlacewig #westkisswig #westkisslacewig
#WestKissHair Official Site Huge sale Big Discount
❤ Follow West Kiss hair on social media :
Instagram @westkiss_hair_store: https://bit.ly/2OlKstu
YouTube @West Kiss Hair: https://bit.ly/2Ol5U1m
Wholesale WhatsApp: +86 13323741050
My Website: https://kb-kollection.com
KBKOLLECTION IG: https://instagram.com/kbkollectionshop...
KEEP UP WITH ME ON ALL SOCIAL NETWORKS
Instagram: https://www.instagram.com/thekiarakayb...
My Website: https://kb-kollection.com
Twitter: https://mobile.twitter.com/KiaraKayBro...
Business Inquiries: [email protected]
==============================
Are you a YouTuber looking for Sponsorships?
Join Octaly: https://www.octoly.com/youtubers?yt_re...
==============================
I use MagicLinks for all my ready-to-shop product links. Check it out here: https://www.magiclinks.org/rewards/ref...
Hey guys welcome back to my channel if you're new here my name is kiara brown. If you're not new, you already know what's up today, video is sponsored by west kiss hair and i'm taking everything out of the package. So i got two bonnets. I got two head wraps. I also got another head wrap, so yeah, that's one of the two, a pair of lashes, an adjustable elastic band and i also got some wig caps and then, of course, the wig, and i love that it has the details right on the back. So it's hd lace, 26 inches small cap size, which is my size. You can always get um whatever size to fit your head. But for me that's what size i get, and this is the wig here - is on my head. It'S already customized, so i have plenty of videos on how i customize my lace if you care, but i always just like to try it on make sure that everything looks how i want it to look and if i need to go in and make some more Adjustments or tweaks, but right here it does look really good and the lace match is good. So my camera did not record when i use the wax stick, but i just took a wax stick and i applied it on the hairline and then i just went over that with my hot comb and i'm just pushing all the hair back and i like to Do this one to keep the hair from getting in the way when i glue the lace down into it, just really brings it together and makes it look a lot more neat, and then here i'm doing the ball cap method. So i like to do two wig caps. One is really just to protect my hair and hold my braids in place and then the other one is just to do the ball cap method, which is to help protect my hairline and i like to use glue. So i'm using the even lace glue and i only did one layer of that and then once it's dry clear. I just go ahead and cut off that cap that we don't need. That'S in the front. I am using. The morphe photo finish foundation to match my cap so that it does not show underneath the lace moving on to gluing i'm using the even lace glue, because that's all that i have i used up all my bold hold. I used up all my gener snatch glue. So this is what i have so i'm going to use it. It is a good alternative like cheaper glue, it's only ten dollars, maybe eleven after tax. I got it from my local beauty. Supply store so check yours, but it's it's a decent glue for the price. The only thing is, i just feel like it takes longer to dry versus the other glues that i like to use, but it is still a good glue for the price, and i only did this one layer, because i squeezed so much out for this first one. So, as you can see, the glue has mostly dried, but there's still like some spots that haven't dried all the way. So i just went ahead and lay this lace down, because i don't want to wait all day for these little spots to completely dry, clear, so yeah. I just went ahead and laid that lace down i'm using the back of this comb to press it in, and i forgot this step. I normally do it before i glue the lace down, but i'm doing it now, which is just cutting off that lace. That'S going over my ears and i did cut some of that lace. That was going over my eyes as well, because i low-key couldn't see what i was doing. But if you want to leave the lace over your ears go for it. But i just like to cut it off because i like it to lay from ear to ear, and i want this to look natural and i am doing a side part. I haven't done a side part in a while, so i was like: let's do it so i'm parting, it i'm doing a left side, part which i normally do a right side, because i feel like my right side is my good side, but i decided to switch It up so we're doing left and i'm using the wax stick and i'm going to hot comb this part down. So when i do a side part, i do like to section off that hair and just hot comb it in sections, because i want to make sure that every strand is laying down flat, which is really important unless you just want that big hair look. But i just like for the top half of the hair to lay flat, it just looks really good and put together in my opinion. So, as you can see, we got her flat honey. That'S what i want! That'S what i want it to look like, and here i'm just cutting a few layers in the front of the hair, because i don't like when the hair is just all one length. I need some layer. I need some dimension like it. Just looks better, especially where the bang is falling in my face. I definitely like to do that and i went ahead and cut the lace and it looks so good again. It is a hd lace, so this is what i expect it to look like. So everything is looking really good, so i know this lace looks so good, but i'm going to do a baby hair. I'M only doing this one little baby hair on the side here, because i definitely don't want to take away from this amazing hairline and i did curl it because i really want to keep practicing this fluffy baby hair that everybody is doing. I think it's so cute, but that's all that i did like i said just that one little hair on the side. That'S all it really needs, so i'm taking this bio silk: silk therapy. This is all that i use these days whenever i put heat to the hair. It'S not a heat protectant, but it does help hold the curl a little bit better and it also just gives it some shine some moisture because we don't want our hair looking dry. So i have this remington curling wand and i'm so excited because i finally bought a new curling wand. My last one broke maybe like a year. It might have been two years at this point, but as you can see, it's not a normal curling wand. It'S a little bit different, so i was excited to try it and it has a little plastic piece at the end that you can hold. So you don't burn your fingers because it does not come with a glove. And honestly i was struggling a little bit. I was struggling just a little bit, but you know i got it together after a couple of tries and i'm just curling it going away from my face and it's called an oval barrel. So that's why it's shaped like that. They also have a teardrop one. I might go back and get that one as well to see if it's much of a difference, but i do like how these waves are coming out. This is exactly what i wanted, because this is a body wave. So i wanted to mimic the same pattern of the original texture, but just make it more glam. So that's what it's looking like so for the bangs i like to curl them going towards my face and only the bang part, the rest of the hair will also be going away. But as you can see, i pull it going towards my face and i really like how that looks and how it falls. It just looks so good and you'll see when i drop the curl. What i'm talking about so yeah? I hold it in my hand for like 10 seconds and then i let it drop and y'all tell me: that's not cute, look how it just fell on my face and i'm also going to curl this part as well going towards my face. So just the hair that falls in my face, so the rest of the hair, like i said, just curl it going back, but that part right there. It makes such a big difference because it just it really glams it up, and then i also just pin that hair up, because i don't want to get it in a way, and i also just want to make sure that it holds the curl. And i also curl this part going towards and not away, but that was the last piece. I only did those three sections right there going towards, but the rest, like, i said, they're going away. I actually learned that little tip from alonzo arnold. If you know you know, if you don't know, go look him up: okay, because he could really do some hair, so both sides have been curled. I can drop my bangs now and it looks so good and cutting those layers also made a huge difference, and i just love how it looks like it looks exactly how i want it, which was a nice little wave. I am finger combing it out because i don't like a defined curl. So i'm very happy with this look: the lace, the curl, the hair, like everything, came out so bomb. So if you're interested, i will have all the details listed down below so make sure you check it out like comment and sub, if you're not already, and i will catch y'all in the next one is


Comments
Kiara Brown: Shop My Website : https://kb-kollection.com
Merle Lawis: That hair is phenomenal I love it and the curls turned out great
Jellyfish Jelly: Ok my coins are ready cuz I need this one too but beautiful as always
West Kiss Hair: Wow! Dear, you are so pretty with our wig.