Nadula Hair Review 5X5 Hd Lace Closure Wig Install| How To Bleach & Tint Knots
- Posted on 02 April, 2021
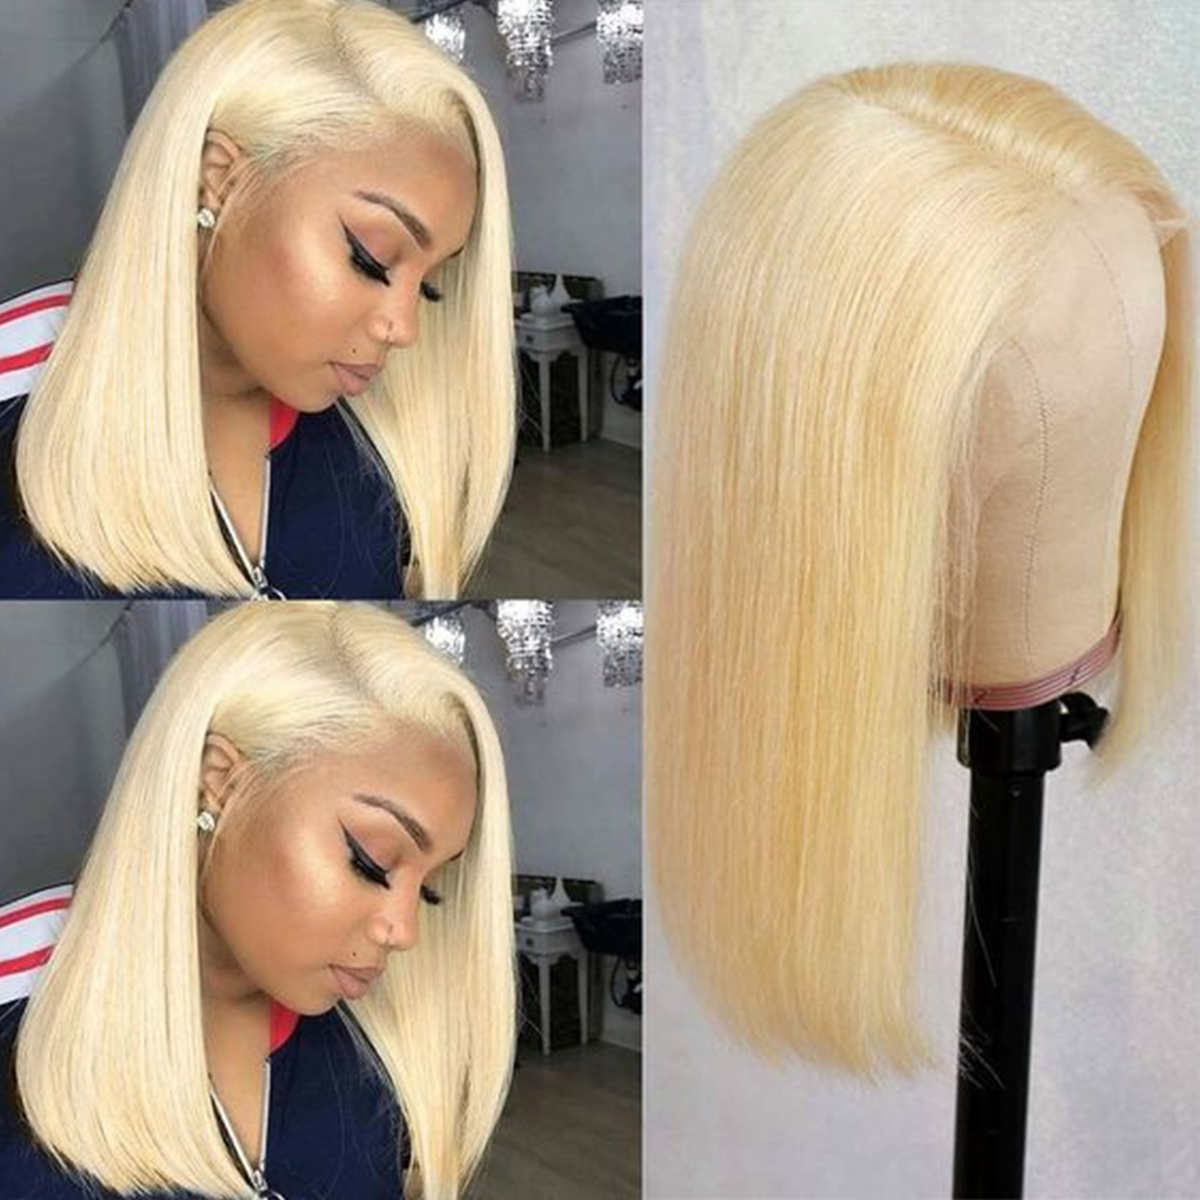
- HD Lace Wig
- By Anonymous
Hey y’all! This is my first time trying out a premade wig. I’m so happy I went with Nadula Hair 5 x 5 closure. The hair is so cute and nice!
I hope you all enjoy this video of me bleaching the knots, tinting the lace, installing, and styling this straight hair!
If you guys enjoy make sure to like, comment and hit the subscribe button. I have more hair videos and a bunch of try on hauls coming soon!
Contact Me:
Business Inquiries: [email protected]
Instagram: @SherylEde
Twitter: @Sherylede_
Wig Purchased:
https://www.nadula.com/nadula-5x5-hd-l...
Website Link:
Products Used:
LL'Oreal Quick Blue Powder Bleach, 16 Ounce https://www.amazon.com/dp/B000A409J8/r...
Salon Care 40 Volume Creme Developer, 4 ounce https://www.amazon.com/dp/B004OKDW20/r...
Rit DyeMore Liquid Dye, Chocolate Brown https://www.amazon.com/dp/B00UL9GRJI/r...
Okay, so hey y'all, it's cheryl here and even welcome back welcome to my youtube channel for today's video i'm going to be talking about this unit. I purchased from the doula hair. If you're new here my name is cheryl eddie. I do videos on beauty and lifestyle and you know i vlog every once in a while make sure to hit that subscribe button if you guys enjoy. Like comment, add me on my other social media platforms and let's get started. So this is the packaging for the wig, the wig came in this plastic bag and it came with a silk scarf and a tan wig cap. This is the way straight out the box and the wig is really full, especially for it being 24 inches and 180 density. This is a transparent, hd lace and, as you can tell the lace, it wasn't too light on my skin tone. You know i could have got away with it, but that's just not me and the wig came with three combs two on the side, one in the back, and it also had an elastic band and lace at the bottom and the wig came pre-plucked. And i really like that, because it made plucking so much easier bleaching. Your knots, i prefer the l'oreal quick, blue bleach powder 40 volume developer. It doesn't really matter the brand. This is my mixing bowl um, it's just a cheap little bowl and then this is my bleach knife. I keep it with me and then my purple shampoo shimmer lights for tinting. Your knots. I have this mug, it's from pink. I'Ve had it for years now, and this is my designated tinting jug um yeah. Nothing else goes in there, then the ritz chocolate brown fabric dye, okay. So to bleach my knots, i start off with one scoop of bleach and then i add in my 40 developer and it's something i just i it's better to add less than to add more because it's easier to correct less than more so you know less is More so your goal is to have a toothpaste like consistency um, so you want to be creamy. It can be a little liquidy, but not too liquidy, because then it's going to get on the hair. So you just want something creamy, something that doesn't fall off. Your butter knife and, as you guys saw, i took my butter knife and that's what i mix it with, because i want this thing thick and if i use like a mixer or something like you know, a hair dye mixer. It might not get as thick as i want it to be, so i just take the knife and yeah so now that i get the paste to a nice little smooth consistency. I spread that thing on like butter on the closure. Um yeah, you guys see some pieces might fall off. That'S just because the head is tilted a sort of way, my bad but yeah. You just have to spread it like butter, cream cheese on a bagel. I don't know what else you spread, but whatever you spread, do it just like that? Okay, so much fell on my floor, so i had to stop recording i'm sorry about that, but you just have to spread it all throughout the closure and you let it sit. I let mine sit for 20 minutes just because i i don't know, i know how to eye it, so i would say start off with 10 minutes and then go 15 and then 20. just see how well your knots take bleach, and this wig did take bleach. Really well, after washing the bleach out, i put the shimmer light shampoo on. I just followed the directions on the bottle. I do exactly what it says and then i'm sorry, i don't like the clip of me tensing the lace i'll come back and do that in another video, but tinting is so easy. You just do boiling hot water. Pour it in that cup. Do like two drops of the ritz hair dye. You do not need a cap full because it's so potent it's. You just need. Like a couple of drops, i put a little salt in there. I use my bleaching knife. I mix it all together, of course, wash the knife first mix it all together. I put the closure in for about 10 seconds. I wash it out and then put shampoo and conditioner that easy. Now i just take my hard head spray and i just spray on top of the lace i do it gets on top of the hair a little bit, but that's fine - and i just take my comb just to really melt the lace down and i'm going to Take the scarf that came in with the package and just lay it on my head for a couple of minutes, cutting the lace. I use two things. First, i have my mini scissors. I got from walgreens, i think they're eyebrow scissors and i like them, because i can cut the sides of the lace with them. Then i use my eyebrow razor to cut the rest of the lace off the wig and when you're cutting i do cut. I didn't cut correctly: i'm not gon na lie when you cut you're supposed to be like jagga jugger like you're supposed to be moving your hand, doing a motion, not just a straight cut. I kind of did a straight cut, but since it was an eyebrow razor, it's still it's not giving me a sharp line because you don't want the sharp line, because then everyone knows it's a wig okay, so that is it with the install. I know i look a little. You know humpty dumpty right now, but don't worry. I'M not gon na. Look like that for long, okay. I just take my comb and my hot comb and you not just make everything run flat and stay tuned for the rest of the details. Okay, so this is a 5x5 transparent, hd lace, closure, straight wig, and it's at 180 density and it's 24 inches. I was pretty nervous at first because i don't usually buy pre-made wigs. I was nervous because you know on youtube. Everyone has like 360 300, whatever it's more than 180, but so this is a 5x5 closure. 180 is okay. I think a 360 with this um with a 5x5 unit might be a little bit too full. I don't know i like the sleek look, so 180 density was perfect. For me. One thing i will say is, since the unit is 24 inches, all of the hair is 24 inches, including the closure, and i would prefer um layers being cut into this wig, so i might cut layers into it like later on. I don't want to. You know risk messing it up or anything, but i will cut you um layers into it just so it could frame my face more. I have not experienced any flyaways with this unit and i love that okay, so i really like this unit. I think it looks really good. The quality is amazing, but look if i start disliking it for any reason, i'll. Let y'all know i'll be back here and i'm gon na. Let y'all know okay so make sure that subscribe button to keep up. You know a little update, so all my other videos, if y'all did enjoy make sure to like comment and subscribe. Add me on my other platforms and until next time, bye your hair. Looking nice


Comments
Precious Balogun: loveee this hair on you!!
Sharon O: Love this intro !!