Nadual 5X5 Hd Transparent Hd Lace Wig Review| Shanice Annette| Nadula Hair Review
- Posted on 26 March, 2021
- HD Lace Wig
- By Anonymous
Nadula Hair Review
_____________________________GET TO KNOW ME_________________________________________
This channel is all about positive vibes/makeup/ skincare/ fashion/ style/ unboxing and first impressions. My makeup style is the natural/ wearable side but every now and then I like to get super creative and step out of the box. I'm not a MUA everything I know I've practiced and taught myself. Being a content reactor is my way of giving back what was given to me, my passion/love for makeup started with watching videos on YT . I upload every week on Monday & Friday so be looking out for new content .
___________________________________________________________________________________________
We are on our way to 1K so don’t forget to give this video a big and subscribe to my channel.
Have a great day.
Thank you for watching my video
Link to website for wig
Nadula 5x5 HD lace wig 18inches
https://m.nadula.com/nadula-5x5-hd-lac...
Hot tools used to style hair
Sutra Flat Iron
https://sutrabeauty.com/collections/fl...
Soleil blow dry
https://soleilhairtools.com/products/h...
Soleil Hot Comb
https://soleilhairtools.com/products/s...
Business Inquiries
PO BOX
Shanice Annette
641
Mount Clemens, MI
48046-9998
Created with Wondershare Filmora nadula hair review
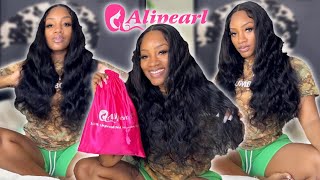
Hey what's up natural beauties, my name is shanice annette and welcome to my channel. Today, i'm going to be reviewing a wig that i bought from nadula hair company. So this is simply the packaging that it comes in comes nicely packaged. My packaging is a little beat up, but that's because it's shipping and handling - i wouldn't blame that on the company itself, so now we're getting ready to pull this wig out and the items that also came in this wig box. So the wig that i purchased is the medulla 5x5 hd lace, closure straight wig, 180 density, real human hair virgin hair. It is also in the color 1b natural. The average cap size runs between 54 and 58 cms. This is like, i said, the transparent, hd lace. It is a 5x5 which is really really good for beginners. I am a beginner, so this is definitely a beginner friendly wig and the hair is like, i said, 180 percent density um. It is 100 virgin hair. It is tangle, free, there's, no shedding it's soft and bulky honestly pulling the wig straight out of the box. It was the bomb i was blown because i've never pulled a wig out of a box and it be so ready to go beautiful. Silky soft the hair was bouncy. There was no um like strange smell, i didn't experience any shedding. It was beautiful and the other thing that i loved so much was that the fact that the hair the wig actually fit my head normally wigs are too big. For my head, but this um wig fit my head to the tee. Now, i'm just showing you how the wig is constructed. It'S constructed very, very well. Very, very neat. You'Ve got the two side string. You got this two drawstrings on the side so that you can tighten and loosen the wig. You'Ve got three combs one in the back two on each side, and then you have your five by five hd lace that you can lay down flat and i am going to do a little bit of manipulation prepping this wig. So i can have it the way that i want it like. I said i am a beginner. I am not a wig ologist y'all just bear with me, because i am learning as i go so here i am simply showing you the wig without me doing anything to it. Look at how freely how beautiful that hair flows, mine is in 18 inches. I forgot. I think i forgot to tell you all that earlier, but i do have mine in 18 inches. I will say it does look like 18 inches, but look at how pretty that is honestly. I could have literally stuck that on my head cut the lace glued it down and i could have worn it as was right out of the box, so here i'm getting ready to um bleach my knot, so i just flip my wig inside out. I put it on top of my on top of my mannequin head on top of the plastic bag, of course, and now i'm just going to get ready to start mixing my developer and then my powder together and all that stuff to create the bleach so that I can get ready to bleach my knot, so when you um, when you mix these two products together, you want to get almost like a mayonnaise consistency, and i literally made it just enough to cover that 5x5 uh closure there like. I did not want to waste any product, and literally that's all that i use and i used all of that product. It was just enough now for me, i felt like it was best to probably start somewhere in the middle, where that natural part already is just in case. I run out of product and i can't apply to the rest of the closure. I just know at least where that part is, which is how i'm going to always be wearing the wig, that those knots are bleached there. Only because i made literally a little bit - and i had just enough just enough to put all over that closure. So once i applied all of the bleach to the closure, i'm going to take some aluminum foil, i'm going to place that on top, so we can kind of cook a little bit try not to push. I think this is where i kind of messed up. Try not to push, because you don't want to push the bleach through the weft and onto the um roots of the hair. So once i put that on top i'm going to give it 10 minutes to sit and rest and activate and start changing the color of my knot, so it has been roughly 10 minutes, i'm going to remove the foil and, as you can see, there's a tint There is a change. The bleach did what it was supposed to do so, once i take a look at that 10 minutes is long enough. For me, i'm going to go off camera, i do wash the hair, i condition the hair. I come back and this is the end result here i do bleach, i do um, i i do pluck. I pluck the hd lace just a little bit, but i end up doing that off camera here, i'm just kind of showing you um how the knots bleached unfortunately, like i said a little bit of the bleach peeked through just a little bit and ended up hitting The roots, but that is honestly a very, very easy fix um. My mistake was: i felt like pushing that foil on that lace and i felt like a little bit of that bleach bled through and it ended up hitting my roots, but that's okay. It'S a really really easy fix. Like i said, i am a beginner and i am learning and i'm showing y'all how beginner friendly this wig is because i, like i myself, am a beginner, so yeah, i'm just partnering through i'm just showing y'all what the roots look like. But the knots look like it, they look really really good. The hair is not tangling at all on me. It is still super duper soft, it's still very, very easy to comb through it's beautiful um. I haven't even worn the wig yet, but i can just say, based off of the quality of the wig, with what i'm doing with it right now. So, basically right here, i'm just going to start blow drying the hair to get it dry. So i can, you know, style it and install it and all that stuff. So that's all i'm doing here simply just blow drying through the hair to get it dry. Okay, so now that the hair is all dry, i'm going to show you how much shedding i got during the blow drying time and honestly, that's all the shedding that i got, which is really really really good. That'S practically nothing! So now i'm going to take my solei hot comb and i'm just going to run that quickly through the hair. That'S going to save me a lot of time with having to take a flat iron and really really section off that hair and straighten straighten straighten, because you can take like large sections of hair with this um hot comb and just straighten it through and get it Straight right away, i absolutely love this hot comb. I have to leave a link down below for this hot comb if anyone is interested in it, because this does say this is the time saver like for sure, i would definitely recommend this so now. It is time to style the hair, which is my favorite part, it's easier for me to style the hair off of the mannequin as opposed to styling it on my head, because i'm afraid of that hot comb and i would hate to burn my forehead. So i'm gon na quickly grab some um a wax stick and i'm gon na apply that to the very top of that part, so that those flyaways lay down. And it's also going to help me um melt that hair down and make that lace and everything real real, real real flat. So now i'm taking my hot comb. I got this from the beauty supply i'm going to go ahead and lay down those flyaways. I'M going to lay down that part that part i'm going to get that part as flat as i possibly can. I want it to lay flat, so when i put it on my head, it is flat to my head now. It is time to style the hair um. You know what this hair was in such beautiful shape that i didn't even have to really go through with the flat ironer and flat iron it and then go back and curl. I literally could go straight in and just curl it and it'll curl, and give me exactly what i'm looking for hair curled like butter. It was silky, it was soft. It took really really really well to the heat really well to the heat. The quality of this hair is beautiful, beautiful, it's just as pretty curling it as it was when i first pulled it out of the package, and it was real wavy and flowy and really really soft. It'S still beautiful, even with me um, applying bleach to the knots and washing it and putting you know, excess heat to it. The hair is still beautiful, so i'm going to just go through and just curl keep curling the entire head. I did not cut this um. I didn't cut on the wig to try to frame it to my face or try to customize it to my face or anything like that. I left it as is, but what i'm doing is i'm kind of just curling the ends of the hair, i'm not curling. I'M not making tight curls, i'm making really really loose curls, and this is the last and final curl here that i'm doing that flat ironing it that flat iron is is amazing. I think it's a sutra flat iron. I got it out of one of my um boxycharm boxes, it's no bigger than an inch, but that has to be the best flat ironer i've ever owned um and since i've had that flat ironer, i have not bought or used another flat iron. That flat iron is the bomb. So now the hair is styled, and you know i am a beginner, so there's my little beginner hiccup, that's the one thing i really need to work on is when i bleach the knot. Uh is to not get that bleach to bleed through the knots and onto the roots of the hair, but that is a very, very, very easy fix. I'M going to take a little bit of a tinted hair spray and i'm going to just spray that right over those areas and they're going to be gone and it was like it was never even there. That'S a very easy fix, oh my god y'all. Finally, the install - i thought we would never get here so now, i'm basically just placing the wig on my head. I do have a stocking cap underneath the wig and i'm positioning those three combs inside the wig to fit my head comfortably. The one thing i do love about this um wig, is that the combs in the wig itself fits my head perfectly. It'S not too big and usually when wigs are too big, the wigs actually end up sitting on my ears, and it typically hurts my ear. So this wig fits perfectly now we are about to get ready to glue down that 5x5 closure piece there. So i'm just inserting some clips to push the rest of the hair back and i'm going to use a little bit of my gots to be freeze spray and i'm going to spray a little bit of that in the bottle so that i can actually just paint The um, the freeze spray onto my forehead instead of spraying it sometimes spraying, is a little bit messy. So i'm gon na pull back that unnecessary lace and i'm just gon na paint on where i want the freeze spray to go and i'm gon na pull that lace down position it and i'm just go ahead and just start drying it so that it will start Holding to my head, oh y'all, why i forget to um grab my my little uh pack of peanuts in the back back there y'all can see i'm sitting back there in the corner, they're resting on my lipstick, but anyway. So now that this is dry, i'm gon na get ready to cut the lace. I'M gon na use some scissors to cut my lace and just kind of cut it in like a zigzag motion, it's more crucial to cut it in a zigzag motion. When you have a for a frontal, but this is a five by five - it's not that serious, but i still would recommend you cut it kind of like in a zigzag. So now that it's cut, if i see any lifting i'll go back spray, a little bit touch it up and then i'll um use a blow dryer to lock it down in place and that, basically, honestly, is it it's not hard, like i said, beginner friendly when I say beginner friendly, i'm saying beginner friendly, because i am literally a beginner. I'M gon na just go ahead and try to like touch up my hair, real quick. I think it'd be better if i just went ahead and just tried to fix the hair a little bit now. Let'S take all the clips. Okay, okay, i had my hair in a fishnet. I have like this white tooth comb here, which kind of just oh, my god. Oh my god i mean my curls aren't perfect, but, oh my god look at how pretty oh look at that. Oh my god, that is so pretty. Let'S do the other side! Oh, my god, look at how fluffy and flowy this hair is. This wig is okay, so that just really like took it up the notch. The concealer that i'm using for the part is the kevin khan concealer in the shade number 12. look. This is the hair. I mean it is beautiful. Y'All, like this hair is beautiful, very beginner friendly. I am a beginner, so take it from the beginner when a beginner says it is beginner friendly. I will definitely leave a link down below for the um information for the hair i'll leave. The name of the products that i use, especially like the hot the heating tools that i use uh to curl and straighten and press through the hair. I'M gon na leave all that down below, but i want to just give y'all a quick look at the hair. Just uh 18 inches the curl pattern. It'S really pretty like this is shining okay and i'm going to show y'all what it looks like from the back see: okay, like y'all, this hair is fine. Okay, the hair is mom. This is not a joke, so i will see you all in the next one and remember never be afraid to feel your way to success. I will see you all in the next one: love y'all


Comments
Delhia Marie: Love the way it looks
Audrey Harville: I’m going to buy me a wig nice job