Watch Me Install This Amazing Hd Lace Wig From My Crowned Wigs | Sam Iam
- Posted on 29 March, 2022
- HD Lace Wig
- By Anonymous
HAIR DETAILS
●▬▬▬▬▬▬▬▬▬♛#MyCrownedWigs♛▬▬▬▬▬▬▬▬●
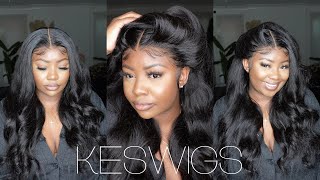
Hair Info: Silk straight 13*6 HD frontal Wig 24 inches 180% density
Same hair in the video:➤https://www.mycrownedwigs.com/hd-lace-...
❤MyCrownedWigs Hair Official Website: ➤https://www.mycrownedwigs.com/
Top1 #MyCrownedWigs Lace Wig:➤https://www.mycrownedwigs.com/360-wigs...
Follow @MyCrownedWigs
Instagram:➤https://www.instagram.com/mycrownedwig...
More Fun?Be Friends on TikTok @MyCrownedWigs
Email: [email protected]
WhatsApp: 0086 15806399181
Subscribe us on Youtube➤https://www.youtube.com/channel/UCFbzZ...
Facebook, Twitter, Pinterest: MyCrownedWigs
Hey guys welcome back to my channel, so today i'm going to be showing you guys how to quickly install this beautiful hd lace wig from my crown. Wigs i've worked with them previously in the past, and i've always been a fan of their hd lace like hands down. They have one of the best hd laces on the market. So today i'm going to be installing this 13 by 6 lace, frontal wig. It'S a hd lace front too wig. It is 24 inches, i believe, that's 24 inches and i'm just going to be showing you guys real quickly. How i just what you call it slap my one and go through the door pretty much here. That'S all so here you know the step. Already you cut off your ear tabs measure it up going in with my lace, grip glued. It is the truth. I will be doing an in-depth review about this glue. Once again, i got y'all. Just give me just give me some time give me some time, but i'm going ahead. I'M just gon na go in with like two to three layers. You know get it all smooth everything out until it's completely clear and then we're gon na go on with the melting process. I won't say too much in this video because it's like self-explanatory and if it's not don't worry because i do like i said - have a detailed tutorial coming up how to customize everything, how to do everything, everything everything everything. So i did go ahead and just quickly bleach it and just give it like a quick pluck, nothing too crazy. What i do love about this wig company is that their knots on their lace is so fine. It is so tiny that it only takes about 15-20 minutes to bleach, like you, don't have to leave on the bleach for an hour 45 minutes all that crazy stuff with thicker knots. These knots are super super thin, so it's easier and faster to bleach, so that thumbs up buddy. So now, with just the remaining makeup that is on the brush that you use to apply to your cap, you want to go ahead and rub it on the outside of the lace. Do not add any more because you're gon na make it super dark, because once you spray it with like your favorite holding spray to tie it down for that final melt, it makes it a little dark already. So adding too much makeup is gon na make it. This is gon na throw off the whole look. Your edges are gon na, be black and you're. Just gon na look crazy. So, like you don't want that, i'm gon na say black. I'M gon na talk about black. Obviously, i'm talking about like super super super dark, and we do not want that. So once you take the band off and it starts to look a little crusty, that's okay! You want to go in with some skin guard, whether it's erica j, that's personally. What i use, but there's other preferable, different types of skin guard you could go in with and then you want to go ahead and spray all across your hairline. It'S going to lift up any type of residue or that crusty looking you know, you know, you know how it look after you take the band off it when you spray that and rub it up, it's going to bring it right back to life, then you're going To proceed with the styling part of this video, so i'm just giving myself a simple little middle part today, with like four little baby hairs. You know two in the front two on the sides good to go. Oh, so sometimes, if you want that extra extra extra amount, you want to go back in a second time with that favorite holding spray and your band. But here i'm just plucking out my baby hairs. First, i feel like they were a little too thick, but that's fine. You could just go ahead and just thin it right on out, as you can see like this frontal was so nice and easy to work with like this is probably the fastest. I ever installed the wig like it was literally one two three and now i'm just going to go ahead. Oh that's! My kai in the bag, hey kels and now i'm just going to go ahead and spray again and tie it up and i'm going to proceed to my baby hair step. Yes, i'm going to fix that part, so don't worry about it! Buddy buddy! So now my hair is on straight, and all i need to do is go in with some jet black dye and when your part is too big, you just want to follow this steps. I just got like a little. It was from like a little makeup. Getting a little cheap makeup kits with the eyebrow brush tool with the eyebrow brush in the comb. So i went ahead and i got some black dye and just put it on the back of like a um, a gel container and i went ahead and i just started you know bringing you want to bring it. You want to bring the dye in. Am i saying it right, i hope i'm seeing it. I hope you understand what i'm saying bring it in to make it as slim as possible to your preference. I don't, like my part. Super super super super fine like back in the days, but i like them to be just right, so i went ahead and i made sure everything was just right and i did everything i had to do off camera and here is the final results. I hope you guys did enjoy this video. The link will be in my description box on where to get this hair and all the information and i'll see you guys again real soon later, you


Comments
my crownedwigs: OMG! too pretty to describe!!! This look is so natural but STUNNING at the same time!!!
Asiah NICOLE: Sis you really got the gems new subbie
Kersha Beaver: Nice job