Diy Headband Wig Cap / Very Detailed/Beginners Friendly
- Posted on 17 November, 2021
- Headband Wig
- By Anonymous
HELLO BEAUTIES
Welcome to my channel so today I will be sharing with you all how I achieve this lovely diy headband wig cap,this is a very detail video and very beginners friendly on how you can achieve your own headband wig cap,do not forget to thumbs up and most importantly subscribe so you can stay update with my latest video thank you have a bless day ❤
#headbandwig #headbandwigs #protectivestyles
_____________________________________________
For sponsorships & business opportunity-
_____________________________________________
my contact:https://wa.me/message/K2LK6RBDAX4CP1
PRODUCT USE
headband
wig cap
needle and thread
tape rule
LINK TO WATCH MY OTHER VIDEOS
BRAIDS&TWIST / cute &
easy protective style for kids https://youtu.be/kqLbZsTMVyE
LINK TO WATCH MY OTHER VIDEOS
How to make a headband wig / using kids pantyhose https://youtu.be/8Teh-Z1xMzk
fake it till you make it natural hair style / using braiding hair https://youtu.be/b3AYVdXd1Ow
Diy passion twist using braiding hair https://youtu.be/5JjlrDXINEY
Diy: super tight curls using kebab stick https://youtu.be/pSYbQPeA3wI
how to passion twist on natural hair, https://www.youtube.com/watch?v=53uQbG...
Jumbo box braids /Brazilian wool box braids, kids hairstyle ft discoveringnatural https://youtu.be/9ScHVKV7tBU
How to goddess box braids tutorial for beginners,https://www.youtube.com/watch?v=ykU7Ok...
diy needle and thread flat twist cornrows diy hair style with brazilian wool,https://www.youtube.com/watch?v=NKCYRe...
Jumbo box braids using Brazilian wool /butt length braids https://youtu.be/kkzAK4740OQ
Let be friends on instagram https://www.instagram.com/invites/cont...
wig cap
headband
headband wig cap
half wig
diy headband wig cap
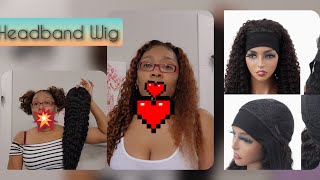
Hello beauties welcome back to my channel if you're so first time come back to my channel. My name is anthony k. Today, i'm showing you how i achieved this lovely diy headband for making a bad wig, i'm going to be making a lot of headband videos. So i try to have a special special video for you guys so that i can achieve your headbang wig yourself within some minutes. You can see what i show you from the beginning of the video need one tread headband, then a wig cap. Now you can see i'm wearing my wig cap on my mannequin head. So now i'm going to put my headband across the cap, but i won't put the headband to the front i'm going to leave that space. You can see that space i'm going to leave it. So that by the time i'm done making the headband wig, it won't fall to my front air. It should be like where the headband will start from. I want it to be my perfect size, so that is why i didn't put the headband from the beginning of the wig cap. So you can see what i'm doing. I'M pinning this down it's very important for you to do that, so that your headband won't shift when you're sewing it so off camera. I really use a measuring tip to measure my head where my the band is going to stop you i'm going to sew it too. You have to mention from here to here at the back of your ear. That is where you want the sewing to start from and what is going to stop from. So when i mention my it was 12. I put the temporary on my head, so you just have to put the table at the cross at the back of your ear. You can see, as i'm doing it so i'm using my lip liner pencil just to mark the line out, so that is where we are going to be starting, and that is where we are going to be stopping so that won't be confused. So now, after i'm done doing that i'll start sewing, the sewing method i use is different if you sew just you're just sewing straight by the time. You finish it. I'Ve done that mistake before so that i was just sewing it straight by time i finished sewing. I saw that there was a lot of space in the middle of between the headband and the wig cap, so this sewing method. I'M using is very good to me. It will look as safe use the sewing machine to sew the headband. So you can see you, you see what i'm trying to say now. My time i put my needle and tray inside the van with the cap, you can see. I took the um thread all over the needles say it again put it in bring out the needle. Then put it inside the thread then drag it out. I hope you understand that part. I try my best in explaining this part. This is very easy to achieve. It'S only going to take you up to 30 minutes to achieve this. It won't take you that hey hmm, if you subscribe, thank you so much for subscribing to my channel everything subscriber. Thank you so much for coming back to watch my video. I really appreciate so much you can see i'm ready at the medium now guys. Please subscribe share with your loved one, because i'm going to be dropping a lot of diy advanced style. Yes, a very diy, lovely, advanced style. So that is why i try to make a special video for you guys so that you can achieve your own headband yourself also, so you can see i keep using that method. I keep sewing towards the end, i'm going to show you the inside of the headband, how it looks like you can never see the thread i use it sewing even inside outside. Also, you won't see the trade it will look as if i use a machine in sewing it so keep on watching. So so this is what i'm talking about. You can see. It'S not showing i use my needle and training sewing it look as if it is the machine. Even though, is that method you're going to see gap inside inside there will be a gap between the headband with the wig cap you can see outside is not showing. I use a needle and thread in doing that, so now we are going to be cutting the excess front away. Yes, at the front where we laid the headband we're going to be cutting that away the extra cup we live at the front and the one we saw underneath it. I hope you understand so cut that off we'll need it be careful when cutting so that you cut what you ready to work for it's just as if you want to cause a least closure when you apply a least closure on your wake up. That is how it looks like so now the essence do not throw it away. You'Re still going to be needing that you can see. I want to show you guys what it looks like before we do the final step. This is not the final look, i'm just showing you guys, so you can see so now you see this excess. I said: don't trade with you're going to be cutting out the band you're going to be attaching it to this headband so that when we are done making our headband wig, it will be secure. So you can see i'm going to apply, i'm going to attach it together with the headband with the wig cap, but be careful when sewing be careful, so that's wound so oversaw something i started sewing it from the line we stopped. That is where i attached the band so when we're done sewing, i want to put it in so you guys can see back. Thank you so much for watching. I really appreciate your love and support. I will never take your love and support for granted. Please don't forget to subscribe like and if you want me to make any week for you i'll put my contact in description box below you can contact me because your girl is going to be dropping a lot of week very soon, i'm still working on those we I'Ll be dropping a lot. So if you see anyone you like you can contact me on my contact number for business only. I really appreciate that. Please don't forget to subscribe to my channel. I want to eat 3k before the end of december. Guys, i'm saying is even more than 3k. You can really appreciate that a lot because man, i can't wait to pass over that. So what can that add? For that? Can you see you need? A thread is not showing i'm sure you guys can see it's not showing and again before i forget you can use any recap of your choice, any wake up of your choice. So thanks. That'S all for the video! Thank you so much for watching for your support and love see my next video stay blessed, always


Comments
ZIKKIE'S WORLD: This is really cool I love the DIY
Marta Mille: Wow the headband cap came out super beautiful
donnaree Love: I love a good DIY love the hen good one