How To Diy Headband Wig: 12 Inch Purple Bounce Braid Headband Wig | Quick & Easy | Missuniquebeautii
- Posted on 12 September, 2020
- Headband Wig
- By Anonymous
#headbandwig #crochetwig #purplehair
In this video, I was able to show you guys how to create your own headband wig from start to finish! This style was so quick and easy to complete and is a very quick grab-and-go style that you can execute on the fly daily if you do not want to take a long time with styling your natural hair.
Follow Me On Instagram@: https://www.instagram.com/missuniquebe...
Follow My Business Instagram@: https://www.instagram.com/missuniquebe...
Shop My Website https://pressedbymissuniquebeautii.com...
Discount Code: YouTube25 for 25% off the Entire Website!
Shop for your favorite beauty essentials! Press-on Nails, Lip Gloss, Mink Eyelashes & MORE!
I also make and sell Headband Wigs, Half Wigs (without the headband) Lace Closure Wigs, Frontal Wigs, & Drawstring Ponytails. If you are interested in having me make a wig or drawstring ponytail for you, please send me an email at [email protected]. SERIOUS INQUIRIES ONLY!
Products Used:
Mannequin Head https://www.amazon.com/gp/product/B071...
Crochet Needle
Black Headband
Crochet Wig Cap https://www.amazon.com/gp/product/B01L...
Scissors
Needle & Thread
Heysis Havanna Zanaa Bounce Braid Color 4
Heysis Havanna Zanaa Bounce Braid Color TTPU
How to DIY Crochet Headband Wig
https://www.youtube.com/watch?v=kzAZJJ...
How to DIY Headband Wig With Dome Cap
https://www.youtube.com/watch?v=opSZQq...
How To Blend 4c Natural Texture With Kinky Curly Sewin
https://www.youtube.com/watch?v=1SU_Su...
Equipment Used
Cannon SL2 https://www.amazon.com/gp/product/B071...
Neewer Back Drop Kit https://www.amazon.com/gp/product/B07P...
Ring Light https://www.amazon.com/gp/product/B08D...
Rose Gold Backdrop https://www.amazon.com/gp/product/B01C...
Instagram: @pressedbymissuniquebeautii, @missuniquebeautiiyt
Facebook: @pressedbymissuniquebeautii
Website: pressedbymissuniquebeautii.com
E-mail: [email protected]
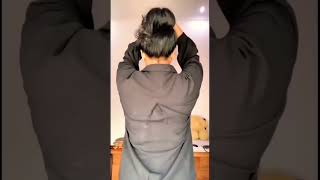
Hey my beauties: it's Miss Scenic Beauty in the building and I'm back with another video. ( gentle music ). So today, I'm gon na be showing you guys how to create your own crochet headband wig from scratch., So keep watching., (, upbeat, music, ). So first item you're going to need is a crochet wig cap with combs, and I got this cap on Amazon. I'll leave the link to this cap in the description box below.. The next thing you're gon na need is a headband of your choice, your crochet needle a pair of scissors and some needle and thread. (, upbeat music, ), The hair I'll be using to create this style is the HeySis Havana Zanaa bounce, braid hair, and I got It in one pack of color number, four and two packs of TTPU, which is this really pretty purple: color. ( gentle music ). The first thing you wan na do is place your cap onto your mannequin, head., (, upbeat music ). Then you wan na, take your headband and apply it to the mannequin head as well, but line it up to the edges of your cap.. Then you wan na also make sure that you're flipping your headband inside out, so that when you're ready to flip the headband up in the end, the seams on the inside isn't facing towards the outside. ( gentle music ). Now I'm just using my T-pins to just tack the headband down and just keep it in place so that when I'm sewing the headband onto the cap, it doesn't move. ( gentle music, ), Now you're just going to begin sewing the headband onto the elastic band area Of the wig cap. ( upbeat music ). I like to sew one side at a time just so I can make sure that the headband is sewn evenly on each side., ( upbeat music, ). Now I'm going to cut this thread and I'm going to proceed to sew the other side from front to back as well. ( upbeat, music, ), (, gentle, music ). I do wan na mention that you do not wan na sew. This too close together.. You don't wan na make your stitches too close together, because you still want your elastic band to have stretch. And by sewing your stitches too close together. It does allow your cap to not have enough stretch and then you won't be able to fit it correctly onto your head., So you don't want your stitches to be close. Together. ( upbeat music ). Now this is what your headband should look like once: you've attached it to your crochet, wig, cap., (, upbeat music ). So now the first thing that I do is I separate one strand into four pieces., So I separate it into two. Then I separate that piece into two again., So in turn, you'll end up with four pieces from one strand.. Now I'm going to stick my crochet needle through the cap loop, the hair on and pull the hair through, and I tie the hair around twice. I'll show you now. (, upbeat music ). You put the hair at once twist and you put it in again. And that's what I'm going to do throughout this entire wig cap. And I'm going to mainly focus the number four towards the back and then I'm going to put the purple color in the front.. ( gentle music ). Now, when you're doing this process, you wan na make sure that you're not putting each one too close to each other.. You wan na make sure that you're spacing them out a little bit from each other, just to make sure that you have enough hair to complete the entire look. ( upbeat music ). So you guys will see me spacing them a little bit from each other and then once I feel like I've placed them where I wanted them, and I still have enough hair left over in the end, I will go ahead and fill in the rest of the Hair just to make it look fuller in the back. ( upbeat, music ), So I'm just gon na keep showing you guys how I attach the hair to the cap and how I loop it just so that you guys can see exactly how this process is. Done.. ( upbeat music ). The reason why I chose this hair is because it kind of gave me a natural texture type of vibe.. When you get closer, you can see the texture., It kind of looks like natural hair, permed and then curled with a curling wand.. That'S what it's giving me so that's why I chose this hair. ( gentle music ). Now at this point, I'm not going to bring this brown color any further up, because I only want it to be focused towards the back. So now I'm going to be working on the sides and bringing it up to that line that I created in the middle. And I'm still continuing to space them further apart from each other. Just so, I can make sure that I have enough hair and then, if I do have enough, I will use my extra hair and I'll fill it in at the end. ( upbeat music ). Now, I'm just going to speed this up a little bit. ( upbeat music, ), (, gentle, music, ) (, upbeat music ). This is what it's looking like once I've placed all of the hair where they needed to be.. Now, since I still have a little bit more of that number four left over, I'm going to go back in and fill out this whole bottom section and if I still have more hair after that, I will also go back in and fill in in between where I placed some of these other strings at. So just continue to watch. ( upbeat, music, ), (, peaceful music, ) ( upbeat music ). Now this is what it's looking like once. I'Ve completely finished filling in the bottom, and this is what it's looking like once I went back in and filled in more hair in between.. I love my hair when my hair looks this full. This is my favorite way to wear my hair.. I love my hair. Really really big and that's just me. ( upbeat music ). Now we're going to begin adding in this purple shade.. I do the same thing I did before I divided into four, and then I placed each purple piece a little far apart from each other. Just so, I can make sure that I did have enough hair to complete this look. ( upbeat music ). Now this purple color right here is very vibrant.. I love this purple color and I've gotten. So many compliments on this purple color already since I've been wearing this wig. ( gentle music ). Now I'm just going to speed through this. Until I get to the top section of my hair. ( gentle music, ) ( upbeat music, ), (, gentle music, ) (, upbeat music, ), (, gentle, music, ) ( upbeat music ). This is what the wig is. Looking like. Once I filled in the side portions of my hair., Now I'm going to go ahead and do the top portions off camera and then I'll be right. Back. ( upbeat music ). This is what the wig is looking like once I've completed using all three packs of this hair.. Yes, I said it. I used all three packs and this hair is big. It'S huge it's voluminous and it's everything that I love in my hair. ( upbeat, music, ) Right here, I'm just showing you guys what this headband wig will look like once you flip that headband piece, up., (, upbeat music, ). Now you just wan na fluff your hair. However, you want it and style it in whatever way that you wish to style it in. (, gentle, music, ). Now, I'm just gon na show you guys what this hair looks like when it's all up into a ponytail. So that you guys can see the effect of the headband in the back and all way around the sides. ( gentle music ), I'm not gon lie ya'll. It was a struggle trying to get all this hair up into this small little scrunchie thing that I had, and you guys will see in the next clip that I did end up changing the scrunchie and getting a bigger one so that I can wrap the scrunchie Around twice to get that ponytail to sit up really nicely. ( upbeat music ). Now this is what the headband is. Looking like once the headband wig is completed.. As you guys can see, I was able to sit this ponytail a little higher than I did before and I feel like I did a really great job.. Let me know on the comment section down below. Now you guys can style this wig. However, you want. I just chose to style this up into a ponytail, because I like to keep my hair up and out of my face. Now, if you guys do wan na see a video on me, styling this wig or any other head band wig in different styles, just leave A comment down below and I'll create that for you. ( gentle music ). Today I was able to show you guys how to create your own headband wig from scratch.. I really hope that you guys enjoy this video. Comment down below any questions that you may have like this video and don't forget to subscribe. Bye. My beauties


Comments
Beth Montgomery-Grant: You’re a GREAT teacher. Quick and to the point and LOUD!!! Love your presentation style. Especially the recap at the end. New subscriber.
Shanicia White: Lovely presentation! Will definitely be making one. Thank you!
ANN STAR: AWESOME GREAT STYLE AND LOOK. GREAT TEACHER YOU ARE THANK YOU FOR SHARING SIS❤️
L’ Dougoux: Girl another great video..now I’m looking for a crochet cap!
Arnice Williams: Yes you did that and thanks for sharing. I been wearing my hair purple for about 4 1/2 years so I loved your demo have a great day.
Tenisha Humphrey: You are a great educator. I’m learning so much from you. Thanks
jdtaylor1224: It looks great! You did do a good job
18missem: This turned out really CUTE!! I also liked the tip about the crochet caps with the clips from Amazon. I'm already an Amazon shopper n love the convenience of not having to sew the clips on myself. So I'll definitely be ordering some! Thank you!!! ❤️
Chocolate Pickney Hairstyles: Thank you for sharing your knowledge❤️. I'm gonna do this. Tip: when putting curly/coily hair into an updo, its easier to use a lace to pull it together or you could cut open a thinner headband and use it.
lady E J: Simply awesome love it girlfriend I am to try this DIY
Jodian barnett: been looking for a video like this for weeks.. ur a life saver
Llomar Green: Game changer...cause headband kinky curly wigs are costly. Love it
Vanessa Collins: Omg! you just taught me a new style thank you lil sis..I loved your presentation Good Job!!!! New subscriber.
Tammy Renee: Omg this is so helpful!! I have been struggling trying to figure out how to connect the headband. I was putting the headband on the crochet part ♀️
ablckdiamd1: THANK YOU FOR BEING PRECISE AND TO THE POINT. I HAVE MADE A CROCHET WIG BUT NOW THIS WEEK END I'M GOING TO MAKE A HEAD BAND WIG. NICE WORK. AND YES I LIKE TO SEE OTHER STYLES .
903De: This is a great video. I may attempt to make this wig. I love wearing crochet hair styles and this is a convenient throw on hair style.
Dee: This turned out really nice! I plan to attempt this as soon as I get the items. Thanku
Lyrehc B: I turned down my sound because the intro was SO LOUD but didn’t realize I turned it all the way down and watched for 2 minutes with no sound... I was so confused as to why you did a silent video Anyway, I love your energy and how well you explain things. I subscribed but I’ll be sure to turn the intro down (but not too low ) thanks for sharing.
Christene Mattis: Just started following you,your videos are so great.Am gonna try and make one.
Crystal Alston: Gorgeous love the color the best I’ve seen yet
Amanda H.: This is amazing!!!!!!
La La: You did a very good job
Juju Bee: I’m about to make this !
luckytube22 Theoneandonly: 100% beautiful job
sandrafay334: Love this
Deryl Casminski: Very Nice...great job!
Shenay Diamond: Great tutorial.trying tomorrow excited
Kegs O: This video better blow up. Make more crochet headband wig videos
Kym Bailey: Awesome job
Romayne Banker: Beautiful
myfergz: I jus luv ur energy.great work as always
Mimi Bright: Yeeesss!!! girl great job
Diane Vandiver: Awesome
Courtney Curtis: I looooooove loveeeeee lovvveeee it
candice patton: Turned out cute do you sell them
kimberly Smith: Nice
Asanya Smith: Giiiirl I subscribe soon as I got your energy
Shema Johnson: Amma try it thanks
gretta s: Short straight hair with headband