How To Diy Headband Wig: 12 Inch Short Kinky Straight Headband Wig With Mesh Cap | Missuniquebeautii
- Posted on 24 September, 2020
- Headband Wig
- By Anonymous
#headbandwig #kinkystraight #diyheadbandwigs
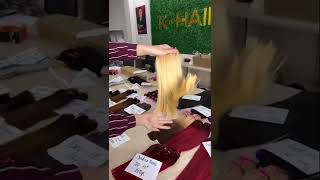
In this video, I was able to show you guys how to create your own kinky straight headband wig using a mesh dome cap. This video is similar to the dome cap wig video but the difference between these two caps is that the dome cap has way more stretch than this cap. When you are using this cap you want to make sure that you are sizing it exactly to your head size or else this wig will not fit. I linked a stretch mesh wig cap below, that will be better and has stretch if that will make it easier for you to construct this wig. I really hope that you guys enjoyed this video. Like this video, share it with your friends, and don't forget to subscribe to my channel.
Follow Me On Instagram@: https://www.instagram.com/missuniquebe...
Follow My Business Instagram@: https://www.instagram.com/missuniquebe...
Shop My Website https://pressedbymissuniquebeautii.com...
Discount Code: YouTube25 for 25% off the Entire Website!
Shop for your favorite beauty essentials! Press-on Nails, Lip Gloss, Mink Eyelashes & MORE!
I also make and sell Headband Wigs, Half Wigs (without the headband) Lace Closure Wigs, Frontal Wigs, & Drawstring Ponytails. If you are interested in having me make a wig or drawstring ponytail for you, please send me an email at [email protected]. SERIOUS INQUIRIES ONLY!
Products Used:
Mannequin Head https://www.amazon.com/gp/product/B071...
Black Headbands https://www.amazon.com/gp/product/B07M...
Mesh Wig Cap https://www.amazon.com/gp/product/B010...
Scissors
Needle & Thread
Kinky Straight Hair
Headband Wig: How To Crochet Passion Twists Headband Wig
https://www.youtube.com/watch?v=iaeC4h...
Headband Wig: Box Braid Headband Wig
https://www.youtube.com/watch?v=KCyt32...
Headband Wig: How To DIY Crochet Headband Wig
https://www.youtube.com/watch?v=kzAZJJ...
How To D.I.Y. Headband Wig With Dome Cap
https://www.youtube.com/watch?v=opSZQq...
How to DIY Drawstring Ponytail: Beginner Friendly https://www.youtube.com/watch?v=MbG9B_...
Equipment Used
Cannon SL2 https://www.amazon.com/gp/product/B071...
Neewer Back Drop Kit https://www.amazon.com/gp/product/B07P...
Ring Light https://www.amazon.com/gp/product/B08D...
Rose Gold Backdrop https://www.amazon.com/gp/product/B01C...
Instagram: @pressedbymissuniquebeautii, @missuniquebeautiiyt
Facebook: @pressedbymissuniquebeautii
Website: pressedbymissuniquebeautii.com
E-mail: [email protected]
Hey my beauties It's MissUniqueBeautii in the building and I'm back with another video. If you are new to my channel tap, that's subscribe button so that you won't miss out on any of my new uploads. And if you have already subscribed, what's good. What'S popping Welcome back to my channel., The items you are going to need to create this headband wig is a mesh dome cap, the headbands of your choice, a pair of scissors needle and thread, and the hair of your choice., The hair that I'm going to be Using today is kinky straight hair. And I have it in one bundle of 12 inches and two bundles of 14 inches.. Now this hair - I am thinking about adding to my website., I'm not sure. Yet I am testing it out.. So we're gon na see how this hair does and we're going to get into making this wig.. The first thing you wanna do is add your mesh cap to your mannequin head position. It exactly where you want it to be and use T pins to hold it down in place.. Now the straps in the back. I did go ahead and hook them in one of the loops just to keep them out of the way and from hanging while I'm creating this wig.. The next thing you wan na do is go ahead and apply your headband to the mannequin head., And you wan na make sure that you remember to flip that headband inside out, so that when you're finished, creating this wig, the seams will be on the inside. Of the wig and not shown on the outside when you're wearing it., Now I'm just showing you guys exactly where I'll be placing my headband and where I'll be sewing it onto this wig cap.. Now I'm bringing it up onto the wig cap, because this wig cap was an extra large wig cap and it did fit a little bit big on my head.. So that's why I'm placing the headband in this position so that I can cut off that extra piece at the end. Now you're just going to proceed with sewing the headband all the way around this wig cap all the way until you get to the back.. Now I like to sew one side at a time just to prevent the wig cap from being lopsided.. I want to make sure that I am sewing this headband on evenly on both sides.. Now, with this cap, when you're sewing along the sides, you wan na make sure that you're sewing as close to the edge of this wig cap as possible., And then once you reach the back of this wig cap, you want to sew your headband on right below The adjustable straps., As you guys, can see here, I'm lifting up that adjustable strap just so I can sew right underneath it not. On top of it., You wan na make sure that you're sewing underneath the adjustable strap and not on top of the adjustable strap.. Now I'm going to proceed with sewing the headband on the other half of this wig cap. And then I'll be right. Back. Now that I've completed sewing this headband on all around this wig cap. I'M going to go ahead and cut off all the access pieces that I did not sew onto on the back of this cap and on the front of this cap.. So just continue to watch and see exactly what I am doing. Now when you're cutting the piece off of the front, you wan na make sure you cut as much of that lace off as possible because you do not want it to be visible when you are Wearing your wig., I did not realize that when I cut the piece of the front that I also accidentally snipped a piece of the string that I had sewn., All you have to do if that happens is just re-sew, that headband on in that area of the Wig cap and you will be just fine. Now, I'm going to begin sewing. My 14 inch bundle onto the bottom of this wig cap. And I'd like to start. My first bundle right above the ears ,'cause. I feel like I get the most coverage on the bottom. When I start closer to the ears. - And I do not cut my tracks so once I reach all the way at the other end of this row, I will just flip over my track and continue to so like normal.. The spacing that I like to use when I initially start sewing my bundles just so that I can make sure that I have enough hair to complete the entire wig. Is I like to keep my tracks two finger widths apart from each other. Now, once you've done that and you feel like you have enough hair left over and you want to still use it because you want your wig to look fuller, you can just go back In at the end and fill in those areas of where you want more hair to be. And your wig will be nice and full, like you want it., As you guys can see right here, this track is two finger widths apart from the previous track.. Now I'm just going to flip this over and continue to do the same thing going back in the other direction. Right here. I'M just showing you guys once again that I left these tracks two finger widths apart from the previous track., And you just wan na continue doing this, just to make sure that you have enough hair to complete your entire look.. Now I'm adding in my second 14 inch bundle. And for this row I'm actually going to leave three finger widths apart of space from the previous row. Just because I want the top to be more fuller., And I want to make sure that I have enough hair to fill in the top section of my wig., So I did go ahead and leave three finger widths apart between this track and the previous track.. This is what the spacing is looking like in between each tracks. There'S two finger widths and three finger widths and then the rest of them are two finger. Widths.. Now I'm gon na take that extra 14 inch piece that I have left over and I'm just going to add it right in between where I left that three finger width spacing apart in the middle right there.. I'M also gon na go ahead and finish this front section off camera and then I'll be right back.. This is what the wig is looking like once I've completely sewn in all three bundles of this hair.. I think I probably had about a little small piece left over once I was done. And right here, I'm just showing you guys that I sewed this top section straight across the front., And I only used I only single tracked, the very front track in the front. Just to have that seamless look once you lift that headband over the front section.. Now I'm showing you guys what my spacing is looking like in the back, especially after I went back in and sewn in that extra track.. Now, with this hair, this hair is really big and full., So you do not have to space your tracks too, close to each other.. It'S okay that they're a little farther apart, because the hair is full and you can't see those gaps anyways. Now, I'm just showing you guys what this headband wig is looking like. Once I pull that headband up over the edges and in the front and around the Back and the sides. Now I'm also gon na show you guys what this wig looks like once I pull it all up into a ponytail, slash a bun so that you guys can get a feel of what this headband wig will look like once you place it Onto your head. In this video, I was able to show you guys how to create your own headband wig with a mesh wig cap.. This is very similar to the dome cap. Wig video, but the only difference is a mesh cap doesn't have as much stretch as a dome cap does.. So you wan na make sure that when you're creating this wig you're creating it to fit your head exactly how you want it to fit., You also want to make sure that you place the wig cap on your head. First, just so, you can see what areas you need on the wig cap and what areas you do not need on the way cap.. I really hope that you guys enjoyed this video. Comment down below any questions that you may have. Like this video and don't forget to subscribe. Bye. My beauties


Comments
A.TurayGayee: Beautiful as always and very detailed as well.
Nadine Rene: Very creative! I would like to see you create a crochet loc headband wig.
Applehead Honey: Another great video! And I love your voice!
la congolaise: can you do the same tutorial but with box braid
Mary Lewis: Miss unique beautii when making your headband wig do u put wig combs?
Ramona Grossett: New subscribers here