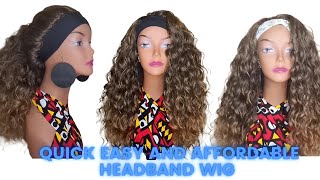
Kinky Straight Headband Wig | Half Up Half Down | No Tracks Showing Ft. Nayoo Hair
- Posted on 30 April, 2021
- Headband Wig
- By Anonymous
Welcome back, welcome back, welcome back! Today's review is from NAYOO Hair, Amazon based company. Watch me style this half up half down bun with NO Tracks showing. Beginner friendly!!!
IG: stacey_isbeauty
FB: Stacey Renee'
Email: [email protected]
Chat directly with me on Responda: https://responda.app/stacey_renee
Link to Wig: https://amzn.to/3D1aztK
Music:
https://www.epidemicsound.com/referral...
Hair Products Used:
Cantu Flaxseed Hair Wax
Garniner Fructis Curl Sculpt Conditioning Crean Gel
Göt2b Glued Gel
Garnier Fructis Curl Construct Mousse
Edge Brush
Bed Head Hard Head Spray
Olive Oil Edge Control
Denman Brush
Maybeline Fit Me Powder 360 Mocha
Hot tools:
Hot Comb
Bed Head Jumbo Crimper
Flat Iron
Mini Flat Iron
Blowdryer
Wand
Beauty Products Used:
Ponds Dry Skin Cream
Garnier Micellar Water
Filming Equipment :
Cannon EOS Rebel T7i
Neewer 700W Octagon Softbox lights
Ring Light
Table ring light
Phone Tripod for thumbnail pics
Hey guys, it's your girl, stacy renee, welcome back! Welcome, back welcome back i'm back for another wig review and this review was sent for me from the company nayu they're an amazon company. As you can see the background, i'm going to be reviewing one of their headband. Wigs um before we get to that, let me just show you what came in the box. They gave me some stocking caps and this wig actually came with four different style headbands. So i thought that was pretty cool because normally you just get one. So this is what the unit looks like. I got the 22 inch because there was a coupon for it um, it's the yaki texture and it's in the color tv, slash 27. So the construction of this wig is pretty basic to any other headband wig, one comb at the top two combs on the side, one comb in the back, and then it has the adjustable velcro in the back. So this is like i said this was a synthetic unit, but the hair is super, duper soft, it's really soft and there was very minimal shedding um. Today i wanted to do something different. I wanted to do a half up half down style, but i'm going to show you guys how to cover the tracks in the back. I'M not sure if there's any videos out there or not that have done this, i haven't checked. Usually i just like to go ahead and style. My wigs without you know, looking up other youtubers videos, so first things. First, we just got to prep the hair. I use the wax stick to lay down any flyaway hairs. Next, i'm gon na part it and lastly, i used um some hairspray, but i'll go over that once we get to it so basically, for the part, all i did was just separate the tracks and i used the track for my part, since this is gon na, Be a really high bun i like to use like the two strand method i just kind of twirl the hairs together and then wrap them around in a circle to create the buns all right guys. So now that the bun is done, what i do to cover the tracks is just take another piece of hair from each side and kind of cross them over like that, and then you're gon na want to um cross them and wrap them around the bun. Going to the front and then coming back around to the back and then and just keep wrapping it until you run out of hair, and i use some bobby pins to secure this bun. So now that the bun is secured down. Like i said, i went ahead and i used some of my bed head spray just to make sure that it was extra secure. So the last step. What i did was, i cut the flat iron down to the lowest setting possible, because this is synthetic hair and i had it up a little bit hotter and it did kind of melt the hair. So this is the lowest setting possible and i'm kind of just doing big chunks just to kind of straighten out the ends, because they were a little bent up from being in the box all right. So the last step is just to kind of um slick down. Your edges any way you want to um. If you have them, if you don't, you know you can, if you don't have you know, thicker edges, you can just pull the headband all the way down to your hairline if you have edges and want to slick them back and leave them out a little bit. Go ahead, that's what i did all right guys, so i finally got the wig on and i decided to go with the leopard print headband, since that is what i was wearing was leopard print and it kind of goes with my makeup and yeah. I forgot to mention: go ahead and hit that like button hit that subscribe button and share this video with a friend if you haven't already, you know that just helps me out here and there so um final reviews on the wig. I really like this wig. I love the headband wigs they're, just great when you know you just need to throw something on and go. You can do multiple styles. With these headband wigs, you can do like a full bun. I'Ve seen people do leave outs, you can, you know, put your leave out over the headband and make it look really natural, so yeah. I would give this wig a 10 for the price. I did. The price wasn't too much. I think this wig um, if you're an amazon prime member with that coupon it's around like 25 26, so yeah tell me how you feel about this wig. Do you guys own any headband, wigs um? Is there any questions that i have not answered? Yet if there are, please comment them down below like i said this, is your girl, stacy renee back with another tutorial, go ahead and subscribe like and share and i'll see you in the next video bye, guys

Comments
nessa elisson: it looks wonderful babes!
J Rich: Just beautiful
Teashea White: i like....