How To: Headband Wig Tutorial | Shake-N-Go Organique Straight Weave - 130 | Simplyshon
- Posted on 09 September, 2020
- Headband Wig
- By Anonymous
#simplyshon #headbandwig #organique
Items used for headband wig:
Headwrap
plastic cap
stocking/mesh/dome cap
needle & Thread
Hair glue
velcro
I got all the Items in this video from my lbs.
I hope you guys enjoy this video.
Connect with me:
IG - simply.shon
SC/Twitter - simplyshonp
FB - SimplyShon
P.O. Box 3944
Saint Louis, MO 63136
Business Email ONLY:
Thanks so much for watching. Comment, like share and don't forget to SUBSCRIBE!
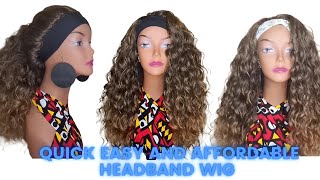
Hey y'all welcome back to my channel if you're new here welcome today's video, i'm going to be showing you guys how to make this headband wig. So if y'all want to see how i did it make sure y'all keep watching okay y'all. So before i start, i want to go ahead and show you guys everything that you're going to need to complete this headband wig. So you need a head wrap and this is a two pack. I got some plastic caps wig cap, and now you can use this wig cap. You can use like the dome mesh cap. You know the caps that they use to make wigs with it doesn't matter just as long as it's a cap that you can put your hair on to okay, some hair glue. Again, some people like to use hot glue guns. Some people like to sew their hair in whatever is your preference? That'S what you need. You know some velcro a needle and thread and of course you need some hair and i'm using the shake n go organic straight hair and it's the color 130.. Now, when choosing the hair for this headband wig, you want to make sure that you get a hair color. That is the color of your hair. Okay, when i went to the store, i was going to get um a number four, which is the color of my natural hair, and then i just got to thinking like it's probably not going to look right, because when i lay my edges down, my edges are Going to be red and i'm going to have all this black hair in the back of my head, i would have been looking crazy. So, like i said you want to get the color of your hair, you want to get the weave in the color of your hair, all right and that's it. So i'm going to start with uh slicking my edges down. First, i'm gon na go ahead and do those off camera because i don't know how long that's gon na take so yeah. I'M gon na go ahead and do those off camera and then i'll be back yeah. That was a job. My arms hurt. It'S probably been like 15 minutes, since i was gon na tie my hair down. That'S how long it took me to slick this little bit of hair down in the front, and i am tied so first you want to take start with the one of your head wraps and you want to take that hair wrap and at the seam right here. Right there you want to just go ahead and cut it. Okay, so now we got the wig cap cut, we're going to go ahead and sew on a piece of velcro to each end of the head wrap. This is the velcro that i'm using, and this is just going to give me a little bit of room to tighten it up just a little bit if it like starts to get loose or you know, i can either clip it right here or i can move It up clip right there, so my needle and thread i'm going to go ahead and take the hair wrap, i'm going to fold it in half and i'm going to stick the velcro right there and i'm just gon na sew a big x on it. I'M gon na make sure that i'm sewing through both pieces of the folded head wrap okay, so we got the x right there and the x on this side and then i'll do the exact same thing on the other side, with the other piece of velcro. Okay, so now i'm going to take my stocking cap, i'm going to put it on i'm going to layer the head wrap over the stocking cap like that, then i'm gon na go ahead and pull it and wrap it around, and so you see it's right. On top of that, thick band, i'm gon na go ahead and take a white eyeliner pencil and i'm just gon na go ahead and make a mark on the middle of the cap. Um, the middle of the stocking cap and the middle of the hair wrap just a little small mark. Okay and then i'm gon na do one on the side right here and then on the other side as well, and that way i can take this off and go ahead and make sure that it's stretched out enough to sew it on, so that it fits around. My head correctly you'll see my line on the hair wrap and the line on the stocking cap. This is going to be the outside of the cap, so on the inside, i'm going to sew right on the edge of the stocking cap connecting the head, wrap to it: okay and i'm gon na start in the middle, so that, as i stretch it around, it's Gon na match up on both lines: okay, yeah. So this is looking crazy, but this is what it's looking like once i got everything sewn on okay. This is the inside, so i sewed it okay, and so, when i put it on, i got my two pieces hanging in the back and make sure it's straight or even okay, right by my ears and i'm going to take those two pieces and pull them back And clip them together. Okay, let's see i was a little off, but let's see, but this is also going to leave room up here, this little pocket right here to cover up that last track. When i get ready to add that last track up there. Okay, i'm gon na go ahead and put on a shower cap or there's a plastic cap, and then i'm gon na add this back on top of this, so that the glue does not stick to my hair and i'm glued up just a little bit further than Where i wanted to lay it because, as i start gluing on the hair, the wig cap starts to slide um with the plastic cap underneath of it. So you know make sure it's even on both sides, pull it up just a little bit further and then i'll make sure that this cap is pulled all the way up. You see the band right there. You know that that part is going to fold back once. You'Re done over that see, so you can pull it up a little bit. First, like i see it, and now i'm just gon na start adding my tracks all the way up, like that, all right, all right, all right, so i took it off and i put it on my little mannequin head and i know you're probably like did you Say she had no minute again, but she her head is not the same size as a regular mannequin hair like her head and see how, like you, come all the way down to like right here like it's just her hair is a lot smaller than my hair. So i can't use her hair is anyway. I know y'all know what i'm talking about so got it on here, i'm gon na. Let her she actually looks really good. So far, i'm gon na leave her on here for a while and let her dry make sure all those tracks are uh dried onto that um socking cap before i pull the shower cap off and put her on, and i also had to change my scarf because That still scarf kept sliding and it was like it was still wet from the uh gel that i put on my hair to try to slick my hair down. So it wasn't really soaking up anything and when i took the scarf off, like my hair, still looked like it was an afro. So i put on this cotton scarf and uh re-slick the edges down. So hopefully they will be laying a little bit flatter now. Okay, so uh yeah, i'm letting you dry for a little bit and then, when i come back uh i'm gon na go ahead and put her on and go from there all right, y'all momma truth. These times these edges gave me the blues. Look at that. It slid down pretty good okay. Let me go ahead and have this uh stocking cap on top here before it starts to raise up okay. So i'm in the stocking cap, okay, i'm gon na put a plastic cap out the inside okay, okay. I got that faster back there, okay, so i could have added another track right here, but it's all good now. This piece is going to pull back and fold up over here. Okay, get that off of there: okay yeah! I think this turned out so good. This is good for us to have twas. We can just slick down the front and pop this headband wig on for women, who, just you know, wear the hair back in a ponytail. They can just slide this over. They ponytail and you know, keep it on the go. You know if you in between hairstyles um. This would be good and another thing you can do this with any kind of hair. I also got this cheap red uh, loose wave hair. I'M sorry it's a ripple deep - and this was like just some like cheap hair at the beauty, supply and um. So i'm gon na make another one using this this hair. So like i say you can use any kind of hair for this headband wig and yeah. I got all this stuff from my local beauty. Supply got the hair the stocking cap, the headbands, the thread in the needle the shower caps, everything that i use in this video today. I got from my local beauty supply and i think what i might do is go get some of those um hair combs that you can sew onto the cap and then um. You know sticking it to your hair, so that it'll make it a little more stable because i feel like it keeps sliding back um that and then um. I just showed you guys, the other hair that i have um with that one. I probably use the mesh cap for that one and not the stocking cap, but with this shot you can wear it down like this you're going to have uh, you can wear it up in a ponytail and then you can also wear it like half up half Down because the band you know covers up all the tracks all the way around, and then i got these cute little headbands from the beauty supply, and so you can just take these. You know just to kind of switch it up. You know, maybe, if you wanted to match your outfit or you know just give it a different look or whatever you can add these cute little headbands over the top of the band. That'S already there like that, i guess i should cover that up all the way. Huh spread it out a little bit there. We go like that, cute all right y'all, so that is it for this video. I really hope you guys enjoyed it if you did go ahead and give me a thumbs up if you're still watching and you're not subscribed to my channel, make sure that you go ahead and do so don't forget to tap that notification bell so that you are Notified first, when i post new videos, if you're not following me on instagram head over there and do so at simply.shine, as always, thank you guys so much for watching. I love you all and i'll see you guys in my next video

Comments
Jacqueist Bond: Girl I love this!! You know I can't do no hair lmao but i think i can pull this off!!!
SimplyShon: Hey lovies... it’s been a min. I really hope you all enjoy this video!
SportsLife SportsMom: ❤️❤️❤️
Therese Johnson: ❤❤❤
Jacqueist Bond: ❤❤❤
Betty Ralph: ❤❤❤❤❤
Lesa w: ❤️❤️❤️❤️❤️❤️❤️