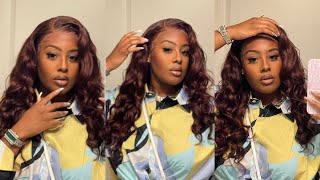
Oreo Wig Highlights W/ 613 Synthetic Bundle
- Posted on 08 September, 2022
- Headband Wig
- By Anonymous
➺Hey babies❤️I've always wanted to try the Oreo trend so here's my take on a more affordable option! I used a synthetic bundle on my human hair wig to achieve this look!
____________________________________________
Hair Details
Synthetic Hair: Model Model Gardenia MasterMix 613 straight 16" bundle
Human Hair Wig Link:
____________________________________________
Follow my socials:
➺ Instagram: Kiannamoracia
➺ Snapchat: Kiannamorae
➺ Tiktok: Factualbrat
____________________________________________
➺ EMAIL FOR BUSINESS INQUIRES ONLY:
____________________________________________
FAQ:
➺Age: 18
➺Ethnicity: Jamaican
➺Fave Color: Blue + Green
_____________________________________
Hey youtube: welcome back to my channel, so today i'm going to show you guys how to do the oreo highlights trend or whatever they call it. So i have this wig from the company um hair. It is 20 inches, it's a 13 by 4 frontal. As you can see, this is a full frontal, no sideburns! That'S why i had to take the moment to show y'all. This wig is a 180 density and it is extremely extremely full. So, first off i'm starting off with just bleaching the wig. I mixed enough bleach for what i thought was a 13x4, but then i realized this is a true 13x4. So it's no sideburns at the sides like it's really full. The lace is there. So i ended up having to mix more bleach, but that was perfectly fine with me and, as you can see here, i'm just spreading it out after that was all done. I recorded a clip to show you guys how well the knots lifted they lifted beautifully, and then this is what the hair looked like after it was washed out and toned for the highlights. I decided to use synthetic 613 bundles because i've never really seen it done. I wanted to try it that way, so i used the gardenia straight weave by model model in 16 inches. It cost me about 9.99, a pack and right now, i'm just gon na show you guys how i started adding it into my human hair wig. I know this looks like a real struggle, but i promise you it wasn't. I just didn't: have the top of my glue bottle broke, so i had to use like the rat tail comb to get the glue from inside it. But i'm just placing that onto the weft of the bundle and i'm also obviously separating the hair. And then i press it down with my finger and then after it's fully pressed into the wig i use spritz to seal it. Spritz is going to make sure that it does not slip out of your wig, just in case it gets hot and then, after that, you want to blow dry on cold because heat separates glue. I chose this specific brand of 613 synthetic bundles because it has the perfect toned blonde color that i needed also because it is full all the way through, even though it is 16 inches, it does fit. My 20 inch wig perfectly. So beware of the length: if you don't want your blonde pieces longer than your black pieces, i ended up only using one pack of the synthetic 613 bundle. So that was great. If you want to do this with like an old wig just to spice it up and right here, i'm just showing you my technique once again make sure that when you separate the hair, it's fully separated and that you're not getting your glue on your human hair. Wig that you're getting it on the wig cap, because trust me that's not coming out so yeah once again after you do every single section spray it down with spritz blow dry on cold. I know it's tedious, but it's gon na work, as you can see right here. I have a clean part between my human hair wefts and then i'm putting my synthetic weft in between that and pressing it down with my fingers as i go along. This clip demonstrates how clear the part was before i placed the hair down. I usually part it out fully before, and then i put the bundle to it just so. I could make sure that all my cuts were precise and that i didn't have any straight ends, because that could risk my hair coming out. Whenever i brush it - and i don't want my synthetic windows falling on the floor to part out those clear sections where i was going to place my highlights - i used the end of a rat tail comb because it made sure that my highlights that were already put In would not fall out and that i wasn't being too rough because the glue was not fully dry. It was like a last minute idea that i had that's, why i'm gluing it and not sewing it, because when i tell you this idea was so last minute. I ended up getting this wig for school and i thought to myself no like. I need to spice it up and i saw someone on tiktok: do this with a human hair bundle, so i decided to try and find something really quick to match it, and i ended up finding a synthetic bundle that can be trained with heat just the same And it ended up working out so yeah. I hear i overestimated the space that i have for that highlight. So what i'm doing is i'm taking my scissors and i'm just cutting off the excess, and then, after that, i put some glue on it and just made sure it was secure. Before i moved on to the next section, despite the cap from my glue bottle being broken, i actually like using the rat tail comb to apply it because it helped me have a more precise hand, and i didn't end up with a whole bunch of glue on My synthetic bundle, so that was really nice too. This is what the wig looked like once i was finished, it is beautiful and then to start off, you know i'm just going to put my cream foundation just so that the lace matches my skin and then set it, and we are all good to install after That, because this lace was so full at the sides and because the frontal had so much space, it did take me a little while to part out where i was cutting for my sideburns. But i took my smaller hair scissors and i just made sure to go over that curve that i parted out and then, after that i just did the same thing on the other side, because i wanted to make sure it fit my head perfectly. Also, this wig is big head friendly. So that's why you see me struggling a little bit because i have a really tiny head. So after i cut the lace, i went straight into installing the wig. You all have seen me install a wig about 24 times now. So you know the whole process, so i didn't record my first layer of glue, but this is my second layer of glue and yes, i'm applying it with a makeup brush, because i couldn't find my rat tail comb at this point. So i'm just making sure to spread it out and create a thin, even layer, now onto my third layer of glue, i'm trying not to put the glue too close to my face, because i don't want there to be too much i'd rather have to go back In again than to have too much glue, because then that is hell - and i found my rat tail comb, so i'm using it to apply it and then spread it all the way back to my wig cap. So i have a good layer right here. I'M just going to guesstimate where i want the wig to be, and then i'm going to pull each side over to make sure that there are no creases in the lace. And then i'm taking my rat tail comb and just combing the lace into the glue. Or i'm i don't know, i'm pushing the lace onto the glue to make sure that it is fully secure. And then i'm going in with my scissors and cutting sections to prepare for tying my hair down. I'M going to go in with my hot comb and make sure that all of the straight ends are fully going back. Just so that when i cut the lace, there are no stray hairs going outside of the hairline, because that is one thing that i hate. When i cut the lace and then the hair gets glued in the wrong position and right now, i'm just tying it up, and then i'm going to put my elastic band on and tie it tight until i can't feel any circulation. I feel like it won't melt unless i have to tie it extremely tight. So that's what i'm doing and then i'm gon na leave that on for five minutes. Okay, five minutes have passed during that time. I use my blow dryer on cold heat and after i unwrap it, as you can see, the glue is fully melted in now, i'm just gon na brush back any straight hairs that are there and then get ready to start cutting in place. I'M taking my tiny scissors and i am just going in zigzag motions up and down until i feel like i'm satisfied with how each section is cut. If i'm not satisfied, i do end up going in again, but this lace was pretty easy to blend in to cut, and after i cut all of that off, i ended up cutting that and then sectioning my edges and just tying it down again so that it Can go another five minutes, while my lace and my edges are melting. I like to go in on the rest of the hair, so right here, i'm just spraying heat protectant, because i do plan to straighten this because it is a straight wig. But right now it's looking a little crazy, especially the synthetic part, but that's okay, and now, as i unwrap it, you guys can see how melted the hairline is. This lace was really good quality. So i'm going to tie my hair up again and we are going to start on my edges now they are stuck to my forehead because they were tied down for a while, but i'm just combing them through with my rat tail comb and then going on my Scissors and cutting in a jacket motion after i applied the mousse to go ahead and lay them down this part, i'm going to be honest with y'all. It is just me trying to get my edges right, so i think i probably should have curled them, because i cut them a little bit too long on one side, but i just kept on going in trying to get them perfect. I went in with spritz as well as moose, so that they would stay down, because i did have my first day of classes next morning and they ended up turning out really really cute. It'S just that. I'M a perfectionist - and i did not want to do my hair the next morning, so i kept on trying and, as you can see, they're coming to life. If you want to learn how to do your edges, it's all in the wrist and you have to make sure that you have a good amount of product. You can't do them dry or you can't wait till the product gets dry, my main goal and why i just kept on going is because i was trying to suit them into the hairline and not just having this loop separate. So i did it on one side and then i was attempting it on the left side, but it wasn't going right. I feel, like i didn't, cut enough edges, so i kept trying, it clearly was not working and what i did was. I just went back in pulled up some more hair, i grabbed those pieces and then i went and again with my scissors and i just cut them so that way they could be put into my actual edges and now my edges look like they were actually correct Because before it didn't look right but yeah, so this is the final product of what the install looks like now. Don'T do me for the way that the back looks because it looks crazy. I'M not gon na lie, but in my defense i did not flat iron. It yet i'm just showing you guys how it looked once i was done installing it. Nothing was wrong with the wig at all. So after that, i brushed out the hair, because i don't think i brushed it the entire time while installing it and then after that, i'm just giving you guys a full view see i didn't really have to straighten it for you to get the idea where i Was going and then after that i did go in again with my straightening iron and i just went over it because i didn't want the synthetic bundles to look perfectly fine for school tomorrow and right here. I'M just filming myself! I'M not really doing anything specific, but you can clearly see the highlights on the sides. I did not want them going all the way around. I just wanted it kind of like a peekaboo effect in the back and i'm just going over it again and showing you guys how it looks if you see me making the weirdest faces. That is so. I could get stuff for the thumbnail. Please do not mind it. I'M showing y'all the full unedited version of me after i decided to put this wig on my head and i'm going over it with the straightener. You see how well those synthetic bundles blended with the human hair wig. So if you want to try this, you definitely can use synthetic hair and yeah. That'S pretty much it for this. Video don't forget to like comment and subscribe. Bye.


Comments
Annette Lesley: That is so beautiful love everything about that hair
Sadilyn Gordon: Beautiful hair. Well done babygirl. Great job as always
Marcus Henderson: One of my personal favorites on you
Livie DeLeon: You made that wig your own fr
Kemesha Johnson-Braham: ❤️❤️❤️❤️❤️
Ambersopretty : THIS ATE