How To Naturally Style The Headband Wig + Hide The Headband Ft. Superbwigs || Ariana.Ava
- Posted on 30 December, 2020
- Headband Wig
- By Anonymous
HEY LOVES TODAY I AM BRINGING YOU ANOTHER HAIR UNBOXING + INSTALL. THIS TIME FEATURING THE HEADBAND WIG FROM SUPERB WIGS!
•SHOP THIS WIG•
Wig link:https://bit.ly/3nW9w79
Wig density:180%
Wig length:18 inches
——— Coupon:AVA3 ——-
Top selling Body wave human hair:https://bit.ly/2UwbfS1
Top selling 360 lace Loose wave human hair:https://bit.ly/2TBVWup
Top selling 13×6 Lace front 613 Natural Straight human hair:https://bit.ly/2ERk1Dq
Superbwigs Wig Category Links ↓↓↓
360 lace wigs Link:https://bit.ly/2SuNMzx
13×4 lace front wig Link:https://bit.ly/2F4Gv3Z
13×6 lace front wig Link:https://bit.ly/2T792e2
Full lace wig Link:https://bit.ly/2HiBV5M
E-mail: [email protected] (Provide Wholesale) WhatsApp: +8613326398647
Follow us know more about promotions and fashionable hairstyles:
Instagram:@superbwigs
Facebook: https://bit.ly/2Jc1OG9
YouTube:https://bit.ly/2Ce91Q3
***PROMO CODES***
●▬▬▬▬▬ ❤ IZIWIGS ❤ ▬▬▬▬▬●
Link: http://bit.ly/2IFbciq
Use exclusive coupon code: Ava20 to save 20% off
NIA WIGS : https://www.niawigs.com/
Coupon Code: Ariana15
$15 off entire order
AFSISTERWIG
Website: https://afsisterwig.com/
Coupon: AVA10 to save 10%
SHOP FUN WIGS : www.evahair.com
USE CODE : “Ariana.Ava” FOR 20% OFF ANY WIG
SHOP SHEIN: http://bit.ly/2M7ZcH0
USE CODE : Q3arianaava
SHOP CONTACTS : http://ttdeye.com?aff=2577
USE CODE : “ARIANA” TO SAVE $$$
SHOP LOVELYWHOLESALE : http://bit.ly/2UxZA4e
USE CODE : ARIANA10 FOR 10% OFF
SHOP CBD PRODUCTS : https://oncali.com/shop/
USE CODE: “CALI20”
••••• SHOP WAKE UP & MAKEUP [MAGNETIC EYELASHES] :: https://bellechloe.com/ ••••••
USE CODE :: “ARIANII”
to save $$$ at checkout
••••••• STAY CONNECTED FOLLOW ME ON INSTAGRAM : @ariana.ava ••••••••••
https://instagram.com/ariana.ava?utm_s...
THANK YOU SO MUCH FOR WATCHING I LOVE YOU ALL SO MUCH! XOXOXO
#HEADBANDWIG
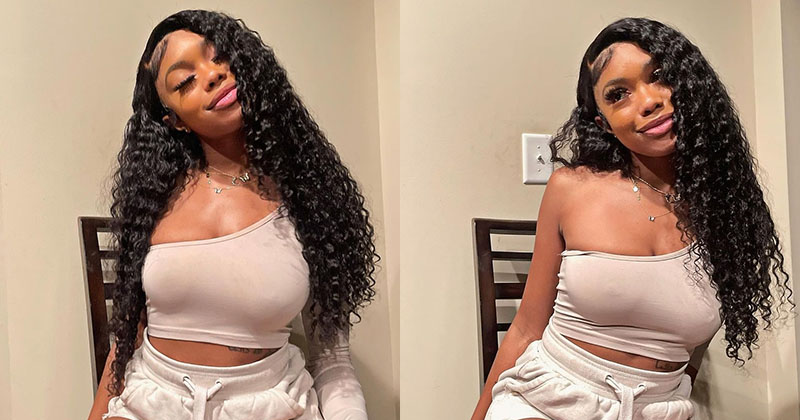
Hey loves: what is up welcome back to my channel. I want to first wish everybody a very happy holidays. I know this time of year and this year, specifically, is very different for everybody. So, however, you are celebrating whether that's alone, whether that's with your family, friends, whoever i hope you are staying safe. I hope you are remembering to remain grateful and to stay faithful and hopeful, and i'm just sending you guys all of my love all of my prayers. All of my strength and all of my peace and joy to all of you in today's video, as you guys can tell by the title and as you guys can see, i have some new hair and this is actually a headband wig. This wig is from superb wig. I know these wigs have been super trending and i've been seeing them all over the internet. So i wanted to show you guys how you can actually style this headband wig really easily just as quickly as if you just normally put it on and put a headband over it. But i actually left out a bit of my hair in the front. I'M going to show you guys how you can do a quick, little half up, half down hairdo with the headband wig, where it actually doesn't look like it's a headband wig. Now these wigs are really convenient, really practical and really easy to use, because you don't need glue, you don't have to sew them down. You don't have to really do anything to the wig itself to install it, and that is just super practical and easy for anyone who wears wigs or extensions, but it's just kind of on the go or rushing one day or one morning. It'S very very practical. It'S very easy and it looks really good now. This wig is trending and everyone is trying out these wigs. I did go ahead and see a video where another girl went ahead and used this method, and i wanted to try this out for myself and show you guys a really cute and quick little updo, where you can still install the headband wig just as quickly and Easy, but if you do want to leave some of your hair out or you want to make the wig look a little bit more natural and style it in a different way, so that it doesn't just look like a headband wig, then just keep on watching, because I'M going to show you guys how to do so in today's video. This wig is from superb wigs and, as i mentioned, it is a headband wig. So i will have the direct link to this wig as always link down below, as well as to their website, and if you guys want to stay connected with me a little bit more. I will also have my instagram link down below, but without further ado, we're going to go ahead and just jump on into it. So i'm going to show you guys the wig first. As i mentioned, this wig is from superb wigs. It came in this beautiful black box that has their logo on the front, and then it just has this cute design of this girl with, like butterflies, the box slides open and, as you can see, the wig is inside wrapped in a hair net. It also included the insertable elastic band, which i actually forgot to use during this installation process, and i'm just going to say off the back. The wig fits very comfortably and very secure, even without it. It also included a pack of wig caps, as well as a little hair tie with this cute little bead on it and then, as i mentioned, they also sent over some headbands. I believe when you order the wig, they are gon na, send you over headbands. I don't know if you get to pick out the ones you want or not, but they did go ahead and send over some headbands, but i'm not going to be installing the wig using that method today, so we won't really be needing those. But that was really nice of them to include, as you guys can see. The wig, like i mentioned, has this section in the front where there is a headband attached now. This material is very stretchy very thin, but it is very durable, which i really love, because you can pull on it really tight and, as you can see, it is much thinner than the actual headbands that they sent over or any headbands that you probably would wear, Which makes it good and easy to cover up and then, as you can see, the inside of the wig has three combs in the front and one comb in the back and the hair on this wig is in this beautiful, beautiful, curly texture. I did go ahead and want to just freshen up the curls and make sure and see kind of like the natural state of the hair. So i did go ahead and just co-wash the hair using some tresemme conditioner, as you guys can see, and i did go ahead and let the wig just air dry. I was able to run my fingers through the hair. It is so soft and so beautiful, even though it is curly hair, i'm able to run my fingers through it without it being really naughty or frizzing up just being difficult to work with which i really appreciate. That was actually two days before i'm actually filming this video, so the weight got a nice chance to air dry and the curls got to set and everything now like i mentioned, i am going ahead and leaving some of my hair out from ear to ear when I'M applying this wig, so this is the braid pattern that i used. The two braids in the front are my leave out and then the rest of the braids are going back. I didn't really make them too small, because this is a curly wig. I just wanted to secure my hair down so that the wig had more so something to hook onto and secure to, rather than just creating the flattest base. So if you were to install this wig, you don't really have to braid your hair all the way in the back. You really just need that row of braids that is directly behind my leave out so that you can clip the combs into place and the wig will be secure without having to sew it down or anything. And then, if you wanted to, you can just slice the rest of your hair back into like a ponytail or under a wig cap, and that would work out perfectly. But i do recommend at least creating the one braid from ear to ear behind your leave out. So that you can hook the combs into it and it can be really secure, i'm gon na go ahead and apply the wig. I first put the comb in the back and then i'm working my way forward and i usually do not use combs um in my wigs, even when they come with combs, i usually don't actually use them. So i was having a little bit of a hard time. Just playing around with the placement of the combs and inserting them into my braids so that they were comfortable but also really secure. So that's what you guys see me doing, but once i found them and it was nice and secure how i wanted to and comfortable. I am going to go ahead and grab a hair clip just so i can get my hair out of the way for this. I am going ahead and taking the headband, as you can see, pushing it back a little bit like kind of folding it over itself and then i'm going to pull it really snug and tight to the back of my head. Once i felt like everything was nice and secure, i'm going ahead and just taking a little bit of the shea yogurt hair moisturizer, it's kind of like an oil, but it comes out like a cream and like a yogurt like it mentions, and i'm just rubbing this On my fingers before i take out my leave out braids just so that i don't really make the hair kind of extra frizzy or ruin the braids, because my natural hair texture is a little bit curlier than this actual wig. But i want my hair to stay. The texture of the braids and the wave pattern that the braids are going to create again you can use any like hair oil or any like curly product that is moisturizing to do this and i'm just taking out the braids really carefully. As you can see. First, sectioning off the hair on the wig that is going to go into my half up. Half down do, as you can see, i'm not taking the hair from ear to ear, i'm actually kind of going up a little bit on the wig and i'm just kind of grabbing it from like, where each of my eyebrows are and then grabbing the top of The hair and kind of just sectioning this off i'm doing this so that, when i add my hair up, you don't end up seeing the headband like on the side of the wigs leaving a little bit more of the hair down on the wig is going to Allow you to kind of cover that up on the sides, and then i decided to leave out this little piece in the front, because i thought it would be cute. And then i'm just loosely and gently kind of using my hair to cover up the headband and to get it into this updo in the video that i watched, the girl did not leave her hair curly, she kind of had it blown out and stretched. So again, if you're, a curly girl or somebody who straightens their hair blow dries their hair and your curls and hair pattern doesn't exactly match the wig, then you can go ahead and also style. Your hair, like that it doesn't have to exactly match the hair on the wig, put your hair up into the ponytail and then in the video. She showed that she used her actual rest of her leave out and natural hair to wrap around the hair tie, and then she used a bobby pin to secure it and she left the hair out as a ponytail. So that is one option just in case you guys are wondering or you're like. Oh, i can't do this because my leave out and my hair isn't going to match the texture of the curls. But if you do have curly hair or a similar texture to mine or the wig, then you can kind of get more creative or be more loose with the style like i was, and i just gathered the hair up created a messy little bun and i left This piece out in the front to create a really like boho and effortless, look, which i really really really love. I also do want to say that my natural hair texture isn't exactly how it looks and isn't exactly like this hair, because i braided my hair in the front and when i did that my hair was initially wet and then i let it dry. My hair was able to actually create this kind of more crimp and loose curl that matches the wig a lot better. So again, that is another option. If you either have much curlier, hair or different hair texture, you can just braid your hair using some product to braid down the hair that i was actually leaving out so again. Just keep that in mind. If you are thinking that your hair might not match - or this method might not work out for you, you can definitely achieve the curl pattern using the actual braids that you create to secure and hold back your leave out, then i'm just gon na go ahead and Add some baby hairs because no look is complete without baby hairs for me, so i'm just taking some got to be glue and my little old toothbrush that i use for baby hairs and i'm just sweeping my hair into place until i like it and literally guys. This is what i'm left with this is the final look. It literally took me less than 10 minutes to fully install this wig and to get this style, and i am so happy with that. That is the quickest i've ever installed any wig in my entire life. So shout out to the headband wig, just for being so convenient, so practical and so easy to use and shout out to the original creator of the video that i am mentioning as my reference, because that is where i got the idea to leave more hair out And to try to create a different style and this style with this wig now to further style it. You can go ahead and add like some layers into the wig and into the hair, to just make it look even more styled, even more natural and just give it more volume. I might go ahead and do that, but i wanted to really come on here and just show you straight out of the box. All i did was co-wash it let it dry and then that was it. I wanted to show you what this wig looks like how easy it was to install and how cute of a style you can get out of it with not much effort at all. Then, as you can see, this is what i'm left with now. What is really nice about this is, if you do this method, you don't have to wear your hair like this. Every day, if you plan on keeping the wig in for more than one day, you can slick down your edges and just push it behind the headband and put a different headband on or just like, leave out a piece in the front. How i have here and then again slick the rest of your leave out back if you wanted to so i like this method and leaving the leave out out if you're comfortable, doing that with your hair, because it just allows you to have a little bit more Versatility when styling this wig, i think this looks so cute. I like the bun, because it's just more me, it's a little more voluminous and again i like, like just the messy quick thrown up bun. It kind of just gives me like boho, an effortless vibe. Let me know what you guys think down below. Let me know if you guys try out this method for yourself and if it works out, for you guys and if you guys have a different hair texture than mine, again be sure to leave in the comments down below some recommendations or tips of how you recreated. This look and what worked best for you, let me know what you guys think down below shout out to superb wigs for sending me over this wig to try. This is my first headband wig ever and i'm really impressed with it really happy with it. When i first saw all the videos i was a little bit, skeptical not gon na lie. I was like um, so are we all just gon na be walking around my headbands now, but no we're not. I got you covered now. You know how you can switch up your headband wig, you can wear it normally, how it's intended to be worn. You can swoop, like your edges, down or something and then put a headband on, or you can do this and just cover the headband all together with your natural hair, to create a different look, and i just really really love that so definitely be sure to follow Me over on instagram, because you guys will see me style this wig in different ways and probably like a normal headband wig. Let me know if you guys want me to do a video like just on how to style, headband wigs, and i can do like a bunch of different hairstyles with this wig. So let me know if that's something you'd be interested in, because i definitely can do that video for you guys, and i think it would be interesting and pretty fun to see like i mentioned this exact wig as well as the website to superb wigs and my Instagram will all be linked down below and also be sure to scroll to the bottom of the description box, because i leave all of my coupon codes with any companies that i've ever worked with linked down below there. So if you guys want to save some money, be sure to check it out and be sure to give this video a thumbs up. If you enjoyed found it helpful like this method or if you think it's something you would try and also be sure to share or send this video to somebody that you think would be interested or would try out this method, because i would really appreciate it and It would help me out so so much again, i'm wishing you guys all the happiest holidays and sending you guys all of my love. I appreciate you guys all so much. Thank you to everyone who entered my ttdi giveaway. Thank you to ttdi for sponsoring that the two lucky winners were both chosen, contacted. They picked out um their prescription for the lenses and everything and the lenses are going to be shipped to them very soon. So i'm so excited to have that opportunity to be able to give back to you guys if you made it to the end of the video. I love you so much. Thank you so much for watching, and i will see you in my next one mwah bye, guys

Comments
JR: This hair looks so bomb on you girl!!
Tamara Marie: This hair looks amazing on you boo!
Mrs. S: Yessssssssss you did that boo!
Ery Stitch: This video is underrated !!! You’re so fire
Simply Asia: beautiful!!!!
Charlielove A: Love the video! is this small head friendly?
yaya804: Wow she is crazy gorgeous.. I need to look to see if she has makeup vids...we have the exact same skin tone...and I'm in need of recommendations
DeJanee Elliott: Great Video!!
Dee Luther: Another Video Love thAt thumbnail tho Your Beautiiful Self Makeup so nice Enjoy your night Too Hope u have a Bless Week Stay Safe always
Toya Guidroz: Cuteeee
Leesa Stewart: your hair texture
TheOriginalKitKat: so so pretty
Time Health Fit: This is a great video, want to be youtube friends?