How To Diy: $30 Headband Wig In 10 Mins * Insta Braided Bun Tutorial * Hot Glue Gun Method
- Posted on 12 June, 2021
- Headband Wig
- By Anonymous
#diyheadbandwig
#braidedwig
#diywig
#diybraidedwig
#hairhack
Hey Chocolates!!!
Welcome back to the channel! I'm here with a tutorial on making your very own braided wig. You can always stay polished with hair hacks like this one! Hope you enjoy! Thanks for stopping by!
Materials Needed...
Hot glue gun (glue sticks)
Headband wig cap
Braided hair of your choice
Link to the hair I used...
https://www.amazon.com/dp/B08WYQ614G/r...
like comment subscribe
Follow Me On IG
https://www.instagram.com/mychocolates...
BUSINESS INQUIRIES ONLY
Save money
Dossier (luxury perfumes for the low)
https://dossier.co/discount/CHOCOLATES...
Filippo Loreti (afforable luxury watches)
Coupon Code:
CHOCOLATESOUP15
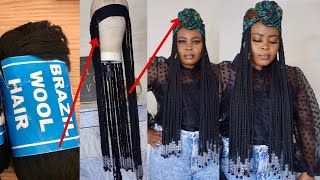
Hey everybody welcome back to the channel if you're, not new, here hi and welcome, consider liking, commenting or subscribing hit that notification bell, so that you can be notified every time that i up upload another video. So it kept me in my sleep now, i'm not saying i'm the originator of this look, but i didn't go and look and see if other people made this video on youtube. So i'm just gon na organically do what's in my head. So i have this idea of the diy headband wig, but with um with passion twist. So what i want to do is i'm gon na do a diy top knot with passion, twist um and a headband wig style, i'm going to see how this hair hack works out. I had all the material already, so i'm just like. Let me just turn on the camera and do what i want to do. I will hop back on when i'm finished and then we'll put it on and see if it came out how i'm kind of hoping. So if you want to see how i create this little look and how you can also do this on your own at home, then keep watching okay, y'all, so first off you're gon na need a hot glue, gun um. This is my mom's. I'M borrowing hers, but you're gon na need a hot glue gun some glue sticks. This is the headband wig um cap that i got. I got this off of amazon. This is the hair that i'm going to use. Um, a company sent me this hair, so i'll tag them as well. If you like the distressed black look, so this is how their hair is looking, and this is how the tip is looking. This is like six or seven packs of the hair, so um each pack comes with two four six: eight ten, twelve twelve strands of hair. Okay, also, i have my mannequin head on mannequin head. I have the headband wig cap on this side. The back looks once i don't know. If i need to leave it not tight. Well, i guess it don't matter this part, don't matter. I don't think this is gon na fit the size of it. Oh yeah they're banging on so i'm gon na just start muting. These clips and i'm gon na zoom you guys in okay, y'all. I am into the back of the hair now and yeah, i'm getting really good with it. I'M actually doing bigger pieces with the glue, i'm just kind of spreading the glue out and about um like this, and i'm laying like four or five pieces of hair at once. But i got the whole front zone and i'm headed around to the back. So all i have is just this little perimeter here left so yeah we're almost finished y'all and i'm only like what about 10 minutes in if that yeah, so we're getting. It done very quick process. Almost finished. Okay, hey y'all! I am finished now the whole head is done, the middle is empty because we're doing a top, not only i used, um wait, five packs one two, three four five: i used five packs of hair. I have a whole pack left and i have one two. Three. Four five five strands out of another pack left, so what i ended up having to do more so in the front was after i brought all the hair up into a ponytail. I just went back through to make sure i wasn't seeing um pieces of the cap and oh lord, wait. One of these comes it's the one i just did i pulled it too early yeah, it didn't even dry. So where i see like openings and the cap more so in the front, i'm adding hair in between those braids that i laid add some more glue here and then i'm gon na reattach. This i'm just gon na hold it for a second. So, along the front, wherever i saw that the cap was showing is where i went back through and added some hair um. And then i tried to tuck that little knot like underneath the existing braid that i put on the cap so that the knot is not showing yeah. So i am finished, i'm done y'all, so i'm going to put it on and then i'll come back and we can put it up into a ponytail and then we can play around with some headbands that i picked up. Okay y'all, so i have it on so this is how it's looking okay. So if this is your cup of tea, you can wear it like this, but i'm going to um kind of try to wrap these into a little top knot. Okay, everybody! So this is just about it got your top knot. You got your headband now with the headbands. You know you can always use your own, whatever type of style that you like. I just had these um, and this is just a pack of 12. they're ripped like um. You know like a red tank top. They have like the red the lines in them, but um yeah. I definitely will probably want to get like some solid, like a solid textured one um, but plenty of different, solid colors um, and you know you even get like you know like the contact when you order wigs and stuff and they send you the free headbands. You can always use these as well um to cover up the actual headband bands. You know, but um yeah. I just opted for the black, because it's solid and it's you know just neat looking but um yeah, depending on your outfits and stuff. You definitely always have the option to swap out your actual headband, so this is how um mines is looking right now and yeah um. The headband did come with combs that you can sew into the back of it. I didn't sew. Mines probably should have, but i didn't um, but this is snug. I don't feel like it's gon na move anywhere um yeah, but this is um how it's looking back is looking like this. So if i had the comb this little area right here, where you see like this little lip back more than likely probably wouldn't show because the comb will be here and then it will be - i guess probably pull it more down to the nape like right here, But um yeah: this is how it's looking. Oh y'all know what would be so cute too, like you know how i don't know how to do it but like when people tie like the actual scarves. They know how to like actually tie scarves around hold on because girl. I do got this one, but i know this one is like freaking huge, but let me just um hold on y'all we just chilling in today we just planning hair and chilling. So let me just let me play with this real quick. Let me just see if this will give the look. I'M kind of talking about so y'all know how sometimes people take the scarves, and i really don't know how they do it, but when y'all get the gist of it, what i just did is not even how they do it, but um yeah. I know they don't do it like this, but you get the you get an idea of what i'm talking about with this. Oh lord, oh lord, you get what i'm talking about, though i'ma just tie it in the back, but they be they tuck it. Some type of way too, but i'm just tired, i'm just tired, but you can even take like designer scarves girl - and you can do little looks like this like this is also a little look. This is cute too, but of course, you know, you're not gon na have this this hanging. It is a way that they do them too, and they do be having these hanging, but they hang like kind of long and they be real cute, but y'all know what i'm talking about you get the gist of it. You definitely can take your little designer scarves and tie it around too, but yes, really really um cute really cute. You definitely have options. I'M gon na take this off because ciao this is it. This is the completed. Look, it's still so many options and room to play around with your perimeter when it comes to styling the actual headband parts hope you guys enjoy it y'all. This was so quick, 10 15 minutes and you got a actual look. Definitely vacation last minute. You just don't have time to go, get something done. You can always do little diy hacks like this at home for the low and still have a polished. Little look going on. If you like this video, don't forget to like it, throw me a comment down below subscribe. If you want to see more diys like this, i should have another one that i'm gon na um film as well. While i have her hot glue gun, i'm gon na have to i have one, i just need to order me another one but um. I have another one coming up. So if you want to see that one or if you like this video, please consider subscribing. Thank you all so much for watching and i'm gon na catch. You guys in my next one bye.

Comments
Do Dream On: So cute... great idea...great job!