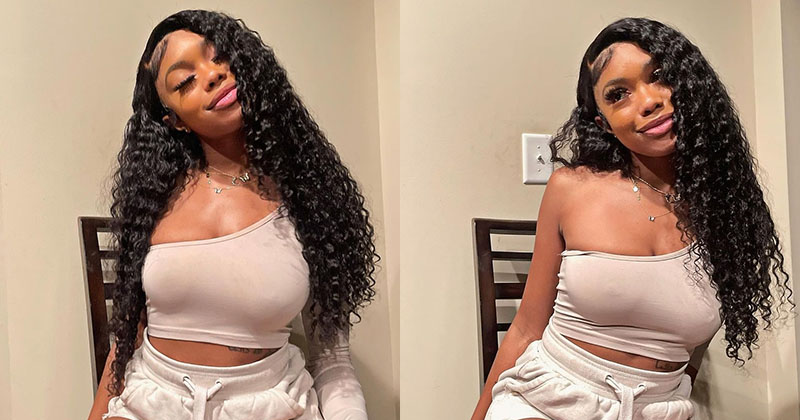
Headband Wigs Review| 1 Bob Yarn Twist Wig 2 Curly Ponytail Wigs And One With A Bang
- Posted on 25 April, 2022
- Headband Wig
- By Anonymous
Welcome All to my channel
In this video I share with you guys three wigs I hand made. Its all about the process, what I like and what I need to do better next time.(my experience)
If you came in come all the way in and hit the bell to be notified whenever I upload a video because you never know when one is going to drop.
■■■■■■■■■■■■■■
Most recent videos
1. April Starting my Elevating Journey https://youtube.com/playlist?list=PL1G...
2. March Still Adjusting to my new life https://youtube.com/playlist?list=PL1G...
3. February Lifestyle videos and back to work after Maternity Leave https://youtube.com/playlist?list=PL1G...
4. January Day In the Life Videos etc. https://youtube.com/playlist?list=PL1G...
Most popular videos
1. TRYING ON CLOTHES I USE TO FIT 5 MONTHS PREGNANT https://youtu.be/W0_tMCx95mc
2. Try on Wig Bess https://youtu.be/yW6PZI_n2Js
3. Motivationl clean with me while 32 weeks pregnant https://youtu.be/okWWQlxLEvw
My Top Favorite Playlist on my channel
1. MY FIRST PREGNANCY EXPERIENCE https://youtube.com/playlist?list=PL1G...
2. FIRST THREE MONTHS WITH TWINS https://youtube.com/playlist?list=PL1G...
3. MY SHORTEST VIDEOS https://youtube.com/playlist?list=PL1G...
4. COOK AND CLEAN WITH ME https://youtube.com/playlist?list=PL1G...
5. WATCH ME DO MY HAIR https://youtube.com/playlist?list=PL1G...
■■■■■■■■■■■■■■
Do you want to collaborate. Just click this link to add your video to the playlist. 2022 LET'S COLLABORATE AND SUPPORT ONE ANOTHER: https://www.youtube.com/playlist?list=...
■■■■■■■■■■■■■■
My channel is switching from mostly motherhood content to elevating in all areas in my life for better health, better living, and a better me. SO here most of my videos will be aimed to inspire others to elevate as I elevate.
■■■■■A little bit about me■■■■■
‼️JESUS IS LORD
MY TWINS ARE MY TOP PRIORITY
SWITCHING FROM WESTERN DIET TO MEDITERRANEAN DIET
❤ BECOMING THAT BLACK WOMAN THAT I INSPIRE TO BE THAT COMES FROM MY INNER SELF
I WANT TO RAISE MY OWN CAT
■■■■■■■■■■■■■■■■■■■■
Disclaimer: I don't own any rights to the music.
All right, you guys hello, come on in come all the way in make sure you hit the notification bell after you subscribe. Thank you for coming in. You are appreciated, and you are welcomed here, just want to come on, because i have made three wigs and i want to give you guys my review on my own wigs and what i need to improve um. So this is the first wig i made and it's yarn braids um when i first made this wig. I didn't know that it was gon na be like this short, but since i didn't want it to be different layers and how i already pre-cut the yarn um, i wasn't able to go longer. If i wanted to go longer um, it's just the way that i cut the yarn. I need to do a a better job at cutting the yarn, so it can all be one length instead of looking layered so um, i just got the shortest piece that was in the back and i let that be the guide and the wrist just falls. However, it it fell, and whatever was longer, i end up burning it wherever it needs to be burning. Yeah the ends are burned. I wish it was a better way to do it um. I googled. I think i youtubed to see if it was a different way to seal yarn. Braids and i said: try combing out the ends, and somebody even said use like a pet brush to comb out the ends and twist it up that way and that it should hold, and i even said dip it. I never dipped my yarn braids before to seal it like wow. I need to try that so i'm gon na try it with this wig right here, because i plan on making more so um. That'S how i got this lint. I really love the shape of the wig um. I really love the layered. Look, the funky look. I love beak hair. I love bobs. I love short hair. That is full. So i really really like this first wig that i've made it took me eight hours to make by the way um. This is two strand yarn braids. I used um one bundle of the yarn i heart yarn, 100 acrylic and um, i didn't hand twist it. Thank god. I had a machine to twist the yarn on and i got a wig cap. It'S the wig cap with um, it's a crochet wig cap and um. It'S not the adjustable one. I got the extra large size. I might do like a how-to video on it. I don't know yet, but i just want to give you guys an overview of each wig that i made and, like you know what i like about it, what i don't like about it, what i need to work on, or whatever um yeah. I really um want to do something about the ends. Uh because i don't like you know, everybody's probably not gon na, like the burnt ends, i kind of like the look, but sometimes you know you don't want that on the end, especially if it's not too toned. If it was too toned, then that'll be fine, but it's just the very ends that are like that. So but i'm okay with it, but sometimes i'm not okay with it. That'S why i need a better way at sealing the yarn braids and not just tying the knot, because that can unravel um. I'M gon na have to show you guys. Like i said, i have to show you guys the wig cap that i use, but it's a crochet wig cap and it's stretchable, but it doesn't have like adjustment straps on it and um. I did sew on um three clips in the front one on each side and one in the middle. I didn't put one in the back, because i feel like it's secure enough in the back and um, so i did start off at the top um. When i started this week, i started off at the top where there were much smaller holes and then i ended up doing the rest um. I know when it comes to wigs. You don't need to really and truly put everything close together. So that's what i was thinking that um. You know to not do everything so close together but um after the fact of doing it. I see that you know the top part where there's smaller holes. It should be its fullest as full as you can get it. It can be spaces, but for the most part, everything needs to be covered. Everything needs to look covered and so that the wig cap won't be shown um. But when it comes to like the back and the sides or whatever um, the top will cover that. But if you want to like move it in any direction, you don't want to see like the the wig cap um, i know for sure, like yarn braids, they can be washed, so i know for sure this wig can be washed. If i wanted to wash it - and i do want to wash it one day - i just don't want to wash it right now, because i'm enjoying it right now um it may not look a hundred percent like oh, you have yarn braids in your head, but you Know the nappier your base, comb, your own wig braiding pattern. Whatever braiding pattern, you have one in there it's going to get nappy. If you have natural hair anyway, it's going to get nappy and it's going to cover up the little band. But if um and next time i do this this wig, i want to make sure i get the yarn braid to cover up the band um. I thought about cutting it off, but i thought that wouldn't be great because it might not fit the head like it's supposed to or go on easy like it's supposed to. So i was like next time i'll just sew it down and um crochet the yarn braids on the edge to cover up the band um. What else was i saying this? First wig um yeah? You can wash this wig if you want to, because i know that if you wash it, it it'll take a long time to dry, because it's darn, because i know when i did wash my yarn braids. It took like a whole day or even two days for it to dry and i'll feel heavy if you was to put it back on your head, it'll feel a little bit heavy, but since these are short yarn braids, they won't feel as heavy, because when i Had my yarn braids, they were longer than this like mid back and my head felt like my neck was like hurting because the hair was so heavy but um i'm going to test it out, see how it goes um. You can shampoo and condition yarn braids. So if you want to do that, just like you would do a normal wig, you would do this wig um just be gentle, just like you would with any other wig and um. You could wear a headband with this. If you wanted to to cover up that band, i got some headbands and i got a head wrap. You can also wear head wrap and do like a turban bun. I like that style um, so you can like add different headbands to this wig and um. Next time, i do want to sew underneath the wig like a silk cover to protect your hair. If you was not to have like a anything underneath like when you wear a wig you're supposed to wear like a stocking cap, but really truly a stocking cap that dries out your hair um, it takes your head, takes your hair's moisture, and so it kind of Damage your hair in a sense, so it would be better if you had like a silk cap on to cover up your protective style, um your real hair. So i would like to like sew on like a silk something silky underneath the wig and then not only that, but to protect the yarn that that is peeking through the the the crochet wig cap to protect it from getting dirtier than it would. If you didn't have like a cap on because i haven't been wearing a cap like i supposed to - and i see how dirty inside the wig is so that's why i'm like i need to, i need i'm gon na end up washing it, but it's not too Dirty but i don't want to wash it right now because i'm enjoying it right now, but i do have two other weeks that i could wear if i wanted to wear a wig, so it would be okay and i'm really excited because you know i don't have To buy any wigs now i can make my own wigs. You know, especially if it's this kind of style or whatever, but you know it's only three different. Well, it's only two really different styles, but i have three wigs that i'm gon na show you because i did them three different ways: kind of it's like three different hair types. Well, this is one of them. I'M gon na show you um so yeah you guys. Let me know what you think about it. Like i said. I got three clips in the front one on each side like by the temple and it's the comb one you just it's like your normal comb. One and you just push it in there and my hair is braided underneath all the way to the back and like 10 braids, and so this is what it looked like, but yeah next time i do like a crochet wig, i'm going to cover up that band. Part make sure it's not too visible, but you can cover it up with like a headband. If you want to wear a headband, but people don't want to wear it. I don't want to wear a headband every day, because you know that can get hot. You know, but you know sometimes i want to cover up my forehead. Sometimes i want to cover up the band. Sometimes i don't want that natural look or whatever i just you know, want to be um, accessorized, okay, so that's the first wig i'm going to show you guys the next week. Let'S see, let's see this here, oh, let me show you guys the wig before i put it back, so this is what it looked like off. It looks full off, but if i was to put it on the doll head, you'll see all the spaces. That'S in it and that's another thing that i want to do to the wig is: go back and add some more yarn twist to it to make it a little bit more fuller. So it can be a little bit more diverse versus having to make sure everything is covered by making sure all the yarn braids is put in a certain way to cover all the lace that is being shown um on the inside here um. These are the clips that i work that i was talking about, i did hand sew them on. I don't have a sewing machine or anything like that. I hand sewed them on and i got everything that i made these weeks with from my local beauty supply store and like i was saying um the yarn can get dirty and you can wash it. You can shampoo it and condition it like. You would any other um wig, but this one um would really get dirty if you don't have like a protective cap over your protective hairstyle like this is my protective hairstyle. I don't have a cap on if your hair is like really dirty um. It wouldn't be good for you to put this wig on because it will really dirty up your yarn, braid and you know: uh have oil and dirt and scent like a scent, a dirty scent attached to it too quickly, and so i'm going to make sure you Have on like a stocking cap, a satin cap or something to cover that, but, like i said next time, i do me a yarn, braid, um yarn, braid cap, i'm gon na sew on like a um silky um base, so that'll be covered. Don'T have to worry about that getting dirty too fast, so this is what it looked like on the doll you can see the spaces that are all up in there. I just need to go back and just put in a couple of more in the top area where there are smaller holes. I'M not worried about the back too much, because everything from the top is laying over that and um. It'S not really visible. I'M not too concerned about that so yeah, the back have smaller uh, i mean bigger um spaces uh because they have bigger holes and i didn't put uh too much too many braids back there, but they are mostly in the front here where i need to put Some more to cover up whatever holes i want to cover up. This is my second wig: it's a weak ponytail, it don't have any clips on it, but it has a headband attached to it that i um i sewed on, and this is what it looked like and i do have names for my for my wigs. So this one is like more of a natural looking um ponytail um. I didn't have anything too much anything to say about this one. It was like a first try good, try, wig um, very simple, very easy to put on it fits nicely. I have nothing too much to say about this wig. It probably took me about three hours to make this ponytail wig um. I wore this. You can wear it like different ways, especially if you have like head wraps or you can. You know put on a different headband with this and you can even tuck in the um bang. Let me show you you can tuck in the band part, if you don't want to bang like that, but that might not be too cute. But if you push it back a little, it can actually look natural and look like you have like braids or something, and then you know, then it would probably be a good idea to have like clips right there. So it won't slide off or whatever, but make sure that's under there, so um um. If the braiding pattern it look better than this uh definitely um, i would wear it that way, but other than that um. I do have like this big, thick um headband that you could put on with it. Let me go get it and show you guys what what what so this is the head scarf and i'm just gon na put it on put it on like this tie. It not like that twist it like this all right so yeah. This is another way you can wear it, and i might even wear this to work today. Like i wasn't going to wear this one, i was going to wear my yarn braid one, but since i just love how the the the head scarf bun look like, if i could, you know, make bun head buns like this. Had red buns like this and like make it stay, this would be great to attach to a a ponytail wig, but yeah um. Don'T have too much to say about this one, but i do want to say you know, as a trick, a trick to making um wigs or ponytail wigs or wigs in general general curly. Wigs are the way to go, especially if you only have one pack um. How i made this one um: it was a different wig cap from the crochet um. It'S a different wig cap from the yarn twist wig that i made um. It has very tiny holes, so i had to get a tight uh crochet needle that was very small. Let me see if i can show you guys, i don't have it with me right now. Hopefully i didn't lose it, but um is you have your normal crochet needle and then you have a tiny crochet needle that can go through very, very small holes. So that's what i used um to make this one, and i have one pack of hair and i did not cut it in half it's probably like 10 inches long um. When you do ponytails, you want to make sure it's long enough to like cover up the top of your head, or you know, uh flow to the back a little bit or hang a little like this and um like i said it probably took me like three Hours to do - and it was like just one pack of hair, but you have to be like really patient um. If you want to do it like that, because really and truly one pack of hair should be enough for any wigs, especially if you think about how the natural your natural hair strands are. But if you really, if you want to you, know, make sure everything is covered, make sure you do the the parts that are going to be exposed the most. So what i did, because i didn't even feel everything and i just um - went around in a circle. Um - and i i sewed i sewed the ponytail together so that it wouldn't come loose and so that you won't be able to see the middle. But what i did to do this one i just went in a circle, went in a circle putting in little pieces of hair in at a time, and i did at first i wasn't doing this, but i thought it would be better at first, i was doing Like the knot um technique, when i was doing the crochet when i was crocheting it on the week, but then i was like, let me do the um knotless technique, so that gives it more of a natural look and it just looks more neater and more presentable. Instead of just seeing all those knots and you're like why, so you know whenever i make, i guess this is something whenever i make another one, you know make sure i do the knotless uh technique and, like i said, i only went in a circle. I probably did two or three row rows in a circle and then the middle is just just exposed, so i um, but when i pulled it up into a ponytail, you can see any of any any part of the crochet wig a base cap. I said that wrong, but you know what i'm saying so yeah. That'S that really liked it um when it comes to. You know the care and maintenance of this. I'M, like you know there are wigs or whatever you would not wash and that you um you'll be more considerate with and more careful with. So this is a wig that you would be more careful with it'll, be like a special wig like a one-day wig. It wouldn't be like something you wear every day: it's not your everyday wig, but it could like be like a throw on wig like you just want to run to the store run down the stream. You don't want to look like a bonnet wearing person. I'M not i'm not i'm, not, i'm not don't come for me. I'M just saying i'm just saying you know so um yeah this could be a great way as a throw on week. It'S very easy to throw on because, like i said it don't have any clips. It'S easy to pull on, especially since um i sew on the headband. It'S very easy to come off. You don't have to worry about sticking combs in to make sure it don't come off. It stays on good. If you have a big head like me. Well, it's a normal stylist to me: oh um, okay, with all these wigs well, not with all of them, just the first, the last two that i'm showing you i got one more week to show you guys um when it comes to doing these. These, the headband or scarf wig, you want to make sure you you sew on your spot. First, whatever is going to be covered. You need to cover that up. First, because it'll be easier for you and then again sometimes it'll be easy. Sometimes it won't depending on which hairstyle you're doing like for this one um. I'M trying to remember how i did this one, i'm trying to remember did i sew it on first or did i. I think i sold this one on first, but it looked it kind of looked like. I did it, but that's just the technique that i used so um. Sometimes it's a good idea to go ahead and sew on the scarf so that you don't have to be like. Oh, how much cover up this spot right here or i don't have enough hair or whatever um it's good, to go ahead and put the scarf on your head and see how it goes on your head and see what's going to be left out um. So you can already have that covered, however you're going to cover it, but it's like how i did my wigs. I did do a little bit and then i'll take it off and see what it looks like you know. If i do the, if i put the scarf on, i put it on and see how it look a certain way and make sure i put it back on the mannequin that way or whatever you know what i'm saying like put it on whenever you feel like You need to put it on and see what adjustments you need to make and that's how i did it and so yeah this is probably the fastest or the uh the quickest one. I made um this one have clips. This is the last week, i'm showing you guys this one has clips and you can see what kind of crochet wig i have um these clips, you pop them out and and they you have to do like that, um pop it open, and then you make sure You um get some of your hair in there and then you can snap it closed snap, open snap close, so i got one in the back. I have one the front and one on each side where the temples are, and then i got this pretty scarf sold on. I need to sew this part down, because i don't want to cut this off and have these clips on there and it took me a long time to put them on there, but i don't know really what i'm gon na do yet i don't have to decide. Okay, so this is the last wig i made okay and it's a curly girl week and i believe i'm gon na make my mom a week like this for mother's day, because i really like it so much and i feel like it's like low maintenance for her Um - and i don't think she really liked the yarn braid um type look, so let me see if i can set this up so um. I really i like all of the wigs that i made, but you know it has trial and errors pros and cons. What i need to do better next time type thing, but for the most part they are wearable, they are presentable, they are pretty, they are beautiful, they are wonderful, they are creative, they are unique and i had fun making them and i want to make more - and I will make more but um with this wig i was gon na, do like a full wig. Instead of like a portion and um, when i say portion, i mean ponytail um, i was gon na, do a full one. I did use a whole pack of this hair and it claimed that it was a one pack. Do it all um, but it's not so. I'M gon na have to go back and buy another pack of this hair. If i want to do like a full wig, but besides that, if i do like just you know, the top one bag is enough. Um i sewed on the cap. For that sometimes it's you know it. I don't know like you have to have use your own judgment. Sometimes it's good to go ahead and show on the cap. Sometimes it's not because sometimes you want to use the headband to cover up whatever you want to cover up, and i don't know it's just you will know, and sometimes you have to go back and fix whatever you want to fix. So it can be how you want it to be um. So that's what i had to do with some of my weeks. You have to trim some of the hair, so it can look um almost even not too off and you know play with it this way. It can get in your face if you was looking down doing something you have to do like this to move it. You know that's kind of annoying, especially if you're at work and you constantly have to look down and look back up and you got ta get. But so i was thinking about sewing down the middle, so that middle part won't fall in my place, and i can just do like this, but i was like you know what, if i would, i don't want that so yeah um the clips to make sure that It don't come off. All you have to do is pop it open and slide it in pop it closed, and if it don't pop close like that, just pick it up and close it i'm trying to pull it. Sometimes it act like it don't want to close. So you have to bring it out and close it and push it back in you have to play with it. So can you do the other side and i have one in the back as well, so you tried to play with her. She might be hungry, make her a bottle, but this wig i got ta, get some more milk, well she's, not crying right now, but um do i have anything to say about so this is the wig that i was talking about. You know you might want to go ahead and sew your scarf on, because you don't want to be like. Oh, i need to go back and fill this part in, like i um sewed on this cap and i put the hair. No, i put the hair in and then i sewed on the cap, and i was like oh no, i got all this space. It was like all the space was left back there, and so i was like what i'm gon na cover this up with, because i don't want to just cut up a headband that i have and you know, it'll be a waste, so um have to give her A bottle, but this video is coming to an end. Look like. I spent like about 10 minutes on each wig, explaining it to you guys. I need to be getting off here anyway, but, like i was saying um, you know what i was saying and um. I used the soft you guys. I used the black socks, i cut it in half and i sold it on. Yes, i did because i know that you know this is gon na, be my wig, because you know i was practicing. So it's like with all the first weeks that i made it's practice and so i'll know what i can do better next time and how much time it'll take me to make it and um. So when i saw that sock on to cover up the part of the wig that didn't have any twists on it, it was just exposed um that wasn't it because it didn't look well when you just saw a black spot back there like what happened to the Rest of it, since you know it's not the same color as the headband, you know it looked kind of weird, so i had to sew down a few pieces of the twist, and so let me show you i sewed down like a few um twists on this Sock the sock i sewed down a few pieces on the sock to cover up that black part, so it wouldn't look like like what happened right there like it looks like she's missing some hair, so um that made it look better. That made me feel better more confident about this week. Whenever i go out and about in it and um, i don't use anything specifically to make the ponytail a ponytail. I just use like this and wrap it around as a ponytail holder, or i use like thread. I, like sew the little like i'll sew, the thread somewhere stitch it somewhere on the wig and like wrap it around all the hair to make a ponytail and just sew it on some kind of way. You know you know, i mean i have a lot of techniques, a lot of things that i know how to do. I feel like that. I incorporated into making this wig. So that's why i'm able to do this. Thank god for that hello, sparky. How are you doing um? So it's like a lot of a lot of techniques that i know how to do, and so that's why this wig was possible. But now i am leaving um this video should post later on, if not later on tomorrow and since you came in, come all the way in hit that notification bell after you subscribe and thank you. You are welcome here. You are appreciated here, and i hope you guys enjoyed this video if you did leave a comment and let me know - and that's all on all elevating where we are leveling up, we are elevating every area of our lives thanks

Comments
Naturally-Roshani LifeStyle: The wigs are cute,and you made that! Maybe you could start selling