How To Diy Headband Wig: Pink Goddess Faux Locs Headband Wig | Quick & Easy | Missuniquebeautii
- Posted on 30 September, 2020
- Headband Wig
- By Anonymous
#headbandwig #fauxlocs #diyheadbandwigs
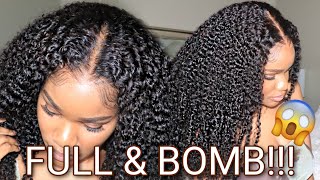
In this video, I was able to show you guys how to create your own Faux Locs Goddess Locs headband wig. I decided to do a pink pop of color in this wig today. These locs are very lightweight on your head and does not give you any tension. The wig cap I used in this video is different from the shake and go wig cap that I previously been using. I prefer the shake and go cap over this one because the shake and go wig cap has wig combs already attached to it to make it easier for you guys to install this wig securely onto your head.
Follow Me On Instagram@: https://www.instagram.com/missuniquebe...
Follow My Business Instagram@: https://www.instagram.com/missuniquebe...
Shop My Website https://pressedbymissuniquebeautii.com...
Discount Code: YouTube25 for 25% off the Entire Website!
Shop for your favorite beauty essentials! Press-on Nails, Lip Gloss, Mink Eyelashes & MORE!
I also make and sell Headband Wigs, Half Wigs (without the headband) Lace Closure Wigs, Frontal Wigs, & Drawstring Ponytails. If you are interested in having me make a wig or drawstring ponytail for you, please send me an email at [email protected]. SERIOUS INQUIRIES ONLY!
Products Used:
Crochet Wig Cap https://www.amazon.com/gp/product/B074...
Crochet Wig Cap (Shake & Go)
https://www.amazon.com/gp/product/B01J...
Black Head Bands https://www.amazon.com/gp/product/B07C...
Needle & Thread
Scissors
Zulu Braid Boho Loc #1, #2, #TPPPNK/1B
Headband Wig: Box Braid Headband Wig
https://www.youtube.com/watch?v=KCyt32...
Headband Wig: How To DIY Crochet Headband Wig Purple Wig
https://www.youtube.com/watch?v=kzAZJJ...
How To D.I.Y. Headband Wig With Dome Cap
https://www.youtube.com/watch?v=opSZQq...
Headband Wig: How To Crochet Passion Twists Headband Wig
https://www.youtube.com/watch?v=iaeC4h...
Headband Wig: How To Kinky Straight Headband Wig With Mesh Cap
https://www.youtube.com/watch?v=b0nSDB...
Equipment Used
Cannon SL2 https://www.amazon.com/gp/product/B071...
Neewer Back Drop Kit https://www.amazon.com/gp/product/B07P...
Ring Light https://www.amazon.com/gp/product/B08D...
Rose Gold Backdrop https://www.amazon.com/gp/product/B01C...
Instagram: @pressedbymissuniquebeautii, @missuniquebeautiiyt
Facebook: @pressedbymissuniquebeautii
Website: pressedbymissuniquebeautii.com
E-mail: [email protected]
Hey my beauties It's MissUniqueBeautii in the building and I'm back with another video. ( ethereal music ), If you're new to my channel tap that subscribe button so that you won't miss out on any of my new uploads. And if you have already subscribed what's good. What'S popping Welcome back to my channel., The first item: you're going to need is a crochet wig cap. Then the headband of your choice, your needle and thread some T-pins, so that you'd be able to secure your wig cap to your mannequin head, a pair of scissors and the crochet locs of your choice.. Now the hair that I'm using today is the Zulu Braid Boho Loc, and I have it in two packs of number two: two packs of number one and one pack of TPP PNK /1B, which is like a pink and black ombre, which is right, here. And this Hair to me gives me that goddess loc effect, and that is why I chose to go along with this hair.. This crochet wig cap that I'm using is a cap that I did order from Amazon a long time ago, because I was trying to choose whether I wanted to use this cap or the Shake N' Go cap that I've been using in my previous videos. And this Cap gets the job done, but I prefer the Shake N' Go cap over this cap because that cap has combs, and this cap does not. Right here. I'M just showing you guys what these locs look: like., They're a regular crochet loc with curly strands hanging off the sides of them, to give you a more fuller look. And also it gives you that goddess loc effect.. Now, I'm going to show you guys how to apply these crochet locs to your cap., And then I'm also going to show you guys a really great example of how to stagger your crochet locks onto this top so that you can eliminate the gaps that you will Have at the end. The reason why you are staggering your locs/crochet braid/crochet twist, whatever crochet style, that you're doing is to eliminate the gaps in between your cap.. Now you do not want to see any gaps in your cap so staggering. It does help that to not happen. ( ethereal music ) Right here, I'm just showing you guys that I started a new row and how I'm placing this loc in between the two previous locs that I created in the previous row. And right here. I'M just showing you guys once again, you want to make sure you're placing it in between the two locs in the previous row, because this will provide the most coverage when it comes to these gaps in your cap.. Another thing you want to do when you are first beginning to crochet these locs into your hair or any kind of crochet styles. You want to make sure that you're not putting them too close to each other as well, especially in the back, because the back is, you won't be seen.. People won't see the back as much as they will see the front., So you want to space the back further apart from each other than you would in the front. Now, if once you're finished placing them further apart from each other and in the end you still Have more locs left over? You can use those extra locs that you have left over to go ahead and fill in these spaces in the back. If you want to do that. But, like I said as long as you will not be able to see them from the front when people are looking from you, it doesn't make any sense to add all that extra hair into the back. When people will never see it anyways. Now that I've shown you guys how to stagger your crochet locs in the back of your head, I'm going to go ahead and apply my headband to my mannequin head and I am gon na flip it inside out. So the seams is on the outside. So that when I'm done sewing this - and I flip it back over - you won't see the seams on the outside.. When I am sewing this headband onto the cap, I sew it to the very edge of the cap, and I also like to sew one side at a time to prevent the headband from being lopsided on one side versus the other side.. It just keeps my headband evenly placed onto my wig cap.. Also when you are sewing this headband onto your wig cap. You do not have to sew your stitches too close to each other, because when you sew them too close to each other, it actually takes away the elasticity and the wig cap.. So you don't have to sew them too close to each other, because you still want your cap to have some stretch when you're putting it onto your head. ( ethereal, music ). Now, I'm just gon na show you guys what this headband looks like once you flip it up over the edges of your wig cap. ( electronic music ). Now I'm just gon na go ahead and continue to stagger these locs along this back section. (, electronic music ). Now I'm gon na go ahead and fill in this bottom back section. And I am going to put them a little bit closer together, just so that when you pull this up, you have enough coverage in this back. Section. ( ethereal, music ). This is what this back section is looking like once I went ahead and filled in the crochet locs, wherever I wanted them to be.. Now I'm going to speed this section up because I'm just going to go ahead and crochet the sides in., And I am going to continue to stagger them as well onto the sides just so that we can have the most coverage along the sides as well. (. Electronic music ) ( ethereal music ). This is what the cap is looking like once I went ahead and filled in the sides and the back, and now I'm going to go ahead and fill in this back section a little bit more and I'm going to complete the front section, off-camera and then I'll Be right, back.! This is what this cap is looking like once it's all completed.. I went ahead and filled in the pink color in the front. And, as you guys can see, I did place the pink ones closer together in the front just so that you can have the most coverage in the front, because the front is what we'll be seeing.. Now, I'm just showing you guys what this cap looks like once I go ahead and pull all the locs up and show you guys how everything is laying around the cap. And as you can see in the back, you can't really see any gaps once that hair Is pulled down. And right here, I'm just showing you guys what everything looks like and how I place everything in the back. And, as you can see, we have a lot of coverage in this back section.. Now I'm going to just pull the headband up so that you guys can see exactly what it will look like with the coverage from the headband. ( ethereal, music ). Now the style that we'll be doing on this crochet locs is the half-up half-down style just so that you guys can see what this hair looks like in this style.. I didn't have any hair ties close by, So I went ahead and used two of the crochet locs and I tied them together at the top at the base of this ponytail just to secure this ponytail at the top.. I do wan na mention that we are on the road to 1,000 subscribers and once we hit that 1,000 subscriber mark, I will be doing a huge giveaway., So you guys do not wan na to miss out on that opportunity. Make sure you're sharing my videos with Your friends and families and get them to subscribe so that we can begin this giveaway.. Now I'm going to go ahead and flip this headband up and then I'm going to spin her around so that you guys can see all this wonderful coverage that this headband is giving you and that the style is giving you.. I love the way this came out.. It came out so perfect.. I love that pink color.. It'S such a beautiful pop of color and I just love it. In this video. I was able to show you guys how to create your own full locs headband wig.. Now this wig is super lightweight.. You can easily put it on and go anywhere. You want, and I love the pop of color of this pink that I chose to do on this wig.. I really hope that you guys enjoyed this video. Comment down below any questions that you may have. Like this video and don't forget to subscribe. Bye. My beauties


Comments
Liz Stacy: I just wanna thank you from the bottom of my heart for this video ❣️ I've been working on a half wig for a few months, and have been extremely nervous about sewing the headband on. This has eased my anxiety a lot and now I aim to finish my project tonight *fingers crossed*
Nadine Rene: Beautiful!
Jamaica Nice: Awesome! Keep up the good work.
Shay Williams: Yes ma’am you worked your skills on this ....
Sophia Jones: I Love your work, it's amazing, too. How many packs did you use in the back?
Lolita Lewis: Very nice
Tiffinay Kirkpatrick: That's cute sus! Yasssss