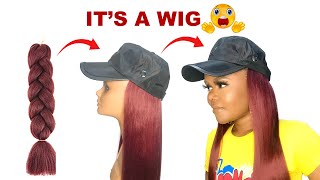
#Headbandwig Must See Diy Headband Wig| Very Detailed Tutorial Using Crochet Method
- Posted on 14 March, 2021
- Headband Wig
- By Anonymous
HEY GUYS!!!
I thought to share this VERY DETAILED HEADBAND WIG with you guys so you can do yours and rock it with pride❤️❤️❤️
PRODUCTS USED;
*LULUTRESS CROCHET BRAIDS(4 PACKS)
*CROCHET WIG CAP
*WIG BAND
*T-PINS & NEEDLES
*BLACK THREAD
*OFFICE PINS
*CROCHET NEEDLE
__________________________
ENJOY THE VIDEO GUYS!!!
CHECK OUT SOME OF MY VIDEOS
EASY TWISTS OUT & STITCH BRAID STYLE ON NATURAL HAIR https://www.youtube.com/watch?v=yxKjmE...
FIVE MINUTES EASY ROLL & TUCK STYLE https://www.youtube.com/watch?v=9jKZIL...
NATURAL HAIR STYLE, ROLL,TUCK & PIN STYLE https://www.youtube.com/watch?v=56Elaq...
NO MORE BREAKAGE, MY WASH DAY ROUTINE https://www.youtube.com/watch?v=WiBnN3...
__________________________________
CONNECT WITH ME:
Instagram: @opaglamz
https://www.instagram.com/opaglamz/
Facebook: Opaglamz
https://web.facebook.com/NATURALHAIRAN...
Email: [email protected]
BUSINESS INQUIRIES/ COLLABS
Email: [email protected]
__________
#headbandwig
"What is worth doing, is worth doing well"
"SPREADING LOVE, ONE TUTORIAL AT A TIME"
Guys welcome back to my channel, it's a girl for glams and i'm back with another tutorial, so today we'll be doing the week headband tutorial for a while. Now this hair has been trending all over youtube, all over instagram facebook everywhere all the social media platforms, everybody's rocking their egg bun week - and i thought to do a tutorial for some of us that are on a budget and we can afford. You know the um headband wig sold by some brand, so i thought to show you guys very easy tutorial. You can do it yourself. This is a diy tutorial. Do it yourself, strictly you doing it yourself and you don't have to spend so much to be able to achieve this elegance look so i'll, be also be breaking down all the product that i used the amount that i got them and, at the end of the Day we're going to see how much i spent getting this elegant, beautiful, glamorous amazing wig that i have on right now, and it is something you want to see. Thank you for watching and don't forget to subscribe to my channel. If you haven't done so already, then you click on the notification bell, so you get notified any time. I make a post here on youtube. Now, let's go so for this tutorial i'll, be using the lulutress braided crochet hair and i used four packs and a pack was for seven dollars. You can use any um, crochet hair, you want, and you can definitely get here that are cheaper than this one. I even saw one for like four or five dollars, so it all depends on your preference. But i totally love this one and the fact that you can separate the hair without freeze and it's still very oily and still giving you that you know look that you want to go for it's amazing. I really love this hair extension. We'Re going through all the items of product that i use and for this is the crocheted wig cap make sure you get this one if you're doing the crochet method and i'll also be using my wii band, this one has stones. You can get the one without stones, it all depends on your preference as well and i'll also be using my t, paint and my um noodles and my thread and i'll be using my fx, pins and i'll also be needing my crochet needle, of course. So starting this tutorial, you want to turn your wig crochet cup inside out, as you can see it's the inside of the crocheted wig cap that is outside right now and the reason i'm doing this is because i want to attach the wig band to it. So the first step is to turn your wig cap crochet inside out, and then i'm going to be sure that my wig band is also turned the same way as you can see, i'm just checking and confirming that it's the same thing before i turn it inside Out me, the next step is to use the paint to hold the wig cap and the wig band together, and the reason why i'm doing this is because, when i start using my needle and thread to attach both ends together, it's much easier when you already have It pinned together, so that's what i'm doing right now and one more thing guys uh most times, people ask me the same questions that i already answered in my videos and guys it's not easy going through those again. So please make sure you pay attention as you're watching this video. This video is extremely detailed and every product everything i use is already here and it will also be in the description box. So when you skip you're going to miss out and then you ask me the same question - that's already been answered in the video so make sure you pay attention and don't skip and watch to the very end. So the next step is using my needle and thread to join both ends of the wii cap and the weave band together. So this is basically very simple. If you already know how to use your needle and thread, then you know what i'm doing right now. But if you don't, then just see how i am using the needle and thread to join both sides or the ends of the wii cap and the wig band. Take me to your heart: take me to your soul, never drawn apart. So for the hair and every other thing that i used here, please you can get them from your regular beauty, supply stores anywhere. You are in the world, it's possible not to get the same exact brand that i use for the extension or you can get something close or similar. It'S just for you to go around your beauty, supply local beauty, supply stores and go through the um crochet extensions that they have and i'm sure you get something really close or you get exactly what i used. This is, and i also decided to use the needle and thread method, because i know not everyone, you know, can have access to sewing machine or can even use a sewing machine. I have a sewing machine and it would have been very easy for me to just run it through and very fast, but i thought to do the needle and thread method to show to you guys that, even when you don't have a sewing machine, you can actually Use your needle and thread to also achieve this, so that is why it is very important that in anything you want to improvise really there's nothing. You can do if you don't put your mind into it. Take me arms. Do just what you want. You'Re, the one to trust so when you're done journey both ends together. This is what you should end up having and it is very secure, no loose ends. It is just amazing what you can do with your needle and your thread and when i'm done, i'm just going to try it out see how it fits on my head before i proceed to the next step, so for the next step, we'll actually get into the Fun part of this tutorial, so what i'm doing right now is putting back the weak cap on the mannequin, and then i start to go in with my crochet, but notice. Now that the outside of the wig cap is make sure it is out, as you can see the stone. So that's telling you that this is the outside of the weak hair, but you don't want to make the mistake of doing it inside out because you end up crocheting the product or the extension inside instead of outside of the week. Take me to your heart. Take me to your soul: this is the fun part guys and it's very easy for you to just go through your crochet needle, especially if you already know how to use your crochet needle. This should be as simple as abc for you, so you go through the holes of the extension loop, your hair and just lock it and that's it and another thing: is you want to start in front, so you pull more of the product in front and then At the back of the wig cap, you just you know, scatter the product through because you don't want the back to look fuller than the front side. So please start in front and then, whatever you have left of your extension, you just spread it out at the back of the hair written in the stars. Whatever with me stars. Take me arms. Do just what you want you're, the one to trust. I belong feelings that i never knew forever. The universe has known it all along, so we're almost done um looking and installing our crochet wig and you can see what i have left is not so much so i'm just going to separate or spread that out at the back of the hair. So that is why i told you initially that you want to start in front and whatever you have left, you just want to spread it out at the back. Belong to you be my guiding star cause. I need your loving baby baby. We got chemistry, you gave me feelings, feelings that i never knew and the final stage guys is me just fluffing or separating the coils, and this is totally optional. If you like it this way, it is fine. Well, i wanted more volume, so i had to separate today and while you're doing this, you have to be careful. So you don't get freeze or you don't get tangled, but even if you get any tangles at the end, just get your scissors and just cut cut cuts at the ends and that's it. But you have to be very careful why you're separating you know it's coily. I curly hair, sometimes or most times they always you know, get the freeze and the tangles, but don't worry when you have your scissors just cut off the ends and then you want to make sure it is equal. You can just get your scissors and just trim the ends, and that is it. Your wig cap is ready and you're good to go so for everything that i got was like 49.98, which is not so bad guys if i'm to take out the needles and the thread. Of course, that means most of us already have new doing thread. Everything won't even be up to thirty dollars, and this is what we have guys. This is amazing, so guys i am back and i will be trying out the wig and i just want you guys to see the inside of the wig, and this is what the wig is looking like inside. Remember we did a crochet mixer, so this is expected. Remember the um wake up is next, so uh, let's try out the week and see feelings that i never knew the universe has known it all along. This is really nice and i love the fact that it is really full and if you want to go for that to like separate the hair, you can definitely do that. But i'm okay with this volume i feel like this - is so much hair already, and this is so so pretty and you can also play around with the band. If i don't want the stones to show, i can just fold it inside, like so just to close up the stones, see that and that's it and if i also want to add my headband. I have one of my headband here that i also got for this band. I got it for maybe two dollar or 2.99 and it's also elastic so make sure when you're getting your headband always check and see if it's elastic, if it's not elastic, it will be very difficult for you to play with your headband. So i'm just going to put this in so it blends with what i'm wearing. Oh my god, oh my god, this is so beautiful, so i'm just going to pull that at the back of the hair and just fix it in very well. This is really really beautiful. You can have different headbands, you can work with your headband with you can get black pink, it comes in different colors and you can definitely have one styling, your headband wig. So, like i said, if you don't want um to, if you want more volume for the hair, you can definitely separate the hair, but i am so okay with what i have right now, like guys. This is so beautiful. I'M going to turn and show you guys the back of the hair. You can definitely not see any space in between and there are so much space because i had to. I didn't want it to be too full. I left some parts of the back, but you would never see the space at the back because of the because of the density of the hair. So i'm just going to turn around for you guys to see that and the hair is so firm. It'S not moving. It'S not going anywhere, it's just going to stay on my hair. This is really nice guys. Thank you guys so much for sticking with me to the end of this video don't forget to like share and subscribe to my channel. If you haven't done so already, click on the notification bell, so you get notified any time. I make a post here on youtube until my next video bye, guys


Comments
Yolanda Stephens: ❤❤ SO BEAUTIFUL!! THANK YOU FOR POSTING THIS DIY TUTORIAL!!❤
JASMINE HARRISON HAIRITAGE: I wanna try this. Its soooo pretty❤❤
omoyebagbe christiana: Wow! This is beautiful
Freda Sez: Beautiful outcome and well explained....Now off to Glamma duties since my 14 y/o granddaughter has been asking me to make her one.
SimplySandy: It’s beautiful
Bella Davies: Beautiful hairstyles
Tukesia Banks: Beautiful
Shayla Kelly: Very nice!
Because_I_Have_To:
Chidiebere Wama: You’re beautiful