Diy: Inexpensive Headband Wig
- Posted on 06 December, 2020
- Headband Wig
- By Anonymous
Hey my loves, thank you for checking out my video. For todays video, I am going to be showing you guys how I made me very cute and very inexpensive headband wig.
If you have been on social media or roaming video's on YouTube, I'm sure you've came across the most popular item this year which are, headband wigs. When I searched online, these wigs range anywhere from $200 and up depending on the length and type of hair. Now, although I can not tell you the exact price I paid for my hair (due to it being a vendor I am testing out) you can make this same with as affordable as you like depending on what type of hair you decide to use.
Things I use to make my wig:
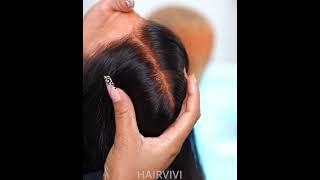
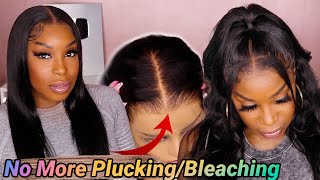
-Canvas head/Stand
-Wig cap (I used an XL wig cap)$5
-Wig grip $3
-Needle (I have 3. It make it faster for me when I pre-thread)
-Thread
-Hair clips
-T-pins ( or anything to hold the wig cap on the canvas)
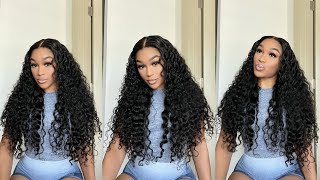
-Hair ( I used 3 bundles of loose way, 18, 20, 22in)
-Cute headbands, scarfs, or whatever you desire to wear on the top of your wig
-Scissors
If you guys have any questions or concerns, please feel free to comment down below. Also, I am try to get to 20 subscribers so pleeeease don't forget to subscribe and join mu family :)
xoxo-BJ
Music By DJ Freedem
Promoted By FreeVlogMusic.com
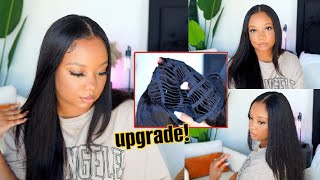
Hey y'all, it's bernie jolies and today we are doing a diy headband wig. Some things you will need is a canvas head. A cap. I got an extra large. You will need a wig grip. I'M using that as my headband and i just decided to use this because it already has the velcro instead of me, buying a headband and sewing the velcro on there. You need thread and, of course, a needle or a couple, some pins to hold down the wig cap, some scissors clips to hold the hair of place and your bundles. I am using loose wave three bundles in a 1820 and 22 inch. They are so beautiful and, last but not least, your beautiful headbands, your favorite ones. I got these from my local beauty supply store and let's get started with this d i y now. What we are doing right here is going to go ahead and attach the wig grip to the wig cap. I sewed the stitch side of the wig grip to the cap and, right now i am just measuring where i want my wig grip to be placed on my head. So here i'm just going to go ahead and use some t-pins and pin my wig grip down. I am putting two at the front and then one each side where my ears will be now right here. I am just making sure that the headband has enough stretch. I definitely want to go ahead and make sure i do this before sewing it down, because once you sew that grip or the headband down it is no going back. So once it's to my liking, i'm going to go ahead and sew. It grip to my wig cap. I join it from where the t pin is from one side of the ear to the other right here. You just see me sewing and sewing the wig grip to the cap, and this is how it should look now right now. What i'm going to do is just sew down where the t pins were where my ear would be, i'm going to sew from the cap to the front of the cap. If that makes sense, once you loosen it, it should look like this and when you pull it back, you'll see the cap underneath the wig grip. We are actually going to go ahead and cut that extra cap, but not until the end now right here. All i'm doing is going ahead and make my markings on my cap, where i am going to sew down my tracks. You don't have to do this, but this is actually my first time doing it and it actually helped me stay on track to where i am sewing my tracks onto. If that makes sense, it actually made it a lot neater and faster to me. In my opinion. Now, starting my 22 inch bundle, i am going to double the bundle and sew it onto my wig cap here. I'M just sewing and i jump to where i finished, and here is the hair. It'S so pretty. So pretty i'm trying out this new hair vendor. For my company that i'm starting, so i can't really give you all the details, but it's so beautiful. So now i'm on to my second bundle, which is the 20 inch, and with this one i will not double, i'm only going to sew it in the single layer. I usually only double the first bundle, so the hair can be really thick in the back and then i sew the second and third bundle in the single layer. I don't want it to be thick all over, especially at the top of my head to kind of make. It look really really wiggy all right. So here we go, we jumped again to the third bundle and then again i am not doubling this bundle. Neither and i'm sorry i'm getting too turned up on my music alexa was playing my jams. Y'All girl get back to work, okay, okay, okay, back to business back to business, and then i'm just sewing and sewing and sewing and boom. So now we are to our very last track, and what you want to do right here is take that last track and sew it directly to the wig grip by sewing it to the wig grip, we'll eliminate the wig cap from showing, and also to close off Your wig we're almost finished y'all almost finished, and i want to apologize if i'm talking really fast. I just don't want this to be a really long video. So if there's anything that you did not understand - or you want me to give a little more detail on then just comment down below and i will create a more detailed and thorough video. Okay, move y'all back a little bit cut this string and we are finished. Look how pretty she is. Oh, my god! I love it so right here, i'm just gon na throw her in a low ponytail to show you how it looks. Look at that! Oh, my god, i love it. Okay, okay, let's see, let's see if we can rock this in a messy bun. Please can't nobody tell me this ain't, my hair. When i throw this on honey, you tell me that this bun is not my natural hair. You can't! Okay, wait: wait, wait before you run off, we ain't done yet we're not done yet almost, but we forgot something else to do right here. I just want to kind of show you a close-up of the construction of the wig. I think it's very very neat. In my opinion, and of course you can adjust as need be, but the last thing that we almost forgot that extra wig cap we got ta cut that off. Remember y'all can't be walking around with this material. Underneath your headband, you can't so right here. I'M just carefully cutting the extra wig cap from underneath the headband. You want to be very careful with this, because one wrong snip and your wig is done for y'all, okay, y'all, i'm back, and it is the next day and we can't leave without me trying this thing on right. So what i'm just showing you is. I took my little edge brush and i took some jam and fixed my edges. A little bit created a couple of baby herbs. Now, of course, you want to put on a cap just to protect your natural hair, so the wig will not break your hair off from the friction of the rubbing. I don't look cute as a ball. Hair. Look, love, science sign so pretty. Okay! So now we're gon na go ahead and make sure the velcro is to the back of the head and put this puppy on now right. Here, i'm just going ahead and adjusting her a little bit to fit to my liking. I'M gon na go ahead and they'll throw her to the back and there you see it now to me it looks a little more natural when i have my natural hairline showing so i'm just going to pour her back just a little bit. But of course you can wear it how you desire - i'm loving this show - oh my god, i'm so in love and bam, throw a cute little headband on top and you are good to go. But, of course, this isn't the only style that we can wear it in. So, let's play around. Let'S see how many other styles we can do with this beautiful diy, headband divorce, okay, guys, so i'm gon na go ahead and wrap it up now. Thank you. So very much for tuning into my channel. Please do not forget to like comment and subscribe and if you have any questions or comments meet me down below. Thank you for tuning in and until next time later, gators
Comments
Aretha P: Beautiful sis thanks for sharing