Headband Wig Lazy Girl Hair No Glue No Sewin
- Posted on 09 December, 2020
- Headband Wig
- By Anonymous
#headbandwig#lazygirlhairstyle
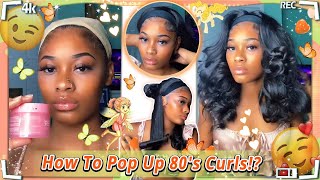
hey guys thank you for tuning into another video
in this video i tackle the headband wig trend
i used 2 packs of indian synthetic hair valued at 4usd a pack and an old headband and a wig cap valued at 1 usd
the hair can be purchased at jays hair affair on fb
social medias
marcy_wacho
snatched_by_marcy
marceline mavhondo
wigs by marcy
enjoy
Hey guys, let's just jump straight into it in today's video, i'm going to show you exactly how i made this headband wig. Now this video is going to be in two parts, so the first part is me actually making the headband weak and then the second part is me installing the handbag wig on my head, so that second part will be definitely in another video. I hope you guys enjoy this video, don't forget to give me a thumbs up subscribe to my channel and let's get into it guys. So the first thing i'm going to show is everything you need. So obviously you need your mannequin head and then you need your hair. So what i did i went ahead and bought synthetic hair, because this was my first time trying to make this headband weak and i didn't want to spend a ton much of money in case it didn't work out. So the next thing you need is obviously your wig cap. Now, the one that i have is like a knitted one and it's breathable you're going to need the headband, and i used an old, headband, headband and then you're going to need sewing thread. The one for clothing and then a weaving thread, the one that we use for waves, so the first thing you want to do is obviously insert the wig cap on your weak head and, as you can see guys, i was struggling a bit to insert to properly Position this uh this wig cap on the wig head, because my stand uh is not stable. It moves around. So the next thing you're going to do is obviously put on the headband onto the onto the wig cap and then see how you like that. Then you move into the sewing process, so what you guys are going to notice is that inside my headband, like i'm, showing you there's a lining, a sewn lining that lining is what i'm going to use to sew um to saw the weak cap to know. Actually, sorry to sew them to sew the headband onto the wig cap. Now this helps so that when i flip over the um, the headband, you won't see any sewing lines, and this makes it so much neater. So i'm just going to go around the recap during this process and then i'm going to cut the back of the wig of the headband after i'm done sewing so that i can put some elastic and that elastic part is going to be in my next. Video is so guys after you're done sewing the headband right around your wig cap and you've cut it at the back, like i said, you're going to open up your headband and then it's going to look exactly like this, then you're going to start sewing your hair Onto the onto the wig cap, as you would normally do so you need to make sure that you've left space at the back um for where the headband would tie in together. So what i had done initially is. I had made a mistake. I had sewn directly with the wig cap starts, but then i ended up um. I ended up removing that and sewing it again, because when i tried to put them the head, the headband together at the back, it just wasn't showing up nicely sorry for that burp. So i ended up undoing the back uh when i finished and excuse that fly. That'S disturbing my video, so i'm just going to saw the rest of this wig and then i'll show you the next step when you're done so on this part i was halfway, or rather i was done with one bundle of weave and, as you can see, i Used black thread uh, the color of the thread really doesn't matter, because this is a headband wig. Everything is going to get covered up now. I was right at the top, so i'm going to show you how to close off this headband wig. So what you want to do is uh saw like um across side to side and keep opening up the headband as you move closer to the top of the hair, because you need to sort of like sew your weave into the headband, so that when you uh, Then close up the headband and put it back to where it's normal. It then covers up all those track lines. So don't worry about your track lines being ugly, as you can see, i'm opening up the weave and then i'm sewing so that when i do cover it up, you won't even see anything. So don't worry about your tracks being ugly uh. This was my first time doing this wig and i'm actually quite pleased with how it turned out so you're going to continue doing this until you get to the top. I think this is everything i have to say i'll. Let you guys watch this video and i'll see you in part two of me installing the video or sorry of me, not installing the video installing the wig onto my hair and also showing you how i put the rubber band uh at the back to fasten the Um to fasten the the headband itself, so yeah guys. Thank you very much for watching. Don'T forget to subscribe to my channel hit on the notification bell. Give me a ton of comments down in the description box and thank you again guys, i'm now over 570. Subscribers. Thank you very much for over 570 subscribers and i hope to see you in my next video guys. Bye foreign, oh is foreign. Oh with my lovely family,


Comments
nyasha chirenje: Beautiful wig❤️
Melissa Tafadzwa: Woow this is amazing, can wait for part 2
Tatenda Jazi: You are so talented and creative Mrs M... great job there
Fit Taku: Well done sis
Yeukai Loreen: U are talented shem I can't do that even if I'm paid
Manda Maps: This is so clever wow
Mufaro Mazodze: You are very Talented Sis
Yeukai Loreen: Hey girl. Beutiful wig this
Aretha P: Beautiful sis
Paidamoyo Siyawareva: ❤️
Yeukai Loreen: #roadto1k
Yeukai Loreen: But girl why didn't u show us wakapfeka madoda was itching to see u rocking the wig
Takudzwa Mazongo: talent who chooses music
Takudzwa Mazongo: handbag or headband