How To: Crochet Headband Wig Using Freetress Deep Twist Hair
- Posted on 22 February, 2021
- Headband Wig
- By Anonymous
Hey beauties !! In this video I show you how you can achieve your own Crochet headband wig!! You will need Bobby pins or hair combs to hold wig securely in place
Items needed
Wig cap/ crochet wig cap
Crochet hook
Mannequin head
4 packs of FREETRESS deep twist hair
Bobby pins/ hair combs
This is synthetic hair so if it gets tangled or frizzy don’t worry just spritz the hair with some water and rub some hair mousse or wrap foam throughout the hair with your fingers and the hair will be more manageable and the curl pattern will remain
Trim and cut layers into the wig if you feel the need..
#wig #diy #hair #headbandwig
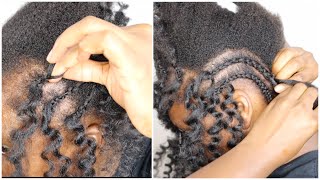
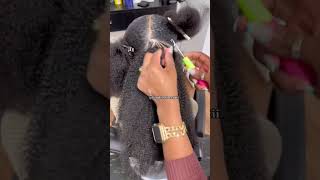
All the bad things you heard about crochet hairstyles forget about them. I'M gon na show you why you need this crochet headband wig in your life right now you need a clothes top weaving cap or a crochet cap. You need a crochet hook and, of course, you need crochet hair. I love freetress deep twist. That'S we're using this video today freetress is my favorite brand. You need a mannequin head. I prefer the mannequin heads that are not made of styrofoam, because the measurements are more accurate. Now, roll up your sleeves and let's get started, you're going to take your crochet hook and you're going to slide it into about two or three holes: you're going to pull the hair through and you're going to loop, this hair at least four times, because this is A looser texture and you want to make sure that it's secure in some areas where you need more security, you're going to loop it five times but that'll be later on in the video. So, as you can see, i am sliding the crochet hook through at least three holes, two to three holes and you're, going to loop it four times and then you're going to slide it up to secure the knot. Now it's not going to stay tightly knotted, but that does not mean it is not secure. If you loop this hair four times it is secure. So don't worry if you see the knot starting to loosen, because that's just natural with this hair texture and of the freetress brand, it's a little silky. So it's going to kind of slide and looping is just taking the loose ends of the hair and pulling it through the hole. You want to make sure that the crochet hook is closed when you're sliding it back through the hole so that it doesn't get stuck or snagged, or anything like that. As you can see here, i got it stuck, but that's okay. I just grabbed it with my fingers and still pulled it through open the loop and pulled the hair through one two, three four and then you're going to slide it up to make a knot. Now we're into the second row. You want to go up about an inch and you want to continue the same process of sliding the crochet hook through at least two to three holes and you're, going to loop it four times now you want to try to do a brick layer pattern. So you see this space right here. That'S where i'm going to stick. Try to stick my next strand. That way you can achieve a fuller look without having so many strands in your hair. It eliminates a lot of the bulk, because this hair can get bulky really fast. If you use too many strands, so we want to make sure that we're spacing it appropriately so that we don't have a huge head of hair. The the process is pretty monotonous, so um we're just pulling it through the hose looping it four times and securing the knot, and this is about the size strands that i'm using i'm using really small strands, because i this hair will get it's going to start to Get full, but i don't want it to get super bulky, so i'm using smaller strands so that i can use less packs of hair and eliminate a lot of the bulk, not to mention smaller strands of hair. Hold the knot a lot better, and this is what one pack of hair looks like. So, as you can see, i have it pretty spaced out now i got a closed top mesh cap, so i'm going to show you how to secure that loose end you're, going to stick your crochet hook through the holes and you're also going to push it through. The hanging piece of cap that's up there. I know that just sounded really confusing, but just watch what i'm doing. We are using the crochet hair strand to securely attach the loose part of the cap to our cap so that it doesn't lift up or flap around while we are wearing our wig. You want to make sure that you are looping this five times so that it is extra, secure and you're going to do this all the way up until you get towards the top. Continue to add your strands like i showed you in the beginning until your cap is covered, we're not going to worry too much about packing the top, because this is a headband wig. So we're going to pack the front and fill in the spaces that are in the front, which is what i'm about to show you now normally, when you make a crochet wig, you want to really pack the top, because that's the part, that's really going to be Showing but this is a headband crochet wig, so i wanted to make sure that i left some space at the top so that it's not too full and i wanted to pack in the hair in the front where the headband will be because i didn't want spaces In the front, i'm trying to create a more filled in hairline, so to speak. So once you get to the front, i laid my mannequin head flat and i started to add thin strands closely together. So, instead of putting it through three to two holes, i was trying to squeeze in strands anywhere that i could squeeze them. Some of them were still spaced out about two holes, but i was trying to go in different directions so that i could fill in as much space as i could with strands of hair. That way, when i put my headband on, i don't have to worry about my hair showing and i can kind of do a half up, half down type thing. So i wanted to make sure i really packed the front of this wig once you've added all the strands you need. It should look something like this, where you can barely see the mannequin head and that's how you know you've got it right and, as you can see, it is so beautiful once you put it on, you can add a headband, which is what i created it for You can put on a head wrap, you can do a half up, half down with a headband which is really cute and you can even not wear anything on no headband at all and it still worked out really cute thanks so much for watching. I hope this helps bye.

Comments
Jessica Washington: Thank you for this inspiration because I was just thinking about making one and then the notification popped up. It looks great
Itsmy_journey_: Very cute and detailed tutorial