Pre-Colored Highlight Bob Wig Install | Start To Finish | No Glue Wig Install Ft. Luvme
- Posted on 11 October, 2022
- Headband Wig
- By Anonymous
Want to install your wigs without glue? Be sure to grab a glueless wig install kit, find ours here: https://dolcemateo.com/collections/wig...
Direct Link of the unit in the video: https://bit.ly/3CRBcEF
Promo code: Dolce
Shop website: https://bit.ly/3CJHVQJ
Instagram: https://bit.ly/3CI11GY
Facebook: https://bit.ly/3CJl0oB
YouTube: https://bit.ly/3BgSJDn
hashtag:#luvmehair #undetectablelace #bornnatural #mostnaturalwig #hdlace
*NOTE: All tips provided on this channel are based off of my personal experience and are of my own opinions, I am not claiming to be a professional or an expert*
SEND ME SOMETHING
DOLCE MATEO
P.O. Box 780804
Orlando, FL 32878
VISIT MY WEBSITE: http://www.dolcemateo.com/
SHOP AMAZON STOREFRONT: https://www.amazon.com/shop/dolcemateo...
Social Media Links:
TikTok: https://www.tiktok.com/t/ZTdsfhFf7/
Instagram: http://Instagram.com/dolcemateo
Business Instagram: http://Instagram.com/dolcemateowigs
Facebook Page: https://Facebook.com/Dolcemateowigs
WIG MAKERS FACEBOOK GROUP:
https://www.facebook.com/groups/thewig...
FAQs:
Where are you from? South Florida
What's your ethnicity? I'm Haitian-American
How tall are you? 5'9
Related tags:
How to bleach knots, how to pluck lace, how to customize wig, hd lace wig tutorials, wig install tutorial, wig customization tutorial, glueless wig install, wig tutorial, customize a wig easily, how to customize a wig, custom wig tutorial, how to bleach and pluck closure, how to pluck and bleach frontal, glue less closure wig install, glue less frontal wig install tutorial, lace front wig, lace frontal wig tutorial, where to place elastic band, frontal wig elastic band method, frontal wig glueless elastic band, where to place elastic band, luvme wig install review, luvme honest review, unsponsored wig review, luvme wig review, luvme glueless wig install, luvme wig install review, no glue no spray wig install, luvme wig install
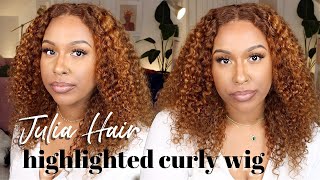
Yeah I like this. I like this, a lot all right guys. We have another unit from Love Me wigs. This time I decided to get a pre-colored curly bob unit. I ordered a 12 inch HD Bob curly wig. It already came with pre-bleached knots, an elastic band already inside, so that pretty much eliminated two steps, but I am a creature of habit, so I did go back in and bleach the knots again just because I like I like more scalpage for my units, but nevertheless The unit is super full. It is 180 density after bleaching. The knots I did use some blue shampoo um to shampoo the hair just to get rid of any further brassiness here is the unit after it is completely air dried. These are the natural curls and, as you guys can see, although I ordered a 5x5 closure wig, it came pre-parted and I only got about this is maybe three inches of parting here. Yeah. Look at the rest of that closure space. I want to part all the way down to the edge of that closure, so I am definitely going to use all five inches of this 5x5 closure wig. Now I have my staple items that I like to use when I'm customizing wigs. I have to have my cop comb on Deck. I have to have a good metal in rat tail comb and a wax stick. I have these wax sticks on my website, they're, currently on sale. So get you one says these three together just make magic. I don't know where the footage went of me going through the unit, I'm hot combing, the hair as flat as I did, but I was able to salvage this footage and show you guys the end result here. I am just adding my finishing touches. I do like to go in with some spreads or hair holding spray, just so that that that lift that little hump that I created in the front it's there. I did not pluck the hairline you guys. This wig came plucked like this, and I didn't want to go in um and you know pluck any more hair because I felt like the the hairline was pretty natural. I am going to use some makeup, I'm using this Ruby, kisses level 9 foundation and I'm using a slanted, angled um brush just to Define The Parting a little bit more. I did bleach my knots and mind you. It came pre-bleached, but still some of the knots are just stubborn now, in order to close up the wide parting. I am using this temporary hair color, along with my metal and rat tail comb, just to sharpen my parting, a little bit more and kind of close that wide space, because I did end up over bleaching some of the knots and I ended up bleaching. The hair. Now to seal the deal, I'm using my spreads this Mega hold well, no, this is a firm hold Spritz. They do have a mega hold version of the Spritz, but just to seal that um temporary hair color in I used the Spritz, and here is how the unit is looking now to keep everything safe and secure. While I Define the curls on the wig, I did use a headband. I am using water and a little bit of cream of nature. Mousse, I'm using water and cream of nature mousse in the spray bottle um to saturate the hair, and I'm going in with this wide tooth comb just to detangle get any kinks out the curls. And after that I am going to use a Denman brush you're, going to see that in just a second there we go, the Denman brush is going to help Define the curls okay. I decided to use mousse this time um rather than just water, because I actually wanted the hair to dry in a certain way. I kind of wanted to have that wet look, but it be dry. I hope I'm making sense like, even though the hair is dry. It looks wet because curly hair when it gets dry um it tends to get frizzy. So I wanted it to be more of a tamed curly. I hope I'm making sense but yeah. That'S the look. I was going for this right here now mind you. The hair is still a little damp in this um in this scene right here, but let me show you guys how it looks dry. This is the unit completely dry and I'm going to cut that HD lace, because we are about to install this wig, I'm using my um, my zigzag shears, and there goes the lace is completely cut. Now I did not use um, I did not use any uh. I don't think I use makeup. I don't think I use any makeup, but we'll see um, because it's HD lace, I I didn't feel like I needed to use any makeup like it's. It'S super thin like one thing about love me, they're, HD, wigs are definitely HD. Like it's that real thin film lace - and I can definitely appreciate that, but, as you guys can see, I am using the Fantasia firm hold spreads. I am using my melt bin here to help that Spritz kind of you know adhere a little bit and there go my handy dandy fan. You can find those on my website too that helps to dry the product and voila. I did use a little bit of makeup. I did because I wanted to kind of blend the lace in just a smidge. I didn't use too much just a little bit of founded um Foundation that was left on my brush, and this was the result. I'M loving it. What are you guys think I've never worn a pre-colored wig like this and the fact that lovely had this on their website and y'all. It'S super duper affordable. I'M gon na link it down below, along with any available coupon codes so that you guys can save at checkout. Thank you so much for watching and I'll see you in my next video bye,

Comments
Dose Of Dadaaa: Love how informative and to the point this was
Dose Of Dadaaa: It all came together soooo welll