Diy Headband Wig || Diy How To Make A Straight Headband Wig | Headband Wig Tutorial
- Posted on 23 June, 2022
- Headband Wig
- By Anonymous
DIY HEADBAND WIG || DIY HOW TO MAKE A STRAIGHT HEADBAND WIG
Thank you so much for Watching
In this video I would show you how I made distressed/butterfly locs using Kinky hair and kanekalon hair. This tutorial is very explanatory. Please let me know your thoughts and ask me any question in the comment section down below
Products used:
Darling Silky Straight hair
Spritz spray
Bonding glue
Dome cap
Headband
Scissors
Needle and thread
_____________________________________________________________________________________
Contact me: [email protected] _________________________________________________________________________________
Let’s be friends and Connect
Instagram- Stephanora
TikTok-Stephanora
Snapchat-Stephanora
Twitter-Stephanora _A _________________________________________________________________________________
Filming Equipment and Editing Software
18 Inches Ringlight
Iphone Xs Max
Imovie
_____________________________________________________________________________________
Philippians 4:6 Do not be anxious about anything, but in every situation, by prayer and petition, with thanksgiving, present your requests to God. _________________________________________________________________________________________________
#howtomakeheadbandwig
#howtocrochetdistressedlocs #diycrochetdistressedlocs #diycrochetdistressedfauxlocs #diycrochetdistressedlocswithxpressionhair #howtodistressedlocswithkanekalonhair #diydistressedfauxlocscrochet #diydistressedfauxlocsnoconrows #diydistressedlocswithbraidinghair #lovethspeakspassiontwists
#expressionbraidingextension #trendinghairstylesxpressions,braiding,
#expressionbraidshairstyles
Braids, Box braids tutorial, Ponytail tutorial, cornrows tutorials, natural hairstyle tutorial, natural hair tutorial, stitch braids tutorial, natural hair, makeup, gele, fan gele,
#butterflylocs #distressedlocs #curlycrochetwig #crochet
#braids #boxbraids #cornrows #ponytail #updohairstyles #wigs #stitchbraids #naturalhairstyles #natural hair
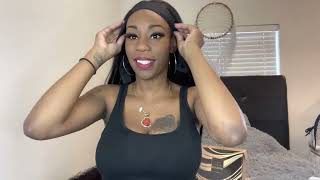
Hey guys welcome back to my channel in today's video, i'm going to show you how i transform these bundles of hair into this diy headband wig. So here are the products you're going to be needing to achieve this headband wig. I have hair spray sprint spray. Um burning glue and this dome cap and regular headband. So let's get started my three bundles of hair. I'Ve used this hair in a previous tutorial, where i styled a ponytail on my friend so i'll leave it linked above for you to go check it out. So yes, here i just went ahead to measure the part where i wanted to start placing the wefts of the hair. Then i went ahead and i sprayed some of the spring on the top cap and i went ahead to apply the bonding glue on the weft and i started placing it on the dom cap. So you guys this tutorial is pretty explanatory, so just watch and i'm very sure, you'll be able to recreate this hey guys. So i'm going to be using the flip over method. In this tutorial i wouldn't be cutting the weave at all. I'M just going to keep flipping over, so you guys here and got into the last part of the first bundle, and i was done attaching it onto recap and you guys when i see my hand got so sticky and messy as i was applying bonding glue. I really don't know why, but it just made me super uncomfortable and i'm like nah. I think i need to sew the remaining bundles on this recap. So please do whatsoever, you know, float you both like, if you think you might prefer. You know just bonding glue straight to the point. Please go ahead, but for me i just felt like i should sew the remaining part of the hair, because i just didn't like how messy it was getting, like my hand, was just getting so sticky, so much bonding glue on my hand - and i didn't want any Of that, so i just went ahead same process flip over sew flip over so and if you notice here, i'm leaving a part of the front part of the wig cap you're going to see towards the end where i don't so i don't necessarily have to sew To the to the band of this of the dumb cup, rather because i'm still going to be attaching the headband to it, so yeah so here is a is a clear, um declarer view. You can see that i'm not swinging any wefts on the front band of this dumb cup. Okay, so here i was already on the third bundle and i just kept, you know sewing it closely to the front part of the dome cap. You know i was just taking it back and forth back and forth back and forth. I slowed down this area of the video so that you can see what i was doing properly. So here's the part we're waiting for which is attaching the headband onto the recap. So here i just went around and i placed the headband. You know on the recap, as though i was putting it on my natural on my normal head. You know so i placed it on it yeah. So please just look very closely at what i'm going to be doing, because it's very important so here i just zoomed in for you guys to get a close-up view. So you see this last part where i sewed on the on the dome cap. The last part where i sewed the weft i'm going to be attaching this sewn part on the headband to that last part where i sewed all the wake up. I hope that makes sense you guys, but please just look at my hands. I promise you: if you pay attention, you would definitely be able to do the same thing, because it's not that difficult. So here i'm just sewing closely to the weft just like that, just so closely, so that when you flip over your headband, it's going to look very seamless, so yeah. So here i was done sewing the headband. I just saw to the ear part i didn't sew. It all the way back, so you don't have to do that. It'S not going to show anyways. So here i just went ahead and i brushed the hair. I really like this hair. You guys started see what it looks like it's so beautiful and very convenient please. If you found this video helpful like share, comment and subscribe, it really helps my channel when you like this video, so that other people can see this video as well. Thank you so so much until my next, i see you guys stay beautiful and stay blessed. Bye guys

Comments
Freedah Vlogs: Where was I when God was sharing talent?