Diy Half Wig Into A Headband Wig | Bohemian Passion Spring Twist | Deja Vu Hair | Missuniquebeautii
- Posted on 23 February, 2021
- Headband Wig
- By Anonymous
#headbandwig #passiontwist #springtwist
DIY Half Wig Into a Headband Wig | Bohemian Passion Spring Twist | DeJa Vu Hair | MissUniqueBeautii
In this video, I show you guys how you can transform any half wig into a headband wig. This is extremely easy and very beginner-friendly. I also show you how to transform a wig that you can make from scratch! Like this video, share it with your friends and family, and don't forget to subscribe to my channel to be notified of my future uploads.
Follow Me On Instagram@: https://www.instagram.com/missuniquebe...
Follow My Business Instagram@: https://www.instagram.com/missuniquebe...
Shop My Website https://pressedbymissuniquebeautii.com...
Discount Code: YouTube25 for 25% off the Entire Website!
Shop for your favorite beauty essentials! Press-on Nails, Lip Gloss, Mink Eyelashes & MORE!
I also make and sell Headband Wigs, Half Wigs (without the headband) Lace Closure Wigs, Frontal Wigs, & Drawstring Ponytails. If you are interested in having me make a wig or drawstring ponytail for you, please send me an email at [email protected]. SERIOUS INQUIRIES ONLY!
Products Used:
Wig Stand
https://www.amazon.com/gp/product/B07Q...
22-inch Mannequin Head
https://www.amazon.com/gp/product/B071...
Crochet Wig Cap (Shake & Go)
https://www.amazon.com/gp/product/B01J...
T-pins https://www.amazon.com/gp/product/B07F...
Crochet Needle https://www.amazon.com/gp/product/B075...=
Cute Headbands That I Purchased!
https://www.amazon.com/gp/product/B08H...
https://www.amazon.com/gp/product/B01F...
https://www.amazon.com/gp/product/B07S...
https://www.amazon.com/gp/product/B07Q...
https://www.amazon.com/gp/product/B07W...
https://www.amazon.com/gp/product/B081...
Equipment Used:
Cannon SL2 https://www.amazon.com/gp/product/B071...
Neewer Back Drop Kit https://www.amazon.com/gp/product/B07P...
Ring Light https://www.amazon.com/gp/product/B08D...
Rose Gold Backdrop https://www.amazon.com/gp/product/B01C...
Instagram: @MissUniqueBeautiiLLC, @MissUniqueBeautii
Facebook: @pressedbymissuniquebeautii
Website: pressedbymissuniquebeautii.com
E-mail: [email protected]
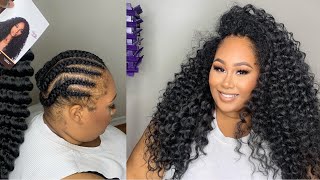
So so hey my beauties, it's miss unique beauty and i'm building and i'm back with another video if you are new to my channel tap that subscribe button so that you won't miss out on any of my new uploads and if you have already subscribed what's good. What'S poppin welcome back to my channel the items that i'll be using in today's video is the shake and go crochet wig cap with combs, my crochet needle a clip and some t-pins, the hair that i'll be using in today's video is by a brand called deja Vu - and this is their bohemian passion twist - and this is supposed to be a one pack solution - it has nine inches 10 inches and 11 inch hair in it and it's 105 strands. So i'm gon na test it out to see if i only truly need one pack to complete this wig. Now this wig is not going to be a traditional headband wig. It will be a half wig that you can add your cute little flare of headbands to it at the end. So what i'm doing first is applying my wig cap to the mannequin, securing it down with some t-pins and then we're gon na get right down into installing these twists. The look that i was going for with this wig was for the wig to look like everything is all one length so, instead of me, starting with the longer length at the bottom, i am going to be starting with the shorter length at the bottom. Then the 10 inch is gon na go in the middle and the 11 inch is going to go in the top in the front section. I do want to mention that the loops on this hair was extremely easy to use and because they were so easy to open up. This leg literally took me no time to make now, because i am using three different lengths and i want to put them in three specific areas of the wig. I am gon na start out by just mapping out exactly how far up i want to place. The 9 inch and how far towards the side that i want to place the 9 inch as well. Now, because this wig is meant to be one length, you want to make sure that you're dividing each length evenly throughout each section of the wig. So i am going to start off by staggering each of the twists going up in each row, and i am going to divide this one pack into three sections. Just to make sure that i am placing the nine inch and the areas that i want them to. Be now after i'm done mapping out exactly how high i want these twists to go in the 9 inch length. I am going to go back in with the extra strands that i have left over and i'm going to use them to fill in this section. This is what the back section of the wig is looking like after i went ahead and installed all of the nine inch length in this section for the side sections i'm going to divide the 10 inch length into two evenly and i'm going to install half on One side and half on the other side, i'm not going to install any of the 10 inch towards the back section in the middle only on the sides of the wig. Now, of course, i am going to begin by laying my foundation with the staggering method. Then i'm going to go in and fill in this section with any of the twists that i had left over and then i'm going to come back and show you guys how to do the front for the front section and the top section of the wig. I will be installing the 11 inch length and when i install any type of crochet styles in the front section of any of my wigs, i like to crochet each twist closer together, because the front section of the wig is what will be seen the most. And this is where most of our styling will take place. So you want to make sure that you're filling in the front section as close as you can, and you want to also continue to do the staggering method as well in the front section now, as you guys can see, i am kind of spacing them a little Further back the further, i go back on the front section of this wig, because i wanted to make sure that i was gon na have enough twists to complete the wig. And, of course, if i have any hair left over, i will be going in and filling in any of those spaces that i feel need to twist the most now i'm going to go ahead and finish up this section off camera and i'll be back to show You guys the finished product and my thoughts on this hair. This is what the wig is looking like after i went ahead and installed the entire pack of this hair onto this wig cap. Now i'm gon na go ahead and show you guys my slow-mo, so that you guys can check out the wonderful movement of this hair. Now i'm gon na go ahead and show you guys what this wig looks like with two headbands that i thought would go perfect with the color of this hair and as i do that i'm gon na go ahead and tell you guys my thoughts on this hair. Now my first impressions of this hair is that it's extremely lightweight on your head. I love the burgundy color of this hair and i love that it's mixed with black, so that, if you do not want the hair to look too red, you still have that black. In there that helps to calm down the color, but what i will say about this hair is that i do not believe that one pack is enough for me now. If you are the type of person that doesn't mind the lightweight, feel and look of this hair, then you can go ahead and definitely use one pack of this hair. But i do feel like i could have went in with about a half a pack more of this hair, if not the full entire second pack, and that will just help to fill in a lot of that. Gapping that you guys see in the back and a lot of the gapping that you see in the front section of this wig, but nevertheless go ahead and add your favorite headband and sport. This wig in this video. I was able to show you guys how to create your own half wig, using the one pack solution, bohemian passion twist by the brand day, job vu. I did go ahead and purchase this hair from my local beauty supply store for twenty dollars. So for a one pack solution, hair, it is a very affordable price. I really hope that you guys enjoyed this video comment down below any questions that you may have like this video and don't forget to subscribe bye. My beauties you
Comments
Delores Berry: You did a great job explaining how you did everything. It was so easy to follow you. I def will be saving this tutorial for future reference. Good work
Asia Main eVent: Girl... I ❤U... I can't do any type of braids, passion twist.. Etc... Because I get major headaches. I like to snatch my wigs off.
Evelyn Sheffield: Great job!!!❤
Joe Murray: loved the tutorial
As Told By Chy: I didn't know if you don't sew the headband on its called a half wig. I was wondering what a half wig was all your videos inspired me to buy the same wig head and I'm going to start making crochet wigs thank you ❤
TASHA MACK: Great job. I need to purchase some headbands for sure.
Melinda Richardson: love the wig
JAG the Diva: Nice I must try this thanks
Kamesha Grant: Nice
Terri: Where did you get your mannequin head from?
Virgil Lopez: any more videos out soon?
Hilda Shaw: hard work was put into this