$15 Diy Headband Crochet Wig |4C | Outre Xpress Afro Springy Twist Hair|Colour 2T1B/30| Chev B Inspo
- Posted on 02 January, 2021
- Headband Wig
- By Anonymous
Make your own headband wig with this simple tutorial.
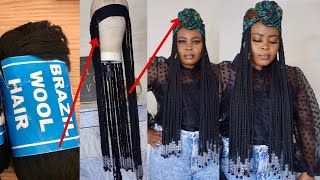
It is a natural-looking crochet afro with just one pack of hair for about 15 CAD at a local beauty supply store. It has 3 bundles in a pack and comes pre-fluffed.
The 4-week update and how to maintain this crochet Afro: https://www.youtube.com/watch?v=STNSOj...
Detailed crochet tutorial - How I installed the crochet Afro on my actual hair: https://youtu.be/8Rt7hnF76D0
How I styled the crochet Afro : https://www.youtube.com/watch?v=uRfx7X...
I have a Detailed Makeup Tutorial| No foundation| Hooded eyes| Oily Skin| Dark skin| Sensitive eyes| Women of Colour
Follow me on IG and Tik Tok to see how I rocked the wig - @chikagodslight
Products used:
1. Crochet wig cap
2. Dome cap (if you are not using a mannequin, like me)
3. Elastic headband
4. Crochet Needle
5. Velcro
6. Hair extension – X-Pression Twisted Up Springy Afro Twist color 2T1B/30
7. Needle and thread
8. White marker or correction pen
9. Wig combs (I didn’t use it)
If you need it, sew it under the mesh cap before adding the headband.
Citations:
• Hair Inspiration: @Chev B on Youtube.
• The ‘X’ symbol - Image by Clker-Free-Vector-Images from Pixabay
Music:
1. Music by Jaylon Ashaun - Pretty Girls - https://thmatc.co/?l=C3234404
Hello and welcome to my channel, my name is chika, i'm going to be recreating one of chef's bee. Most recent looks, i love the style and i love the look and i want to recreate it with with a synthetic extension i'm going to be showing you which one i'm using this. In fact, this has become one of my favorite extensions to use because it's it's just so beautiful. It makes natural hair so good and it lasts for a good time, like that's twelve, well yeah, so i got this one for about 15 canadian dollars. The other things you'll be needing are a mesh wig cap. This is what you will crochet the the hair onto you will need the crochet pin. Of course, you will also need needy one thread and you need the unthreadable door and you definitely will need vector and any headband of your choice. So i am going to be doing all of this on my hair on my head, because i do not have a mannequin or a styrofoam head. If you have any of that perfect, it's going to make your life much more easier, but right now i do not have that, and i am just going to wear this. It'S a dome cap, i'm going to wear it on my hair on my head yeah, so that i do not crochet into my hair. Okay. So, let's get started taking down my hair, i'm gon na make it as flat as possible you! You will not be needing a dome cap if you're using a styrofoam head or a mannequin head. Okay, you only need this if you're going to be doing if you're going to be creating the wig on your head, so just ignore all these marks. I use it in my practice and do not not useful so now i am going to be sewing on the headband to the mesh cap. I'M going to do this before crocheting the hair so that it's much more easier. The headband goes around my head. Well now i want to know the part that has to be sewn to the front of the weak cap. I already marked it. I used a correction pen, you can use any pen, you have or anything that would show through your headband. So from this point is where like this is exactly where i have to sew it to like from the forehead all round to this white point. So i already did the first part of the velcro. I sewed it to the band, and so this part of the vector, especially because this is diy - i am going to be testing it as much as and as often as possible, so that i don't make a mistake and have to start over again because that part On its own is frustrating, so this part will have to go on top here. So definitely the second part i'll be sewing. It'S here on top this way, so i'm just gon na go in so now i'm done sewing it on i'm going to put it around. My head and then test the velcro. I just realized. I made a mistake, so i was supposed to have this band on top the mesh, but i did it the wrong way. Oh, i took the band off so that i can repair it. So it's going to go in first and i'm going upside down, locking it in place, and i take the week inside out as well, so i'm basically sewing both bands together and then we can start crocheting yeah see now it's only the band that is visible this. This little part is visible. You cannot see anything from the net and that's the goal, so we are going to begin. I'M going behind the comb taking part of the mesh and the band sewing them together. Oh, my god, okay, just this too good, pretty tired of this over-sewing sewing and sewing. So i'm gon na check what we've done. So i have my band sewn to the week cap and now all that's left is to crochet. So there's the back nice and now we're going to start crocheting, the hair so before that you have to bring out the comb so that it doesn't get stuck in the hair, so you just bring it out, i'm going to put it under my dome cap. So now it's like completely out of the way i'm going to do the same here. So the column i'm using is 2 1 b 30 stretch and then i'm going to start from the front so that if i run out of hair, it won't be that noticeable because everything will be covered. So i'm going to pinch insert the hook, pull the hair in close the loop and drag through now put the hair in once and then tighten the knot be good so because of this loose end, it's quite slacky in front. So i'm going to be bringing this to the front. Put this in the hair in close the latch, bring it through put the two legs in. So if you want a detailed tutorial of how to crochet i'm going to link the video in the description box so be sure to check it out. Okay, so my wig is almost complete. Okay, let's fill in the sparse areas so around the back of my head. Now i'm gon na go style it i did not do any extra treatment. All you have to do is to fluff it to your face so that it suits your face, shape like just to move it around. I'M going for the side parting, so i kind of created um um a parting, not too obvious, because you don't want the mesh showing - and i took like a mini bundle - put it across the pattern so that it disguises it: okay, okay, so i'm not even wearing A head scarf - and i don't have my edges laid - i just don't feel like, but you can layer this. You can layer this if you want to, and you can wear a head scarf. If you want to. This is literally the band that was sewn that we practically like that we added to the week and there you have it as told by ginger the synthetic version okay. So if you would want to see or get more styles or more ideas on how i style this diy headband week, leave a comment to the section leave a comment in the comment section and i will get started on it. So i'm gon na leave you here. If you like this video - and it has been helpful to you, please give it a thumbs up and leave extra comments. If you want to till we meet again bye,

Comments
Sapphire Jones: Love it!
Peace Samuel:
Naturally Kerry: This is really pretty on you
Vivian Allen: How many packs of hair did you use?
Godspresence Ihezuo: Well done❤❤❤Consistency
Salazar Joyce: Nice sis...abby says hi...someone likes your video