How To Diy Headband Wig: Kinky Curly Headband Wig With Dome Cap | Mayvenn Hair | Missuniquebeautii
- Posted on 26 October, 2020
- Headband Wig
- By Anonymous
#headbandwig #kinkycurlyheadbandwig #diyheadbandwigs
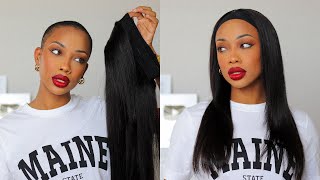
Headband Wig: How to DIY Mayvenn Kinky Curly Headband Wig With Dome Cap
In this video, I was able to show you guys how to create a headband wig using kinky curly bundles from my website. This hair definitely mimics the natural texture and blends well with natural 4a, 4b, and 4c textured hair. This hair gets very big and is very soft to the touch! I used 3-bundles to complete this wig. Like this video, share it with your friends and family, and don't forget to subscribe to my channel to be notified of my future uploads.
Follow Me On Instagram@: https://www.instagram.com/missuniquebe...
Follow My Business Instagram@: https://www.instagram.com/missuniquebe...
Shop My Website https://pressedbymissuniquebeautii.com...
Discount Code: YouTube25 for 25% off the Entire Website!
Shop for your favorite beauty essentials! Press-on Nails, Lip Gloss, Mink Eyelashes & MORE!
I also make and sell Headband Wigs, Half Wigs (without the headband) Lace Closure Wigs, Frontal Wigs, & Drawstring Ponytails. If you are interested in having me make a wig or drawstring ponytail for you, please send me an email at [email protected]. SERIOUS INQUIRIES ONLY!
Products Used:
Brazilian Kinky Curly 2-22inch bundles, 1-20inch bundle https://msuniquebeauty.mayvenn.com/pro...
Mesh Dome Weaving Cap https://www.amazon.com/gp/product/B01G...
Black Head Band (similar to the one used in the video)
https://www.amazon.com/gp/product/B07C...
Needle & Thread https://www.amazon.com/gp/product/B07N...
Scissors
T-pins https://www.amazon.com/gp/product/B077...
How To DIY Lace Closure Wig: Mayvenn Brazilian Straight Hair
https://www.youtube.com/watch?v=2MpxcB...
Headband Wig: How To DIY Havana Mambo Twist-Out Headband Wig
https://www.youtube.com/watch?v=SpJto8...
Headband Wig: How To Brazilian Kinky Curly Headband Wig
https://www.youtube.com/watch?v=r97Rrb...
Headband Wig: How To Zury Honey Blonde Afro Twist Headband Wig
https://www.youtube.com/watch?v=cNcGy0...
Headband Wig: How To DIY Faux Locs Headband Wig Goddess Locs Pink Wig
https://www.youtube.com/watch?v=9jOER6...
Headband Wig: Box Braid Headband Wig
https://www.youtube.com/watch?v=KCyt32...
Equipment Used
Cannon SL2 https://www.amazon.com/gp/product/B071...
Neewer Back Drop Kit https://www.amazon.com/gp/product/B07P...
Ring Light https://www.amazon.com/gp/product/B08D...
Rose Gold Backdrop https://www.amazon.com/gp/product/B01C...
Instagram: @pressedbymissuniquebeautii, @missuniquebeautiiyt
Facebook: @pressedbymissuniquebeautii
Website: pressedbymissuniquebeautii.com
E-mail: [email protected]
Oh hey my beauties. It'S me scenic beauty in the building and i'm back with another video. If you are new to my channel tap that subscribe button, so that you won't miss out on any of my new uploads and if you have already subscribed, what's good, what's poppin welcome back to my channel, the items that i'm using today is a mesh dome cap And this is an extra large cap, i'm using a black headband, and i got this one from my local beauty. Supply store some t-pins to hold your headband and your cap down to your mannequin head, a few strings of needle and thread a pair of scissors and the hair of your choice. The hair that i'm using today is kinky curly hair from my website, miss youniquebeauty.maven.com. I will leave the link to this hair in the description box below. I do have three bundles and right here, i'm showing you what this hair would look like when you receive it in the mail. Like i said in my previous video i like to co-wash my bundles before i use them so the first two bundles i already co-washed and this one i didn't co-wash yet because i wanted you guys to see exactly what it will look like when you get it In the mail now, let's get down to business, the first thing that i'm going to do is apply my mesh dome cap to my mannequin head. Next, i'm going to apply my headband to my mannequin head and i'm going to line it up to the edges of this dome cap and i'm also going to flip it inside out. So the seam that's on the inside of this headband will remain on the inside. Once i flip the headband back over when i'm done sewing it onto the dome cap, when i'm sewing the headband onto the dome cap, i like to sew one side at a time just so that i can make sure that the headband will be evenly sewn on Both sides of the cap, and also when i am sewing it as well. I do not sew my stitches too close to each other, because i still want the cap to be able to have some stretch in it and when you sew them way too close to each other. You lose a lot of that stretch that you need in that band. Now i'm going to begin sewing the band onto the second half of this cap. This is what the cap is looking like once i finish, sewing the band onto the edges of this dome cap and, as you guys can see, the seam to the headband is on the inside, and the headband lays nice and flat and flush to the dome gap. Now we're going to begin sewing on our tracks right here, i'm just showing you guys that i double the track at the bottom, and i am beginning this first track right before the ears on the mannequin head and i'm starting it right on the band. But i'm not puncturing the needle all the way through the band, i'm only puncturing it through the first layer of material on the band. Now i'm just going to continue with sewing this first track on all the way around. Until i get to the other air on the other side of this mannequin head now that i've reached the other air, what i like to do is i like to pass the needle through the weft of the track and tie a knot and secure it before i Flip the track over and secure it again so now, once i've done that i'm flipping the track over and i'm going to leave about two finger lifts apart from the previous track and be skin sewing the next row along the bottom half of this cap. Now i'm bringing the second row track all the way up to the band of the mesh cap, and i am going to sew onto the first layer, like i previously said, tie a knot and then flip the track back around and begin sewing in the other direction. And i'm going to leave one inch with space from the previous track for this row as well. The reason why i leave so much space in between each row and the back section is because i just want to make sure that i will have enough hair to complete this entire wig. Now, of course, in the end, if you still have hair left over, you can go back in and fill in that hair wherever you feel you need it to be filled in now, we're going to begin attaching the second bundle and i'm going to be doubling this Bundle as well now, the length of hair that i do have is two bundles of 22 inches and one bundle of 20 inch. Now, because this hair is kinky curly hair the length when you look at it won't be 22 inches, it will only be 22 inches once the curl is stretched. So this hair does have a lot of shrinkage. So if you are looking for kinky curly hair to be really really long, i suggest you go longer in length so that you can get that length that you are looking for. Now that i've reached the end of this row, i'm going to pass the needle through the weft of the track and then i'm going to tie a knot and flip it over and begin sewing in the other direction. I'M also going to mention that when i'm actually sewing each row down, i do not sew through the weft of the tracks. I sew underneath the weft now. The reason why i do that is because sewing through the weft the entire time. One slows down your process and two can lead to shedding in the long run as well, because every time you push your needle through that weft, it's separating the hairs in the weft and making them looser. Now i only sew through the left when i'm securing the ends of each row, because it helps to keep them from moving and helps the track to last longer on your wig caps. Now i'm going to go ahead and finish sewing on the rest of this bundle and then i'm going to sew on the last bundle off camera and i'll be right back to show you guys the finished product. This is what the wig is. Looking like once, i went ahead and sewn on only two bundles of hair and, as you guys can see, this wig is looking super full already. Now i'm going to go ahead and sew on this last bundle and i'll be right back. This is what the wig is looking like once i went ahead and added all three bundles of this kinky curly hair to this wig cap. Now, as you guys can see, this hair is big. It'S voluminous and it's everything that i love in my hair. Now i'm showing you guys what the spacing is looking like in the back of this cap, as i was sewing it down, and i want to say this wig is giving me natural texture vibes if you're like a natural 4a texture for b, texture for c texture. This hair will definitely match your hair right here, i'm just showing you guys what this wig looks like once i pull the headband over the perimeter of this cap, as you guys can see. Look at this coverage. This coverage is absolutely amazing. I do want to mention that these black headbands do come in different sizes. They come in small, medium and large, and they also do come in different thicknesses, and this one right here, i think, is a medium headband and it is a wide sickness headband, and i like this headband because i feel like it gives me more coverage around the Edges of this wig, this is a cute half up half down style that you can also wear this wig in as well. In this video, i was able to show you guys how to create your own kinky curly headband wig, using your bundles from miss uniquebeauty.maven.com, and i will leave the link to the website in the description box below so that you guys can get your hands on some Of this beautiful voluptuous kinky curly hair, i really hope that you guys enjoyed this video comment down below any questions that you may have like this video and don't forget to subscribe bye. My beauties um


Comments
Ashley Marie: Yes sis! Very detailed and informative, just the video I was looking for. We love to see it, subscribed!!
Lyrehc B: This wig is gorgeous! Can’t wait for the try on video, I know it’s gonna look great on you. Can you tell me how you sewed down the last bundle? It looks like you continued the back and forth pattern and then went right around the perimeter of the wig cap to cover the front... anyway, great job
A.TurayGayee: Wonderful job sis !!!
Yvonne Rodriguez-Rivera: I love your videos, I don't understand why you don't wear or try on after finished.
nanny nanny: New subby here