Hair Series 6: Natural Burgundy (99J) Full Lace Wig | Glueless Wig Install | Ft World New Hair.
- Posted on 20 July, 2022
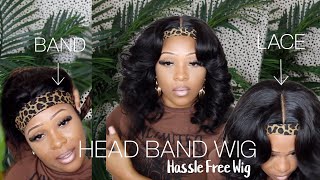
- Headband Wig
- By Anonymous
**OPEN ME UP**
WATCH IN 1080p
Hey guys,
Welcome back to my channel In todays video I will be showing you guys how I install this 99j burgundy straight wig hat got sent to by world new hair #worldnewhair . In addition, I will be showing you guys how I styled the wig. This install happen to be very easy and I love the way it turned out. If you got anymore questions please don’t hesitate to ask me them in the comment section below. I hope you like this video please don’t forget to comment, like, share and subscribe..
#wiginstall #worldnewhair #99jwig #fulllacewigs #burgundywig
*NATURAL BURGUNDY (99J) FULL LACE WIG | GLUELESS WIG INSTALL | FT WORLD NEW HAIR.*
*WORLDNEWHAIR*
EXACT SAME WIG AS IN VIDEO: https://m.worldnewhair.com/product-det...
DETAILS ON WIG:
LENGTH: 20INCH
DENSITY: 180%
COLOUR: 99J (BURGUNDY)
WEBSITE: https://m.worldnewhair.com
WORLDNEWHAIR INSTAGRAM PAGE: https://www.instagram.com/world_new_ha...
TIME STAMPS:
0:00-INTRO
1:07- WIG DETAILS
1:46-STOCKING CAP METHOD
2:26- WIG INSTALLATION
8:37- BLUNT CUT & STYLING
11:25-OUTRO
VIDEOS THAT ARE RELATED TO THIS VIDEO LINK:
-HAIR SERIES 5: NADULA “KINKY STRAIGHT” HEADBAND WIG | HALF WIG STYLING | FRESH BLOW OUT : https://youtu.be/P8T1bEyn8gs
-HAIR SERIES 4: NADULA “BOB CUT” HEADBAND WIG | BRAZILIAN STRAIGHT | IS IT WORTH THE COINS?! | £67-00: https://youtu.be/IowJn8EQEx4
-HAIR SERIES 3: YWIGS "WATER WAVE PIXIE" HEADBAND WIG | 5 MINUTES INSTALLATION | MOST NATURAL LOOK: https://youtu.be/uy426p-HVcI
MY PERSONAL SOCIAL MEDIA:
- INSTAGRAM: @nurse_bellinda
-EMAIL: [email protected]
TAGS:
Full lace wig
World new hair
Worldnewhair
Installation
Wig install
99j wig
Burgundy wig
Wig series
Lace frontal wig
World new hair review
Affordable hair
How to install
Burgundy wig install
Lace melt
Glueless install
Quick and easy install
nurse_bellinda
glueless with no lifting
premade wig
bald cap method
wig reviews for black women
wig review 2022
burgundy hair
world new hair review 99j
99j lace front wig
hair review
blunt cut hair install
wig
#worldnewhair #fulllacewigs #wiginstall
Hi guys welcome back to my channel, i hope you're all doing well. Thank you so much for joining me once again back on to my channel. My name is belinda and if you've not already subscribed, please don't forget to press the subscribe button as well as turn on your notification bell, so that you get a notification every time i upload so guys. Today, we've got a hair tutorial or a hair week in store guys. This is the unit i will be installing. Obviously, the unit did not come this way. I did cut it, which you guys are going to see further on in this video. This unit was sent to me by world new hair, so shout out to wellness for sending me this unit. So once again, i also want to say thank you to world new year for being patient with me in regards to this review, because it has been long overdue. Okay and i'm gon na tell you guys all the specs of the suite guys at the end of my video, but for now guys let us get straight into this tutorial, so starting off with this unit guys. This is a unit from new world. Here, like i mentioned at the beginning, this is in the color, 99j 20 inch and it's a 13x4 lace guys. It also came with full comb attachments, as well as the securing strap at the back okay, so that is the spec of the wig. I am gon na run through the spec of the week at the end of this video, so for now guys, let's get into the installation. So obviously i have i'm starting on fresh washed face guys. If you've not you already used the retinol product guys, then that's the product, but that's not what this video is about. So i did do the stocking cap method and um looking back now, i'm thinking to myself. There was actually no need for me to do this, but anyway it is what it is. So i'm gon na go in with the foundation, obviously to blend the stocking method in um as much as possible with my skin, and for that i'm using the maybelline in the shade um 135 or the 335 um either either can't remember i'm gon na leave it Down in the description box below - and i'm also applying that onto my lace and just to make sure that obviously it blends and i'm gon na make sure i blow dry it out um. So this is basically how the hair looks like without anything being done to it. Obviously, i did pre and bleach the wig and plucked it as well. You know, prior to obviously the installation just so that it matches as much as possible to my scalp. If that makes any sense so now that i have done the comb attachment guys, i'm just making sure that the unit is where it needs to be obviously, and then i'm gon na obviously go ahead and cut the sides. Now this for me guys as i'm not a hair professional, this is a hit or miss. Sometimes i cut more than i need to, and then sometimes i don't cut as much as i need to so honestly speaking, it is um. You know quite difficult. To be honest, if i could say that um but, like i said, i'm not a hair professional, so yeah um, so i'm just gon na go in with my hot comb and comb, everything back just to make sure that everything is as flat as it possibly could Be um obviously prior to the install and, as you guys can see, that makes a world of a difference, hot combing, the hair or back because then i can see what hairline i'm basically working in with. Rather i'm gon na go in with this um hairspray guys. I recently started using this hairspray because i've seen other youtubers use it, and i must say it is amazing. Obviously it doesn't last as long um as the ghost bond or any sort of strong bond glue, because this is obviously not a glue guys. This is more of an adhesive, and the wearing period of this is maybe one to two days, so i'm just applying that onto the lace and then i'm going in with this um new thing, actually that i picked up for my eyelash install. So i'm just going to use that to basically make sure that the unit is dried down um as much as possible and as you guys can see, this makes a lot of difference. I'M just going to take my headband and tie the hair down and then obviously i'm going to go in with parting the hair. So initially i was going to go with a lift or rather is it left. Yeah left side part, but then i decided otherwise i'm gon na later on, as you guys would see in the video and as you guys can see guys, the parting space once again is a 13 by four unit guys there is not much parting space. However, you can work around it. So obviously, once that's done we're gon na go in with the hot comb as well, just to make sure that the parting space you know sticks to where i need it to stick all right. Okay and as you guys can see, it makes a world of a difference really so now i'm going to go in with the section guys i'm just going to straighten this here, because i do want to show you guys this here, um in a straight stage prior To me, obviously cutting the unit, because that is actually what i want to do matter of fact, to be honest with you, i need to cut the unit. I need to straighten the hair anyway in order to see how i'm going to go ahead and cut this hair. So once again guys like i said this is a 20 inch unit, okay from new world here, so i'm passing the um straightener as well as the hot comb, to try to get the unit as flat flat as possible. All right. So once that's done guys, i'm gon na obviously put everything back and now i'm gon na go in and cut the lace. Okay, so, as you guys can see um it's all that melted down. If i could say that looking back now, i feel like i should have just lifted like that and not done the baby hairs, but hey ho. We learn um, so i'm just gon na go in and cut it by sections. I normally used to cut the whole lace off in one go, but i realized that actually cutting a section by section is a bit much more easier. Now, as you guys can see, i cut myself a bit. Okay, so don't be like me. Take your time. Do not rush when doing this process so obviously now, obviously the lace has lifted, but i'm going to go in and obviously blend it in as much as i possibly can. I did go ahead and pull out some hair that i want to create baby hairs with and, as you guys can see, i i have changed the section uh the parting rather of my wig, and to be honest with you, like i said initially, you don't actually Need baby hairs if you bleached a wig and you actually um pluck it well, you don't actually need any baby hair. So it's basically a personal preference. If you know i'm saying um, so i'm just gon na go ahead and do that, and this is a new hot comb that i picked up, or rather small and straightener that i picked up specifically just for this. Actually, so, as you guys can see, i did. I do need to actually cut the haze a bit more because it's a bit too long, but for now it will do so. I'M just going to go ahead and try and create some sort of baby. Hey see what i'm saying and obviously when that's all done, i'm going to lay it once again flat guys this is the install. So this is the hair in its full length, guys so finish installing it. Like. I said at the beginning of this video. This is a 20 inch unit. Okay, however, i am gon na cut it into sort of a bobcat, because i just like it that way all right, so i'm gon na go ahead and get my scissors and hope that i do not get two scissors happy. So we are gon na go ahead and do that so obviously one of the sides i already did off-camera okay, that's that section done and that's that and then we're gon na go into the next section. So it is like a difficult process, especially if you can't see towards the back. So i do say that you will need some sort of assistance from somebody or rather try to cut the unit when it's on a mannequin head rather than your own head. So you can get it as straight as possible, so you will see that i tried to get as straight as possible, but obviously i still need to go back in. I did so um. We are now done customizing the week. I did cut the wig just a bit okay, so i couldn't cut it as well as i want to cut it. Obviously, because i need a bit of assistance, so i'm gon na wait until somebody comes around the house. Somebody i'll wait until i get help so for now, i'm gon na go and um straighten this unit, guys i'm gon na try and get it as flat as i possibly can, and then i'll see you guys, basically in the outros that we can discuss some specs On this week, so let me get into that. So i'm basically going in section by section trying to get this wig as straight as possible, because we don't want it to look too wiggy. I find that with units that have color rather it can come across as looking too wiggy. So you know that's, basically it really just go in and straighten it towards your liking. You can bump it or you can just go ahead and do it straight. I was doing both, but at the end of the day, i still like the results of how the hair came out personally, so i'm just going in with a bit of styling mousse, basically, just to you know, get the white crustiness out of the hair, because i Feel, like the spray made it a bit white, so i just went in with the foam just to get that whiteness off and trying to fix up the last ends, obviously so that i can do an outro for you guys. So this guys is the unit once again like i did mention to you guys in this video. They sent me a 20 inch unit 13 by 4. Okay, however, i did go ahead and cut the unit guys some of it was on camera. Some of it was off camera. Obviously i still need to go back in and cut it properly. Once i get assistance with that. So we're going to talk about this here this here once again, guys came in the color 99 j, all right, so i did go ahead and pre-plug the wig as well as bleach. Do not. Obviously i did that off-camera prior to coming on. So i did go ahead and cut this unit once again, so you guys can wear it to your own preference. You can wear it long, obviously or short, whichever one is your preference and in regards to color coming out or anything like that, i did get some sort of um red coming out. Obviously, the color of the wig when i was um pre-washing it after pre-bleaching, but that's just normal guys when it comes to colored hair, all right and it did shake, but not excessively it just shed like a normal unit in regards to bleaching guys. It was very easy to bleach the knot, so i didn't really do much to this unit. Obviously i still need to put on some foundation and try and blend the lace more in so guys. This is everything in this specific video. If you are interested in purchasing the unit, i'm going to leave all the specs down in the description box below which will redirect you to the specific unit, but for now guys. This brings me to the end of my video. Please don't forget to comment like and subscribe any other future videos. You would like to see, please don't forget, to comment down down below and i will hopefully hopefully hopefully see you guys in my next video bye


Comments
WorldNewHair: thanks dear, you looks so gorgeous with this wig
Sienna s: You look beautiful