How To Install A Glueless Wig Ft Tinashe Hair
- Posted on 19 July, 2022
- Headband Wig
- By Anonymous
Hello my beautiful people, thank you for watching today's video on how to install a glueless wig ft Tinashe hair.
Wig details below:
●▬▬▬▬▬▬※ Tinashe Hair ※▬▬▬▬▬▬●
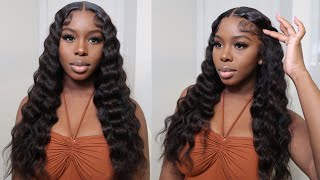
Hair Details: Glueless 5x5 Closure Bob Wig 14 Inch
The Same Hair in The Video➤https://bit.ly/3RIMxvo
#Tinashehair Official Store➤https://bit.ly/3aJUArt
Use code "TSIG" to get 15% off!
❤Invisible HD Swiss Lace Wigs➤https://bit.ly/3RFEaki
❤Trending Colored Wig➤https://bit.ly/3RRQ62K
❤New In Glueless Wig➤https://bit.ly/3yKqs7m
❤Lace Front Wig➤https://bit.ly/3yI982G
#Tinashehair #lacefrontwig #gluelesswig
Instagram @tinashehair: http://bit.ly/2Isud9X
Facebook @Tinashe Hair: http://bit.ly/34FxUAm
Tiktok @Tinashe_Hair: https://bit.ly/3zeeRPs
WhatsApp: +86 16649781957 Wholesale: +86 17537405381
Email: [email protected]
XoXo
Love you guys
Do hey my darlings welcome to today's video welcome to today's hair installation. Today we are working with um tina, hey they've sent me this beautiful gorgeous gorgeous um bob. This is a 5x5 straight above, as you can see, and i absolutely love it and the nice thing about this installation is, it is a clueless, so there is no glue going on over here. So it's very quick and easy, and i'm going to take you guys through the entire process of how we got here. So please stay tuned. If you're interested remember give this video a big thumbs up, show your girl, some love so um. Other people can see this video as well subscribe if you're not here to subscriber and let's get right into it. So we have some goodies that came inside the satin bag, which are clips um. We have a rat tail comb, we have wig caps and we have a bonnet and an edge control brush as well. We have some mink lashes too, and this is what the box looks like inside the box. We have um a little brochure with the information and at the back all the social media details we have here the units. This is a 5x5 14 inch body wave um bob and i absolutely love the length because it gives you like a nice long, shoulder length type of bob, and this is what the lace looks like now. I did have to go ahead and bleach my knots as you can see, they're very visible there and i had to do some plucking as well, which makes the wig look a little more natural and not too wiggy. This is a machine constructed wig, as you can see here, and let's go ahead and bleach our nuts now without bleach. We always want a toothpaste, type of consistency, um a bit on the thicker side, so it doesn't run into your hair and actually dye the wig - and i left this on for about - i think, five to ten minutes and i made sure that my knots were bleached. Off-Camera, i did go ahead and um pluck the hair as well. I have a video where i actually show the process of plucking, so i didn't put it in this video um. I went ahead and straightened the hair as well gave it a nice blow. Dryer straightened. It and now what i'm doing here is going in with um. This wax stick and melting it with my hot comb. This is to get a nice sleek flat wig, and we want this box to obviously come out as sleek as possible. I then went in with my mousse just to further flatten the lace in the front and, as you can see there plucking, it really helps. It just appear a lot more natural and i went in with the hot comb again to ensure guys. I didn't want to make any mistakes. I wanted this hair to be as flat and sleek as possible. I then went in with my nuts healer that i got from hair city and that's what you're seeing me do here. I just put um some of the product onto the lace and then i brush, i brush it out just to make it blend, and then i put my wig on brush it out to see if it's sitting properly and another thing i didn't mention is this: wig: Does have a headband on the inside which helps you to actually wear it without gluing it down or securing it in any way, because the the strap keeps the wig secured. This is what the lace looks like before: cutting it off everything looks um natural as natural as i could get it um. I did go in with my concealer. Just to you know, um change the color of the lace because it was appearing a bit like um brassy and a bit too orange. So i went in with my concealer and i'm just brightening up the the middle parts. As you can see there, then i went in with my scissors to cut the lace off um. As per usual, we go in zigzag, motions just to you know, make sure that it um melts down nicely and it looks as natural as possible. I then went in with this iso plus spritz um. This is a holding spray, so what i'm doing here is just putting it on literally the front of the lace. So you don't see those lifted parts there i mean you can go on without using this and just be about your day. Your wig will stay um securely, but yeah. I think i just wanted like. I wanted it to look a lot more neat, so i went in with the spritz again: it's not glue it's just holding spray and that is to just um melt the front of the lace. I then went in and started creating my baby hairs. I take a section of the hair in the front out, as you can see here. I then went in and put my elastic band over my head just so it like melts down even more, and while i was doing that, i cut off part of the hair. So i can create my baby hairs and then i go in with my small straightener to curl the baby hair, so it can swoop nicely when we put on our mousse. As you can see there, the hair isn't glued down or anything. It does lift. If you um pour on it a bit, but the whole point of the spritz was just to make it blend, um a bit better with my skin and not like lift anyway, we go in with um my wrapping mousse from design essentials, and i'm just creating my Little swoops there, as you can see, i did one on each side and then i went in again with the elastic band just to make sure everything is flattened and laid down nicely. Then the last step that i did is to go in with my um bronzer. I am using my hula caramel from benefits. You can use a foundation powder for this as well or concealer that blends in well with your skin tone. So i just went into the front with this bronzer just to make it blend a little better and then. Lastly, we comb, the hair out, you know, make sure it is flat and sleek as possible. Baby um, absolutely love this wig guys the texture, the quality, it's very light, um, it's not bulky at all. Like i love everything about it, i love the length. This is a 14 inch and then i went in with my um hot comb. Lastly, you don't have to do as many steps as i am doing here, i'm just a little extra like that, and i like my installs to just be perfect, but yeah you don't have to do as much as i am doing. This is a very quick and easy um wig and i'll leave all the details of this units down below and of tinashe here as well again, thank you so much to them for sponsoring today's video. I hope you guys enjoyed it and i will see you in my next video remember: give it a big thumbs up. So this video reaches as many people as possible, and i love you guys so much have a beautiful and blessed day bye. You

Comments
Lethabo Nare: Love it, quick easy and beautifully installed.
Kamva Makiki: Thank you so much for this video ♥️, who knew an installation could be this perfect with no glue
Bianca Cave: Very nice vlog! Loved that you shared all the steps to you prepping the wig for a sleek install.
magugu Bhengu: You always so beautiful love the install love the length of this wig ❤️
POZ_VETO: Your installs are def perfect f
Katlego Ratshidi: Loving this long bob on you. Beautiful
Silindile Mbongwa: Beautiful hair indeed and it’s perfect for you I get confused after every hair video on which unit suits you best
relebogile maluleke: This bob looks so good on you❤️beautiful video
Relebo. N: You’re absolutely stunning!! And that hair on you??? Gorgeous
Lesego Mofokeng: You really killed it my love beautiful clean as always love that
Goodness M: Your videos always clean and lovable , Thank you so much
Temarr Kya: Love it♥️♥️♥️
Kutlo Baruti: This hair looks great on you
Nthabi Mabuza: Babes I love this video of installation wigs this Bob really suits you always looking stunning ✋
Siyamthanda Tiyingwe: Sila Sis is lovely , Sis dresses so well, sis is well educated most of all ,She's a wonderful mother and a Wife.. The hair is giving and that makeup
zanele mkhatshwa: I love it
lyndy Boavista: Looking beautiful ☺️ as always
Athini Mayekiso: You’re stunning Sis and I love you ❤️
Leungole: You look amazing ♥️♥️
Karlina Twala: Perfection ❤️
Thati_the_creative: Love this
Karlina Twala: Love love it
Innocentia Makgalemele: Long awaited video ❤️❤️you look amazing
Mamma Leah: Love it
Alfredine May: Looking beautiful mama
Neoleen Motshekga: Hi Khanyi please make a video and show us the setting of your recording tools and name of cameras etc. thank you in advance.
Anesi T: Looking cute mommy ❤️
Rego Mogapi: You're soo gorgeous plsand that hair
Bongi Mngomezulu:
Nosihle Mevana: ❤️❤️❤️❤️
nothile ngema:
Sibulele Poto: ❤❤❤❤❤❤❤❤❤