Summer Ready Water Wave Wig Detailed Talk Through Install Tutorial | Tinashe Hair
- Posted on 23 June, 2022
- Lace Front Wig
- By Anonymous
●▬▬▬▬▬▬※ Tinashe Hair ※▬▬▬▬▬▬●
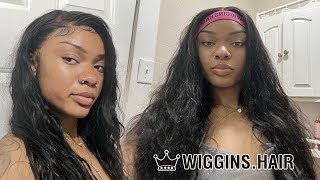
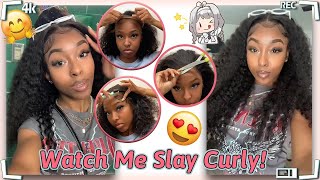
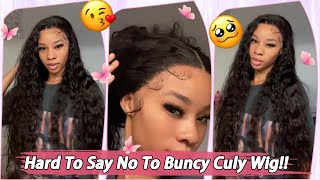
Hair info: Water Wave 13x4 HD Lace Front Wig 28 inches.
The Same Hair in The Video: https://bit.ly/3OqMBNW
※ Tinashe Hair Website➤ https://bit.ly/3Ob8Hoc
※ Coupon Code"Mani" to Save extra 15% Off
※ Buy Now, Pay Later with PayPal & Klarna.
Invisible HD Lace Wigs➤ https://bit.ly/3OsBCnX
New In Glueless Lace Wig➤ https://bit.ly/3Obc1Q7
2022 Trendy Colorful Wigs➤ https://bit.ly/39KnOWE
Short Hair Styles➤ https://bit.ly/3y9wY8i
#Tinashehair #undetectablelace #hdlacewig
Instagram @tinashehair: http://bit.ly/2Isud9X
Facebook @Tinashe Hair: http://bit.ly/34FxUAm
Tiktok @Tinashe_Hair: https://bit.ly/3zeeRPs
WhatsApp: +86 16649781957 Wholesale: +86 17537405381
Email: [email protected]
My Socials let’s be friends! (literally) :)
IG: @kamanijeann
Twitter: @kamanijeann
TikTok: @manijean888
Snap: @manijean
Wig IG: @wigssoldbymani
Email me for business inquiries only [email protected]
Hey guys welcome to my channel welcome to my channel if you are a returning viewer, what's up girl. So if you would like to see i'll install this wig, this 28 inch water, wave wig from tanashi hair and how to install a wig. That is way too big for your head just keep on watching, because i'm going to show you guys how to install a wig that is too big for your head today. So i am starting off here with 17 or 18 braids. I'M not sure how many exactly, but you want to make sure you have a flat foundation for your wigs. Rather it's a slick back or braids this flat to your head. Then i just stretched out my cap, and now it is on my head and i'm taking my scissors and i'm cutting around my ear tabs for a comfortable fit and so that you know we can get started on this um bald cap method. With this space, i'm using the evan wonder: lace spray in the red can and i'm just using my fingers to smooth that along my hairline and then here's my dog, my sister was being childish that had me weak re-watching that but um yeah that was lucious anyways Y'All i'm doing my bald cap um. You want to make sure to really smooth it out and make sure it's even all the way around. I didn't really make this cap even all the way around, but once it was cut, it was okay and also you guys want to make sure your edges are slicked all the way back, because my edges were sticking back, but they ended up like coming back up And um i had to do my bald cap lower than usual to protect my baby hair. So keep that in mind you guys now, i'm just using my shears and i'm cutting off the bald cap. I'M just gliding the scissors through this cap because it's going to be very easy to cut off. Okay guys. So, now that the cap is on, i'm going to be taking my ruby kisses cream foundation in the shade rd15 and i like to mix both of those shades with my makeup brush and really pat all of that makeup into the cap along right. Where the cap starts, you feel me i like to make sure it's right there, because when it's right there, it's going to look like stuff, it's going to give invisibles going to give scalp but anyways i like to put it right in the middle of the cap, Because that's what we're going to do today is the middle part, and i don't need the makeup all over the cap. That'S going to be wasting product anyway, i'm cutting off the ear tabs. As you guys can see. This wig is very big on my head, but yeah, like i said earlier, i'm going to show you guys how to finesse that okay, so now i am going to be hot combing, this hair, all the way to the back. It just makes the hairline look cleaner. A more realistic look because you can see the gradient effect of how the hairline is moving and how it was plucked. If that makes sense, so i'm going to take care of that then, before you use any adhesive, whether it be spray or glue, you want to use some surfa alcohol and clean off your skin because yeah, it's not going to stick. That glue is going to stick. The spray is going to stick y'all say it in all of my videos, if you do not clean your skin and make sure that it is clean and dry okay. But i finally got me: some erika j hold me down glue and it was definitely holding this way down. I can't do too much because i've only had this big one for not even 24 hours, but i will say i did like this glue y'all. It did not give me any issues like at all, but um yeah, you guys, i'm spreading out this um a layer of glue the first layer and i'm using this big ass popsicle stick and i'm smoothing this all out along my hairline and i'm really just trying To make sure it's smoothed out and even all the way around before i go in with my blow dryer and when i go in with my blow dryer here, i am i'm going to be using it on a cool dry setting, which i always do and i, Like to use my finger sometimes to make sure that it's tacky and even though it looks clear, i want to make sure that it's actually not too dry or not tacky enough. So i always do a little test, but this is me going in with my third layer. I did three all together and yeah, i'm just finishing up applying this glue, so i wanted to show you guys what the glue looks like up close when i'm blow drying it and when it's all the way, tacky and dry, it should look iridescent just like that, And similar to that as well, but okay y'all, let's get into putting this big wig on! Oh my gosh, i was struggling so hard, but really what i'm going to tell y'all? Is you really just want to like make sure you press it? I mean do our diet type press it into the glue really good when the wig is too big, especially in the middle, because that is where the rippling will show. Okay - and i was really making sure to use my blow dryer, which is on a cool high setting and my comb, to press that lace in and try to make it as flat as possible because it was not flat like right here. I was making sure that that glue was getting. You know what i'm saying, but anyway, now i'm using my red ebbing lace spray and i am fixing the parts on the left side that wasn't laying down, because on the left side it wasn't laying down. Because when the wig is too big, it's only one side, that's going to lay down like accordingly, the other one you have to force it. So for me, that's always forced it's the left side, so it all ended up. Looking good anyways but yeah. I had to use my red edmond lace, spray to kind of help, melt that lace some more but, as you guys can see this movie this not movie. Oh my gosh. This video is moving on pretty quick, but i'm just getting my parting together. You guys y'all know y'all, know, y'all, know, y'all know i personally love to hot comb, the back of my wigs, because i just think it makes it look more put together and just more cleaner, like you put more effort into it, so yeah, i'm going in with My hot comb a lot with this install because the hair was very big and i'm just trying to mellow it out and get it nice and flat. So i'm using my wax stick here after i hot combed it slightly i'm going to hot comb it once more. This is the caracara wax stick by the way, but yeah you guys, i'm going with my hot comb and i'm making sure that this is pressed out. Okay, y'all see how good it's looking already looking better than ever looking flat, especially in the back. Oh wait. It'S my favorite part, but um yeah. That'S what i'm doing here, i'm just trying to make sure that i'm giving my lace time to melt. So i like to style my hair in between time, but now that it's melted, it's been about maybe 11 to 12 minutes. I'M going to be taking my razor and cutting off this lace, so cutting off this lace wasn't as hard as i expected it to be because of the way i melted it thanks to me now, but the way that i melted it, it wasn't as hard as I thought it was going to be with the slice being big but yeah. It wasn't looking the best because, since this wig was so big, i had to cut off a lot of the ear tabs more than i usually would so like the hairline wasn't accurate, like i don't know how to explain it, but the sideburns was like pieces of The actual hair - i don't know if that makes sense, but it does to me like, since that this wig was too big, like the hairline. Just was too short, it wasn't even for you know what i'm saying so, y'all just make sure y'all get the right wig size please. So i don't have to go through all of this okay, because this install was stressing me out, but hey it'd, be like that. Sometimes you know not all installs are going to come out perfectly but um back to what i'm doing here. You guys i'm pulling out my baby hairs will already have the two in the front, i'm hot combing them so that they can lay flat. Once we melt this hair and these baby hairs once more so now i'm going to be taking my wonder, lace, spray and spraying that again on the lace and i'm really trying to smooth it over the lace with my fingers so that it can, you know what I'M saying and i'm moving fast too, because yeah this stuff it it's going to drip on your face and it's going to get sticky. So you want to make sure you move fast with this product you guys but yeah. I just sprayed that you know i have my hopes up because it's turning up for me. It'S looking better but y'all enough of this lace talk. This hair was beautiful and it was so bomb like no lie. I don't know why it took me so long to install this water wave wig but yeah. I washed this hair after i bleached the knots with some shampoo, and this is what the hair looks like just air dried and i just added water, as you guys just seen. I didn't want to put any product in this hair because it was giving water wait. Okay, all you need is water, just add water. It was so pretty you guys so yeah, let's get into the hair, show her, but now that the band is off, i'm going to be cutting off my baby hairs. Um yeah, my baby hairs did not come out. The best, but as long as you try, you know what i'm saying: that's what i want y'all to know as long as y'all try, cause y'all might think. I'M perfect and i'm good at doing these wigs but y'all i'll be struggling too okay, but i like to share my knowledge. So this is me sharing my knowledge with y'all butcher. You guys nothing special here. Just using that same razor and cutting off my baby hair is in a diagonal motion, while i was trying my best to, but since the hairline was a little wonky, it was hard for me to get these baby hairs to be perfect. But now i'm using my half inch pencil flat iron by kiss and i'm curling my baby hairs upwards. Now that i'm realizing, i should have curled them kind of inward instead of upwards, because this wig was further down on my head than usual and you have to work a little bit harder on the baby hairs. For that reason, so if y'all prone to putting your wigs low down on your hairline, which mine didn't look crazy and i'm sure y'alls don't either if you're doing it right, but don't curl upwards, it looks better when you curl inwards, when the hairline is a little Bit lower, which yeah anyways, let me see my got to be glue gel and i'm using my edge brush the comb side because it gets everything looking cleaner and just more uniform, just how i like it, but still fluffy, yes, ma'am and yeah, i'm just swooping. My baby hairs with a c motion. You feel me using my finger to keep everything intact, keeping any motion of the ocean of what i wanted to go, but yeah these baby hairs didn't take long either because i was over it but yeah you guys um now for the sideburns. You know i like to give them a fluffy feel, so i make sure to fluff them out after i swoop them and yeah. Those are the baby hairs pretty much so now it is time for the finishing touches i'm going to be taking that same wax. Stick the keurig hair wax stick and just you know touching up this hair to make it look finished complete. You know, i don't know. I really don't have to do this last part, but i just do it because i'm a perfectionist - and i like things to look really uniform and perfect, but yeah, i'm taking my ruby, kisses creme foundation in the shade rd11 and i'm basically just cleaning up this part To make it look realistic and i like to smooth it out with my finger and then boom voila. This is the completed completed. Look. Thank you guys so much for watching hope. You guys learned something and gained something from watching this. I definitely enjoyed making and editing this video for you guys to show you guys. You know what it's really like. Sometimes installs do not come out perfect in your eyes, but yeah. You guys make sure to check the description box for all the information on this hair. A coupon code and all my socials i'll see you guys in my next one bye,

Comments
NemoTheGreat !: Don’t let the views fool you we love a good install. But I would recommend olive oil, Tresemme, Sebastian shaper plus hair spray because ebin is very harmful to the edges and the hairline
Kira Nyree: This install is everything thank you for sharing tips ❤️❤️
TASHA MACK: I need to practice installing my own lacefront. Great tips and video.
MeAsia Bruton: Definitely going to use this video you made it real simple cause I’m slow as hell
ChasityElise : you have taught me so much on your page , I appreciate you
Tinashe Hair: Gorgeous as always, thanks for your sharing our hair
💕Daiii_daiii: Looks great girlllll!!!!!
Double Dip Nails: Love this!
TymarrahGi:
Kayla Carpenter: So cute.
Chisom Okoye: you never miss
Heaven Harris: Girl where did you get the band from I’m watching your videos to install my first wig next week
Allen: Im a hairstylist and when I say I love your videos you do such a good job
Kaitlyn Harris: Would you be comfortable dying a wig ? Water wave/deep wave to be specific . Maybe you already did I just need to look. I love your work❤️
India J. Smith: You need to do a video of your favorite glues PLS!
ツdani: i know this isn’t part of your video type but can you do a video on how to lighten or keeping your lips from getting dark being a smoker☹️ cuz yours looks so good !!
hi welcome to C H I L 'I S (눈‸눈): "DO OR DIE TYPE SHIT" girl I felt that!
adore.niyaaa: whats the lace type and density?
DaBaddestBrat L.E: Hey girly new subby here I was wondering if u can just list everything You use in an install in the comments or in the description box please and even if u have links that would be even better please
Tykeria S:
denea whisonant: I’m glad I found your channel ❤️❤️❤️now girl make me a wig❤️❤️❤️
Highflyer757: Looks Great
Brianna Marine: Her glue made me have a allergic reaction it burnt my skin and it itched so bad
shina king: Great video
Queen Paola:
niya galloway: how much for this wig ?!!!!!
JaNae: Love your videos !!! Can you do a updated plucking and bleaching video? On the last one I got kind of confused because you said you don’t recommend using the product that you used
Tinisha Robinson: Fire dope If you did half up have down would’ve been
KashDior: ❤️❤️
Fabulous LifeWithDae: Period
Vibes with Nae Nae Hill: Is it hard to install it I wanna do it but I’m scared
Montana Cheyenne: Your intro is my song lol
Senya Green: 222 likes I don't wanna mess it up
💕Daiii_daiii:
Nicole: Most wigs are way too big for me
Melodyswervo: You need to start selling your wigs
Riquel Fitzpatrick: how tall are you?
barbiedbyshay: purrrr notifications gang