Back To School Start To Finish Frontal Wig Install | Flat Iron Curls With Layers | Sowigs
- Posted on 06 August, 2021
- Lace Front Wig
- By Anonymous
Welcome To My Channel ❤️
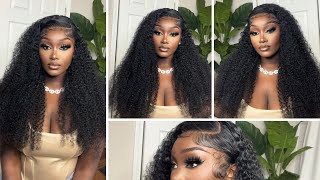
In today’s video I'm coming to y'all with a start to finish wig install! This is a back to school start to finish wig install using a body wave frontal wig from Sowigs! Im going to show you how to install your frontal wig as well as show you how I achieve my flat iron curls! Get into it!!!!
Don’t Forget To Like, Comment, and Subscribe!
$10 coupon code: KW10
Hair detail: Peruvian 180% Density Lace Front Wig Body Wave Human Hair 20 Inch
Hair link: https://www.sowigs.com/180-density-lac...
Website link: http://www.sowigs.com/
Contact SOWIGS:
IG: https://www.instagram.com/sowigs
FB:https://www.facebook.com/SOWIGSTwitter...: https://twitter.com/Sowigs
YouTube: https://www.youtube.com/channel/UCwl9A...
SUBSCRIBE TO MY BROTHERS YOUTUBE CHANNEL!!!!!
https://youtube.com/channel/UCuiVkFC_5...
https://youtube.com/channel/UCduE_QRDq...
Jesus loves you ❤️
“For this is how God loved the world: He gave his one and only Son, so that everyone who believes in him will not perish but have eternal life.”
John 3:16 NLT
Connect with Me ❤️
Snapchat: @Keandrawilson
Instagram: https://www.instagram.com/keandrawilso...
Want a crochet piece made by me?
Shop Kskrochets! Shop www.ks-krochets.com
Instagram: https://www.instagram.com/kskrochets/
Shop My Poshmark:https://poshmark.com/closet/keandraw
Contact me for business inquiries only:
if you ever wanna send me something......
PO Box 651
Oak Creek, WI 53154
United States
Name for the mail: Keandra Wilson
Camera and filming equipment (y'all stay asking for this elite camera quality lol):
Camera: https://amzn.to/3oHE2mi
Lighting: https://amzn.to/3ffXDao
Disclaimer: There may be affiliate links in this description. If you choose to make a purchase through the links I provide I can receive a small commission which takes nothing additional from you!
What'S up youtube and welcome to my channel or welcome back to my channel, my name is kiandra and in today's video i'm coming to y'all with another wig install, i'm gon na be using boho for this install, of course, my boho active this wig is from so Wigs - and i just want to thank them for sponsoring this video, as well as centimeter wig, to review for y'all. This hair is peruvian, it's 180 density and it's 20 inches and it's a body wave wig, i'm just giving you all the details right off the bat. However, you can check out the description box down below for further details, but right now i'm just hot combing, the hair back. I think i did a lot of my work on my head more so than a mannequin, so yeah and by the way this lace was super duper bomb. So y'all just see me plucking the wig right now. Y'All know if y'all be watching my hair tutorials kind of how this be going, but i'm just going through and plucking and customizing the wig. While it's on my head and i'm just making sure i hot comb it back and actually brush the hair back as i'm working just to keep everything out the way, all right, y'all. So now that i'm pretty satisfied with the plugin i'm going to be pulling the hair back and going on my glue. So i'm going on my first layer, i'm just dotting along um, the band and what my actual skin is, and i'm just smoothing that layer out you want to make sure. Of course you apply your layers thin, so they can dry clear in between. So that's what i'm doing and i actually really really like this edge brush. I think a company sent it to me or mama got it from the beauty. Supply store one of the other, but it has a flat end. That is really good for smoothing out your glue, or you can also just use a popsicle. Stick, that's usually what i tend to use. I have like a whole pack of them that i bought from amazon and i think my puppy would sleep and i didn't want to wake her up or something like that. So i did not use my blow dryer. I kind of just fanned it with one of my wig caps, so yeah, that's what that's about i'm going on my second layer now as y'all see and i'm just gon na kind of repeat this process. I think i did two to three layers. That'S usually what i tend to do when i'm doing installs but yeah, just smoothing, smoothing and smoothing this out, and i just noticed that i actually didn't film the ball cap part of this install um. Sometimes they get a little repetitive and i want to switch it up, but yeah i did do the ball cap method using a boho as well, so i'm just making sure that this dries clear for the most part. So i did two layers and i'm going to go ahead and lay the lace down and i'm just going to use my edge brush to kind of help. Me push that lace into the glue and i'm just going to be doing some background motions. I'M using a comb side the brush side and making sure that the lace is pressed into that glue. So now i'm just hot combing, the hair back, so that everything is just back out. The way before i put this band on i'm also going to be using some got to be glue spray just to make sure there are no flyaways and again that the hair is all going back before i put the band on. If it's not my wax stick. That'S usually what it is i'll just use a little bit of got to be glue or something just to make sure all the hair is going back. Sometimes i switch my way of doing my hair yeah i'll, be noticing that, but as long as the final result turns out good, that's all that matters. So i'm putting some slits into the hair with my scissors and i'm going to be putting a little bit of glue in the area that i missed before. I get ready to cut this lace off, so i'm just doing a little thin layer and just pushing that lace back down, because i clearly missed the spot and i'm just using the actual end of the razor to help me do that because it was small and It got in there real nice, so yeah, i'm just doing that, combing that back i'm doing the same exact thing i did when i initially laid the wig and now i'm just using the razor to take all the excess lace off. So that's! What'S going on now and then i'm going to get ready to part out my hair that i want for my baby hairs. I don't really worry about this cast because y'all will see that it kind of goes away towards the end of me doing my hair, but now i'm just parting out the hair that i want for my baby hairs. They started off kind of crazy and then um. I cut more hair as i seen fit. I was just i like this way, this method that i did of mapping them out and seeing actually where i want them to be before i did them, instead of just like freestyling it so yeah, i kind of had an idea and i'm using the got to Be glue spray there, that's what kind of takes away that cast, and i'm just hot combing that hair back kind of to separate the baby hair from the rest of the hair. So i'm just going to go ahead and part all of that out and then i'm going to start cutting them and laying them and doing all that good stuff. With my gorilla snot and as you all see, i'm going in with a little bit more of gossipy glue, just to make sure everything is good and late, and that is what gets rid of that cast just a little bit of got to be glued so yeah. I really didn't actually tie the band y'all. I literally held it there for a couple minutes and took it off because i was like needed. I was kind of rushing a little bit needing to get this done, but yeah now, i'm just going in with my little scissors and i'm cutting the hairs. Y'All can kind of watch this process thanks like i said they started off kind of big and long, and i went in and cut them as i seen fit. You can always go back in and cut as you see fit, but yeah once you go too short. Ain'T, no, it's no going back, so i rather cut them too long in the beginning and i'm just curling them on my mini flat irons, i'm going to get ready to lay them so i'll, just let y'all watch that whole process. So after going in with that foam lotion, just to soften the hair up a little bit, i'm going back in with the last band, doing it the lazy way and just holding it there for a couple minutes, and now i'm going to get ready to style. The rest of the hair - i do like how my baby hairs came out like i wanted them a little bit dramatic, that's what i was going for and i was going for a side part with this unit y'all. I really really like this hair like this hair was bomb. I think the only complaint that i had with it is that it was kind of on a frizzier side, but that's nothing that a good serum can't tame so yeah other than that, though, i really really love this hair y'all super soft and bomb. It was really easy to work with, and here y'all just see me cutting layers into the hair before i get ready to curl it. This really just frames the face, and i don't know something about cutting layers into your hair before you curl. It just makes the curls come out way way better every time, so i did go ahead and layer this hair on up and i felt like i actually knew what i was doing this time. So that was like a good thing, but i'm just using some hair shears, i'm going in with my olive um oil, serum and i'm putting that through the hair before i get ready to do some flat iron curls. But what also would have really been cute is some crimps in this hair. I think i want to give me a crimper, because crimson be looking so cute at first i was like whatever like i feel like i'm a wand, curl or, like you know, regular curls type of girl, but crimps be looking cute. So i think i'm gon na give me a crimper but anyways, i'm going with my flat iron curls ever since i didn't learn how to do these. This is all i do when i'm getting ready to curl my hair so yeah. I just basically sped it up and i curled all of my hair. Now i'm just going back into my hot comb. I think i use my care care wax, stick up there and i'm just getting everything flat at the top and jam out as i do per usual, but i'm just going along the perimeter of the hair and y'all. This is the finished. Look. Okay. I think it came out. Super duper cute. This was a cute, easy, simple, little style, nothing too crazy, just a side part with some curls and yeah yeah. I really really did enjoy working with this hair. If you are interested in getting this look, make sure y'all hit the description box, i will have all the information down there, as well as the link as to where you can purchase this wig and again. Thank you so much so wigs for, first of all, being patient with me on this video because y'all i have been so busy, but yeah thank y'all for also sponsoring this video. Thank you. If you watched all the way to the end - and i will see y'all in the next video - don't forget to like comment and subscribe and hit my bill, you
Comments
smarie alicia: u did that , this looks so gooddd
kbl_ hair: looks good
TiffanyTV: i need that link for the edge brush
Dajah Tate: Layering tutorial?
Yati Banks: link to brush pls?
Nadia Chavez: Can I know where you got your glasses from
Prettylay ‘: Where did you get the glasses?