Watch Me Install + Style This Wet And Wavy Lace Front Wig | Luvme Hair
- Posted on 13 September, 2021
- Lace Front Wig
- By Anonymous
In this 3 in 1 video, you will see: my initial review of this wet and wavy wig from LuvMe Hair, my curly hair maintenance routine and how I style this lace front wig.
Thank you for watching, drop me a comment and a thumbs up!
Use my discount code “Toni” for money off your LuvMe Hair purchases
Hair details:
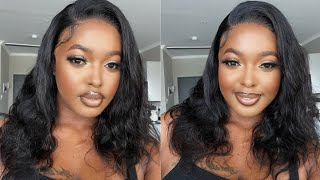
WET AND WAVY HIGH DENSITY GLUELESS FRONTAL LACE WIG
Direct Link for the wig: https://bit.ly/3EaZcAw
Length: 20 inches
LuvmeHair Website: https://bit.ly/3yXahSd
Instagram: http://www.instagram.com/luvmehair/
Facebook: http://www.facebook.com/luvmehair/
YouTube: http://bit.ly/2OCjZrr
0:00 Intro
0:54 Initial Review
3:25 Install, Curly Hair Routine and Styling
13:40 Finished Look
14:22 Outro
Products/ Tools Used (contains affiliate links):
- Diamante Hair Semi-Matte Wax Stick (the BEST wax stick ever)
https://www.diamantehair.com/product-p...
- Wahl Hot Comb
- Black Got2B Gel
- Creme of Nature Foaming Mousse
You might be interested in:
How To: Easy GLUELESS Lace Front Wig Install | Maxglam Hair
#lacefrontwig
Keep up with me on social media:
Follow me on Instagram: ToniKelani
Add me on Snapchat: ToniKelani
For any enquiries:
Hey guys, what's up, welcome back to my channel thanks for tuning in again to another of my videos if you're new here, hey welcome, what's up same applies to you, just click the subscribe button and belt as well, so you are up to date with what i Do on my channel i'm not annoying. I promise today's video is on this beautiful, beautiful curly hair, any details that i might have missed in the course of this tutorial. Anything that i don't mention now will be in the description box use my code tony so t-o-n-i. Tony as in braxton tony as in tony kalani, you might call tony for money off your lovely hair purchases. This beautiful hair came in this purple box. Obviously the hair was in this like chiffon, it's not cheap organza bag, and they also give you a little pouch. They give you the essentials you need realistically to like work, the hair hair. Let me tell you about it. The texture is absolutely beautiful. It is, i think, it's the nicest curly hair i've had in a minute like i'm, not shading, my wiggins, hair one, because god knows that's a loose deep wave. I said the white girls went to like new yorker or someone with their family, and then they get the cornrows in their hair and then they come back to school. Like oh yeah, my hair looks like yours because they have cornrows and they take out the corners. Like three or four days later, and then they have like a weird zigzaggy curl pattern. That'S what this hair gives me it gives me it gives me white girl on holiday and take out her braids curl, but it's weird because it's like i don't know it's. I hope you guys get what i mean when i say that it's not a it's a bit of a zigzag curl, not really a curly ring, look curl per se, more of a zigzag curl. But let me say that the hair is thick as hell thicker than me. It is thick and it is beautiful, they're not bleached, very very quickly and, quite frankly, i'm really happy. The lace i think, could have been better. I prefer the lace in their undetectable lace range. This one was a bit a bit a bit more lacy, not really scalpy, but nonetheless you can still make it work and i'm so excited. So if you want to watch how i installed the hair, please continue watching on don't forget to subscribe comment and like thank you for tuning in. Let'S go i've one point on my head: the first time. This is what it looks like this curl is so cute. Let me just stop whiffling and actually get to installing the wig. My other eye starts moving mad in this video, i'm gon na cry, because i'm tired, i don't know what to do my eyes. Just keep watering or the product keeps creasing. It'S driving me insane, obviously, because my hairline is quite low. I had to um cut into the or tweeze into the hairline to make it like work with my face. They said it's 13 by 6 for like this space from here to here. It doesn't look like six inches across to me, but i don't make the wigs and i haven't, got a tape measure or so i guess, if they're saying that six inches it's six inches, but i've seen six inches and i think it's a bit bigger than that. But anyway, on some more important things, i'm gon na begin by cutting the hairline in a jagged motion. Yeah, i feel like my cap is a bit too light, so i'm gon na just go over the perimeter and in the middle because i will be wearing my hair, basically okay, so my eye makeup, like the under eye, is telling us about this one. It'S been an absolute vaseline, so we might have some problems, and that is just unfortunate because i look really good. Why is it always that when your face is like done, and it looks amazing that your nose decides to run your eye, decides to water or your under eye highlight decides to crease like it's so bad mind but um right now, i'm just getting rid of any Makeup that is going to be or english tony, i'm just taking off any makeup that is on my face and underneath where the lace will lay, because you don't want to lay the lace on makeup. It will just make everything, look messy and gunky and disgusting. So that's why i'm using just a baby wipe to clean my face now, just to put the wig and then to lay everything down i'll, be using my got to be gel in black surprise surprise, i lost my elastic foam so i'll be using the creme of Nature style and shine, foaming, mousse and next time i'm gon na focus on this top area. First, i'm going to use my blow dryer just to dry it quickly. So it gets a bit tacky. I think that's all right yep! Then i'm going to bring forward the wig and just position it through my little rat tail comb or not a wrap top coat with my little comb. Just so that everything is in place so with the comb, but literally just using it to like press in and ensure that there's no creases and everything is um flat and push in anywhere, where the lace might still be lifting just go over with a little bit. More on top of the lace this time so that you can literally just melt in this glues on its last like legs, so not glue this gels on its last legs. So yeah you literally just go over, and this i won't drive with the blow dryer, because i'm gon na just set it with the band and whatnot and then down here is literally just going to be pure got to be gel because i think it requires the Most security, because when your wig lifts most of the time it's down here like this first and then you can dry that a bit so it gets tacky, that's cool, look, it is laying, and even if it isn't, i'm literally just gon na tie it down and Use the blow dryer, so it will just set in place and the same should happen on this side and with the hair, rather than directly with your fingers on the lace you want to, like just press into place, the whole hairline. I hope you understand what i mean so rather than just okay. Thank god, lace! Look! No! You literally use the hair on itself to knock things in place, i'm going to just wet the hair quickly, so i can work on the curls a bit because, as i've been trying to set the wig and whatnot, obviously i've made it a bit more poofy. So let me just wet the hair and i'll be right back, i'm using my color nature. Foam just to help me define these curls, get them popping and whatnot and focus on the ends, because the ends can be the drier part, not drier, but they tend. The ends of the hair tend to look quite different to the top of the hair. So i want to make sure they look defined and healthy. I might even just trim them slightly actually and then on this side. Same applies. Take off this band, oh yeah, look at the leg! Look at the melt that that is all done. I shouldn't really be playing in the hair as it's drying, but i look at this side as well. I quite like that. Okay, i don't really want to wear baby hairs with this wig, but for the sake of the tutorial i'll just show you guys how i would go about getting them. So the little swoop here used to tell the comb to separate the hair and if it's a bit too thick just to thin it out and make it fluffy use a tweezer and just tweeze randomly to thin out the hair you've picked. And then i'm gon na have baby hairs on this side. You forgot to be jealous here, we're gon na start this side and use a toothbrush and just mold this into place. It looks a bit long, but um whoops and then this one over here everything in place get it looking good. I'M going to use my work. Stick my diameter hair, this white! Stick, i love it. I love it. I love it because it's semi-matte and it isn't too greasy and it gives the hair like a nice little shine, nothing! That'S too! Oh, my gosh look she's wearing fake hair, like it doesn't make your hair look like barbie hair, along with my hot hole. This thing is so hot: i'm scared, because it's even smoking jesus to flatten everything and get it looking perfect and then for that natural height that i, like i'm gon na just hot comb upwards, looking healthy - and i think that's me done. That is how i install and style this wet and wavy hair from love me hair. It'S about bra, strap neck, but it's not stretched and when it's stretched it's about, i would say 18 or 20 inches 18, most likely because i trimmed it. I think that's really cute, it's given, oh i'm so cute wow, so that is the finished style. If there's anything i missed guys. Please do comment below. Let me know what you think about it. I think i can actually wear it up. I can wear it in all sorts, but just for the sake of this tutorial, i'm going to leave it as it is, and i look so awesome and innocent. Oh my gosh, thank you for watching this video don't forget to subscribe comment and, like i'll see you in my next video bye,

Comments
The Ashleigh Watson: Best in the game
Marquita Willis: Did you bleach your knots? I tried bleaching mine and it didn’t bleach should I try bleaching my knots again?
Tropical StormXoX: What’s the intro song ?