How To Change Parting On A Lace Frontal Wig | Creating A Side Part Lace Wig Install Ft Giifti.Org
- Posted on 08 March, 2022
- Lace Front Wig
- By Anonymous
Hello beautiful people my name is GIIFTI, The gift to your hair. On this channel I help you achieve the look you’ve always envisioned. While you’re here please like and share this channel our goal is 1000 subscribers by next year May 2022.
Shop the wig : https://giifti.org/products/highlight
Melting lace band link: https://giifti.org/products/giifti-lac...
Booking your appointment link: https://booking.setmore.com/scheduleap...
Website link: GIIFTI.ORG
I offer 1on 1 classes book your private class https://giifti.org/collections/classes...
For business inquiries : [email protected]
Follow me - Facebook @ Gifty Parker
Instagram @Giifti
Snapchat @Gifter69
Catch up on our most popular videos :
Plucking 1 on 1 https://youtu.be/N5iT0cbJl88
Changing parting on a wig https://youtu.be/osNpDeIc8hg
How to box color https://youtu.be/vY3rpqkyMP0
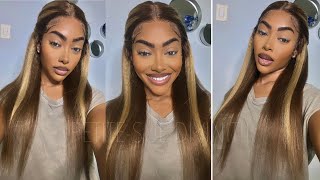
Hello, beautiful people welcome back to my channel. This is gifty the gift to your hair. In this video, i'm going to be showing you how to part your lace, frontal, wig, and how to do a really simple wig installment we're starting off with glowing down. You know putting the glue on my hairline. I'Ve already did a bald cap method, definitely check it out. That was my previous video. To start this, i'm going over the adjustments and the placement of the wig itself. I like to start off by the sides using the rat tail comb cutting off any access pieces that is not needed. I also use my finger as a guide, so i start off on the right side of my ear. Then i make sure that is laid down. Then i go to the left side of my ear, pulling it to really add pressure so that it lays flat together again start with the right ear. Lay that down - and i pull the left side so apply pressure on both sides. That is the very first step to do the adjustments of your wig before you get down to the melting down, i'm going over using my scissors to cut off all the excess lace that is not necessary and i'm using either my scissors or my rat tail comb To push down that lace into my skin before we get into the actual melting make sure you cut off all the excess lace, because it's not necessary and i have a small forehead. I don't want the lace to eat up my forehead. Now i'm going over to the sides, once you have the wig on, you always have to use a band. Gifty.Org has the gifty lace melting band that comes with the velcro in the back. This is going to push down that lace into your skin into the glue. You have three layers, you have the glue, you have the lace, no, you have the skin the glue, then the wig. So once you do that, this is how it's going to look once you take it off boom. It helps everything just flush in more. Naturally, it looks melted now. This is the part that you guys have been waiting for. How do you part a lace, frontal wig on your head, you're, going to start by the side that you need to be parted? I want a deep side part, so i'm going to start on the side. I take my rat tail comb and i part it to the deep side part that i want i'm going to keep looking and make sure. Okay is this. The part that i want is this, where i want my side to start? No, i kind of want it to be more curved, so i'm going to go over that again and create that really deep, deep, deep, deep curve kind of look using my rat tail comb for this style or anytime you're parting, your hair, a rat tail comb - is Really really necessary and also you will need a hot comb. I put my hot comb on the highest level and then i'm going to part my hair and then lay the hot comb on top of it on both sides to create a demarcation from like the middle to the opposite side. So again, i part the hair, and then i use the hot comb to just get that demarcation. So you can see the row and the part whenever you're parting, your hair, you want to part the hair first using the rat tail comb. Second, you want to take a hot comb and you want to hot comb it throughout to get that, like you know, lay down look depending on the size that we're going for, as you continue parting the hair, to make sure that it's perfect to where you need To be parted, i'm a perfectionist, so i, like my part, to be in a specific way. I'M gon na keep parting until i get it right. So now we're gon na go. Take a holding spray. I love to use either the tresemme holding spray or any kind of holding spray. You spray that lightly on the part that you want, and then you use your hot comb to melt it down like to lay it even more you're doing that, because the holding spray has like a tacky sticky feeling to it. So once you spray it on, it gives your part more of a clean look and it separates the two parts out of each other, so you can get a clean scalp effect. Now, i'm all done with my parting, i'm going to start taking out my baby hairs. I'M working on the baby hairs. Now i like to start off by carving out where i want my baby hairs to look, i'm just going for something light and simple. So what i do is i take out the hairline of the wig from where i've created my parting and i'm pulling that out. I'M only taking out a small piece, though, once i take out the small piece i continue on trying to carve out and see how much baby hair that i want in the front that is the baby hair section right there now to pull it away from the Actual wig i like to to strand twist the front of my hair or try to like you know, try to keep it away from the rest of the hair. So i have my first baby hair done and now i'm going to push it away from all the other ones. Moving on to the second baby hairs, the first baby hair for me is going to go where my part is the second baby. Hair is going to go by my ears to create my little like whoopsy whoopsie soups. Now that i'm all done carving out where i'm going to have like my baby hairs at. I do take my hot comb and then i'm going to flatten the demarcation from where the baby hair is from. Where the hairline is. Then i'm going to take the same melt, wrap like the gifty lace band and i'm going to wrap that on the hairline to push the hairline and the baby hairs away from each other. While waiting for my hairline and my edges and everything to melt together, i do style the hair. So once you put the wig on, you have carved out your baby hairs or your hairline. You want to put the lace melting band on and keep that on for as long as possible and style. Your hair, i'm doing beautiful, bouncy body wave curls on this custom wig from gifty.org. This wig is a chocolate brown wig. Then i had, then i added some caramel highlights to the hair. Just to give me some, you know body yachty, like you know, just something give me something. So this wig is from my company gifty.org it. This wig was longer y'all. It was about a 24 inch. Wig, but i have cut it down to to this length, i cut it down to about a 16 and 18 inch length. I really like short hair, but i had this wig for about a year now, so i've done many styles on it. I will put a first installment in the description box. I have a youtube video of how i installed this wig when i was already long. So if you guys want to check that out, it'll be in the description box as well, but right now, i'm just going over and creating some beautiful bouncy body weight curls to my hair, hey y'all. So this is the end look of this video. I actually cut the wig from super long too short added some body layers to it did a lot of layering um. Did the baby hairs right there and around the side? And this is it cute, deep side, part and i'll? Show you guys how to do a middle part as well, so stay tuned for more, it's gifty, the gift to your hair. This is the look


Comments
Jaquisha Calixte: I love it! Beautiful ♥️