Lace Wig Installation & Customization For Beginners Cbw08 Wow African Bob
- Posted on 02 April, 2018
- Lace Front Wig
- By Anonymous
How to make a lace wig look natural, how to glue a lace wig using cling? How to wear a lace wig. Lace wigs for beginners. Lace wig baby hair. How to apply a lace wig? Does CLING work? All of these questions will be answered and more.
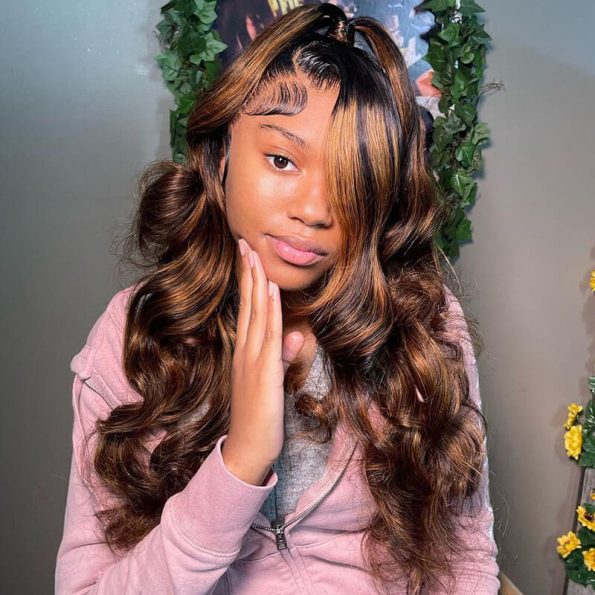
This beautiful black wavy bob wig is from https://www.wowafrican.com
My wig info:
Black Wavy Bob Style Virgin Brazilian Hair Lace Front Wig[CBW08D]
Link to this wig: https://www.wowafrican.com/black-wavy-...
Virgin brazilian human hair
Length: 12in
Hair color: Natural Black
Wig density: 150%
Cap construction: Cap7 lace front cap
Front parting lace: 4"-4.5"
Shop my wig collections on WowAfrican.com
https://www.wowafrican.com/destiny-god...
Use coupon "Destiny15" to save $15 all wigs
WowAfrican Popular Affordable 360 frontal wigs, pls check here:
http://www.wowafrican.com/360-frontal-...
More beautiful Lace Wigs pls check this page:
https://www.wowafrican.com/lace-wigs.h...
JOIN wowafrican
Facebook: https://www.facebook.com/wowafrican
Instagram: @wowafrican http://instagram.com/wowafrican
Youtube: http://www.youtube.com/user/wowafrican...
Subscribe | http://bit.ly/1m73sWJ
Donate | http://bit.ly/2dg74sg
Fitness IG | http://bit.ly/1mtHzTm
Fitness Youtube | http://bit.ly/2d0sAQ0
Alright guys so to start your customization off you're gon na go ahead and place your wig on a wig stand and they're gon na brush the baby hair back or any of the hair back just so you don't look a hair that you don't want tucked out And I'm gon na go in around the hairline to give it a softer, more natural shape to give it some curves and some squiggles. Basically, I'm trying to make it look more like my natural hairline, which is kind of jaggedy, and you want to go in and kind of, like, I said, give us some shape and then you're gon na go in a little bit behind the hairline and a little Bit into the bulk of the hair, as you'll see me doing - and this is just to soften the gradation from the very edge of your hairline into the wig, and you will see a difference when, when I kind of show you the wig you're gon na see A difference, but what I want to say is I wish I would have done some more and you'll see as the week progresses that I could have done a little bit more, but I always think it's better to do less than to do too much, because once You over plug your lace, you're pretty much done unless you know how to make weight and add more hair, but right now I'm just debulking and softening up that hairline and even going to go into the part of the wig. I'M gon na bring it back further and I'm going to make it look a little bit more natural right now. It'S kind of like a perfect square line which looks cute, but I kind of wanted to give it a little bit more of an organic look and feel so. As you can see, I've pinned some of the front baby hair down as to not remove too much of the hair. Then you're gon na create bald spots. If you have hair missing in front of and behind the baby hair - and you don't want to do that - so I did that and I'm just going in and debulking the front a little bit more. This is pretty much what it looks like and pretty much what it will look like on your head. I love this stocking cap. It actually came with the wave and the wave is from Wow African calm. So, basically, right now, I'm going in the magic, hair, moisturizer and oil to my hair, because my hair is gon na, be wrapped up for a little while and I'm gon na go in with some gorillas snot gel if you're not familiar with that girl. What you doing here, and I'm just gon na use that to press my edges back - and this is just gon na help - keep my edges safe from the adhesive, and it's also gon na help to hold the stocking cap down. So now I'm going in adding a little bit more gorilla, snot and letting that dry naturally, and I'm gon na go ahead and stretch my stocking cap over that gel and that is going to help to hold it in place. I used to do a whole bunch of gel all over my whole head, but I live in Southern California when it gets hot and your head is sweaty and you have a whole head full of gel, it's nasty. So, as you can see, I tied my edges down a little bit with the Gorillaz. Not now I'm going in with a little bit of the adhesive that I'm using and that's clean, I'm gon na go ahead and tie that down just to further secure my stocking cap. So now I'm going in and I'm just cutting off the excess stocking cap - and this is gon na - really really help your lace installation to look really natural. The wig is the color of my skin. It detects my edges and is also helping to kind of give a little bit of a scalp look further disguise the grates on your lace. Wake tie that down lower and more so now I'm gon na go ahead and put my weight up there, and this part is really important cuz. You want to just pull it and make sure that it's gon na fit exactly where you want it to lay, and you want to go in and cut your lace. You don't want to cut too straight across. You want to add some of those Wiggles and waves and to kind of have your lace look a little bit more natural, leaving a little bit in the front. So now I'm going in with a pencil. That'S close enough to my skin tone to be noticed, but not so bright that if it gets on my lace, it's going to ruin it. I did that because that's going to allow me to know exactly where I need to put glue, so I don't put too much or too little in either case it could be disastrous for your lace weight. So I really love doing that. Little technique again, the adhesive that I'm using is cling and I'm gon na go ahead and do about four coats just spreading that across the area where I want my wig to stick down to my skin and a little bit on the cap. And basically, you apply a coat, let it dry clear, apply another coat and a dry another coat, let it dry and another coat and let it dry a little bit longer. But I've seen people just go ahead and apply their lace right on top of it. When it's really really white and I've done that before, but you have to let it dry in the air for about 20 minutes before tying it down. So now I am applying my wig and getting ready to lay it to the glue, and you just want to really make sure that the back is secure. It'S in place where you want it, everything is going to match up as near to perfect as you can get it going in with my rat tail comb all cleaned off from glue, I'm going to use that to further adhere. My wig, I'm also gon na make sure, as you can see with my comb, make sure to comb the hair backward just keep combing it keep coming in because you don't want to get hair all stuck in your lace and all nasty and gooey. It can really make your legs look dirty really really fast, so you want to make sure not to get any hair stuck in there, and you want to also try not to touch her Lakes. If you can help it using a comb will help and, as you'll see a little bit later, I'm using somewhat of a toothpick to help further add adhesive. Tamales tweezers are also very helpful in fudging and keeping your leis, and especially the edges of the lace, are very, very important, especially if you didn't cut straight across you're. Gon na really want to make sure to get all those little curves and squiggles. As you can see here, going in detail and making sure that all the areas of my lace get to live and like I said when you go and - and you do detail, work like this and if you have to pile glue in a certain area, make sure To let it air dry for a few minutes before tying it down in this area, you'll see that I forgot a little area that needed some glue, so I'm just going in with the edge of my comb spreading it, and that area is gon na, be something That needs to dry and you'll, see it dry before I tie it down same goes for this edge over here. The edges is an area that a lot of people say they have a hard time getting to stick down. You really need to make sure it's clean. Really need to make sure there's no hair in your lace and you really need to make sure you're using a proper amount of adhesive. As you'll see. I go through this wig a million times combing and combing. It combing it because you, like, I said you don't want any hair getting stuck in the lace under the lace like sometimes it'll get stuck under the lace, and then you have to like try and pull the hair out. It'S just very crazy. Just going in and doing that, detail work, it's really gon na help. It look really natural. So, as you can see, this is pretty much the final result, and now I'm just going in with a little bit of makeup and applying that to the lace just to kind of give it a little bit more of my skin tone. What I did here was, I use a little bit of a concealer that was lighter than my skin, but later after this video, I did apply my very skin tone foundation. I just feel like my scalp is chocolate like if I was completely shiny, bald my head is one color. My scalp is not really lighter, so that's something you have to take up, it's a personal choice and then going in another step after you're doing your makeup and doing all the glue just going in and just taming all the little hairs and flyaways taking a baby Wipe with some high percentage, alcohol and cleaning off the lace is really important, but yeah, so you gon na really have to come to a realization or a choice. Anyway, you had to make a choice: whether you want your scalp to be a little bit brighter or the same color as your skin, and I think it looks better when it's the same color as my skin. So I plan to wear this unit with no baby hair, but I did want to go in and show you how to create some baby hair in the front, and I was just evoking a little bit and now I'm cutting the hair, and I prefer my baby Hair a little bit short. What I do is I'll go in and pull out the very front hairs that that were created when I, when I customize my hairline and I'll, just go in and cut them pretty short and wispy, and then, when I do them, I know that looks crazy and People are gon na, try and roast me, but what I like to do is just curve it. Let it dry I'll use some mousse and then I brush them free. So they don't look wet or stuck to my head, just very natural kind of swept back into the hair so going in with some of this L'Oreal mousse. I just want to show you guys the texture of the hair a little bit. This is a really really pretty unit again. This is the cbiit wo8 from wow acronym calm. This is a medium large cap, it's 12 inches. The lace is light brown. So if you guys are interested in checking it out, I will have more information and it's just cow code in the bottom bar. So after putting it on my head, like I said, I did feel like I needed to bring the line back a little bit more and I tried to do a little bit more with it on my head. But I've decided that my next installation, I will definitely go in and bring that line back and as this unit gets older and older and will get better and better. I really feel like we're living in this kind of disposable unit world when lace wigs are supposed to last, you a little bit longer and get better as you own them. So I think within my next 2 to 3 applications. I'M gon na make small adjustments here and there to perfect it. Alright guys so go ahead, and let me know what you thought of this video. You can leave your comments and questions in the bottom bar. As always, I want to thank you so much for commenting rating and subscribing I'll be in touch, and hopefully those are the same bye guys.


Comments
MyrinaKR - Life Coach: I CERTAINLY agree that you should use concealer that's your skin tone. When I did that people thought my lace front synthetic wig was my hair or a super high quality human hair wig. BTW, I LOVE how detailed you are in your tutorials. You are really good at teaching us how to do things in EXCELLENCE. Thank you, Desi!
Vicie Vee: Beautiful! You did a great job!! It looks like your natural hairline.
Jag 3532: You did a fantastic job! Just beautiful and so natural looking!
Alex Monét: Very nice!! I love the natural curl pattern, it's giving me beachy wave vibes. It's looks great on you! ❤️❤️
Mz dbnell: Really great job! The quality and attention to detail are A1. You are very talented!
Ria Wally ::::: This was so helpful & informative. Looks gorgeous, Thank you!!!
Noah & Noelle: I love your videos! Straight to the point and informative ❤️❤️
mizzstar21: Great tips! And amazing tutorial!
elaine Nelson: Good job! Very natural and realistic! PRETTY
ForeverFarrah: This is sooo helpful. I just bought my first wig from wow African. It’s amazing but I feel so bad at putting it on. Like you said, the edges can be so hard!!!
Sylvia Swaby: Love the unit, and definitely learned some things from your installation!
Ashley Marshall: Hello Destiny:) Love your channel. I have had problems in the past with lace wigs looking very fake in photographs. Especially with flash. Do you have any tips on how to prepare your lace frontal and apply it to prevent this? Thank you!
DOTTY GIRL: Another great tutorial. I really like the way you touched up the areas of the lace that did not stick after the intitial application. I suspect this happens a lot, however a lot of tutorials don't address this. I will certainly be adopting this technique when I have plucked up enough courage to do my glue install. Thank you Destiny.
MikaDivaMakeup: I use cling too! I’m now trying bold hold but I think the cling last a little longer for me. As always you slaying mamas❤️
Mona B.: Looks so good!!
Lucozade ?: You did an amazing job! The hair is basically growing out of your scalp
Thee Deevyne Goddess: Beautiful and very helpful
notocha coe: Not sure how I found your channel, because I've never worn wigs or weaves. However, if I did I could learn a lot from you. I watched this vlog from beginning to end. I plan on telling a couple of my friends who do wear wigs, about you. You have a new subbie.
Rae Isabell: Looks great! KEEP THEM COMING
Takeima Comer: I would just like to also add thank you so much for all your makeup tutorials I watch you Faithfully and I ordered some Jordana 2 + 1 Foundation I pretty much go get the drugstore makeup that you do tutorials on I love them so much
Simply Divine Makeup Artistry: Very nice, how long does it last before you need to remove and reapply? How do you maintain it?
Sy: I'm in love with this wig!
R Vlogger: I just knew that once you really got into this wig game you would have killed it....get it ma!
Christ Bella: It's so natural looking. It looks like your natural hair like. U did great girl. Keep them videos coming
Deborah: How long should you leave a wig on for?
AnnaSuarez Anna: Thank you this is dc such a helpful vid
DollFaceDeluxe: Thank you so much for EXPLAINING this.. Jesus you make this sh×t look easy af. I'm over here takin' notes like a m#ff#kkah ...❤
#OneLife: Great job
Takeima Comer: I loved it
marie Brad: Hey Destiny. I love your videos . I wanted to know if you could give me any recommendations for Amazon wigs. I don't have the coins to purchase one over 50 dollars and I wanted a kinky wig for the summer to help keep my hair protected from this Arizona heat
Kim Vaughn: Flawless!
Justin’s Other wife: THIS IS GENIUS! luv ur nails too
melbey: What glue did u use?
Barbara Brown: Very NICEEE.....YES.....Great Job
thepiscesedition: What can't you do?? Love the hair.
K Smith: Can I do the same with synthetic wigs?!
Cmichellestyles: Girl the wing is beautiful but I need to know that nail polish color! *Besos*
Salima Jabang: Wooow this is a full time job
MsEmeh:
Melonie Spencer: Pretty
TrueSugar: Can you share the nail polish color?
unique choice: Thanks
Nadia Layla: Great video! Very informative! You crute or whatever ...aka Lisa Cullen
Zeze: Great technique. Just wondering will you ever do a hair transplant update?
Marie Forcier: Way to much work uhg just rock natural look