How To: Make Lace Frontal Wig *Extremely Detailed* | Part 1 Of 2
- Posted on 15 December, 2020
- Lace Front Wig
- By Anonymous
Hello beautiful people!
I hope PART 1 of the tutorial was helpful to you! In Part 2, I will show you how to make your frontal wig look as natural as possible. This will include plucking the lace, applying the wig with adhesive, and making sure your wig is laying flat. So, STAY TUNED!
Check out my other videos!
HOW TO: Make Lace Closure Wig *EXTREMELY DETAILED* | PART 1 of 2 :
Mannequin Wig Head link:
https://www.amazon.com/Canvas-Block-Ma...
Hair used:
Snoblife.com
Brazilian Body Wave
16in Frontal; 18, 20, 22in bundles
*This is not a sponsored video*
For Business Inquiries only
Follow me on IG, Twitter & Snapchat : @lanachriss
Business IG : @lanacstyles
Intro song : Trill Mike Check - Not the Same
Don’t forget to subscribe!!
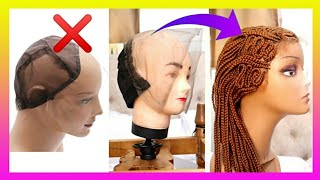
Hey girl welcome back to another tutorial today we're making our very own frontal wig. Now this is the cap that i'm using today, i will listen below in the description box. This wig this wig cap is just much more stretchier than the dome cap. So that's why? I'M using this one so and then make sure you braid your hair flat flat. Don'T put those big braids just to save time, because your wig gon na look crazy. So i'm going to use the adjustable straps in the back just to make it fit my head, and now i'm getting out my front tool this. This frontal is from snob. Life is usually where i get most of my hair from, but what i'm going to do is put this up to the mannequin head that i have so that i can braid this hair up, because i do not want this hair in the way. While i'm sewing this onto the wig cap, so you definitely need some t-pins um before you get started to hold this down now, let me just say the braid is not necessary. You definitely can just put the hair up in a bun, but the braid allows the lace to just lay flat on your head when you're getting ready to sew down. It'S just easier to see everything so now that all the hair is out the way you can now see exactly where you want the frontal to lay on your forehead so measure that out of where you want it to be on the cap. So, while you're doing this, you're still going to have your cap on and then you're going to mark it out with a white eyeliner pencil the way, the reason why you use this is because clearly it's easy to see. So when you go in and get ready to sew it down, it'll be easy for you to see your guideline. Okay, it's time to get busy, but first and foremost, you need to find a mannequin head. That is your size. My mannequin head size is 22.5. So that's what i have you can find these on amazon, but those styrofoam heads baby girl that you're trying to use it's not going to work and your your wig's not going to come out right. When you lay this frontal down, you want the back to be flat, so no wrinkles so use as many t-pins as you need to lay this down as flat as you can, and once you um, you know, pin it all down the front should be kind of Loose boom, we got a pin in place now, it's time to stitch it down now, this video is not going to be a how to stitch. This is more so the placement of how you should have everything. Now, if you don't know how to sew, you definitely need to just stop this video and go to my how to make closure video it'll be listed down below or if you just want to know my technique on how i sew check out that video. It explains it in depth and actually slows down the process, so you can know and understand and learn how to sew. Now that we've attached the frontal now we're going to try on the wig just before you know, you start sewing on everything and then it don't fit right. When you try on this wig cap, it should fit just like this. It should still fit snug to your head and the frontal should lay flat along your hairline. Now, when i tack this wig cap down, i'm going to pull the adjustable straps in the back so they're, not in the way when i start to sew and once those out the way now we can go ahead and start sewing. So i double the first bundle, and that just means i folded the entire bundle in half so the way i secure these bundles, i first go through the weft and then i create my own knot. The way to keep the knot close to the wig cap is to place your thumb where you want it to stay and then pull it now, if you don't tie these knots close enough to the weft, the the weft will start flapping up, and you don't want That you want it to lay flat and seamless. So that's what we're doing and um i might have another view of it as the video goes on, but if not, you can rewind it as many times you want now before i do my flip over method, which is in my other video, i'm going to make Another knot to keep the wefts in place so that when i fold it over, it won't move and it'll just stay in that one spot now, with making a frontal you kind of just want to go a little higher than you did before, like it's kind of Like just a zigzag like you go up a little bit on this side and then, when you make it to the next side, you go up a little bit that way so that you gradually get closer and closer to the frontal. I figure i'll show you how to stitch it when i flip over, while we're just here, so i don't actually go through the weft. I go under the weft and then i wrap it around the needle about three times and then i go ahead and pull it through and then what you want to do is pull the thread up and the bundle down to lock it in place. Now, after that, you're just going to sew regularly, but you do want to do about three stitches, really really close together on the edge. So it lays flat and then you can go ahead and just start stitching the rest of the bundle. You don't want to put the tracks so close together on top of each other, so just make sure it's about a thumb space apart. Okay, we're done with the first bundle. Now we're going to go up into the second bundle. You want to leave that thread that you already have left over from the first bundle, and all you're going to do is just sew like how you regularly do um. It looks like i double wefted this. I don't know why, but i usually just double the first bundle and then the second bundles i just sew in regular regularly. So once you attach that second bundle, i'm just gon na, do like a stitch or two back onto the first bundle, and what this does is just marry. The two bundles together now, when you get up to this part, to where you're very close to the frontal, do not sew on the front tool. You can it's your preference. I would advise you to not do that. The reason i say that is because hair the hair is in the bundles lasts longer than the frontal frontal hair there you they usually start to bald or they just don't last as long as the hair, so you're going to eventually need to replace the frontal. So, in that event, all you have to do is just cut off the frontal. Now, if you sew on the frontal, it makes it extremely hard to replace the front tool the missy mari got beat. So i'm just finishing up this second bundle and now i'm going to start to put in my third, but i still have some more thread left over and i don't want to flip it right here. So what i'm doing is i'm just going through the wig cap and actually just pulling it through, so that that thread can start right at the the cap. If that i mean right close to the frontal, if that makes sense, i'm sorry y'all just follow me. Y'All. Just got ta follow me, i didn't mention it, but the bundles that i'm using. I have a 18 inch, a 20 inch and a 22 inch and brazilian body wave. The frontal is a 16 inch and i double with i double weft. The first and the second bundle, but i advise you guys to just double the first bundle at the bottom and then the next two just do single just to make it as flat as possible. You just you really, that's really. The key to making a wig is making sure it's as flat as possible so that it looks as natural as possible. Okay, so i do want to give you guys another tip, because i just don't want y'all to make the same mistakes i made and we are going for scalp. Okay, we want this to be as natural as possible if you do not feel comfortable with this flip over method. Please cut your tracks, and even if you don't want to cut your track, i would advise to at least cut, maybe like the first five tracks on the top of your head, like close to the frontal it just makes. It lay flatter, like i noticed when i, after i got done making this wig, that it wasn't as flat as i wanted it to be, because i i did the flip over method at the top. I just want to add that in there, because i know it's kind of crowned upon the cut tracks, but i don't think it's a bad thing to cut, maybe like three four pieces of tracks at the top. That'S fine, especially to get the flattest install. You can get so now, i'm on the last track at the top, and i still don't go through the webs. I mean i'm sorry, i still don't go through the frontal, so just so, as close as you can up to the frontal and um go ahead and cut off the the rest of the track and then sew it down that last bit and you're done damn so You'Re, finally done with the hard part: now we just have to do this little minor thing is to take this excess cap off. That was under the frontal. All you do is pin it up. Take some scissors and just cut along do not cut too close to the frontal girl. Do not do it. You will ruin your wig. You will be so mad at yourself. You will cut a piece of the the thread and it'll just be all downhill from there. Just make sure you leave enough space for the thread to still be on the cap, and now we done with our frontal wig okay. So now we got that done boom. That was the hardest part, so make sure you tune in to my next video, i'm going to show you how to pluck this, this frontal wig and i'm going to show you how i apply the wig. So please stay tuned. Thank you guys for watching make sure you like comment and subscribe, and i will see you guys in my next video bye. You

Comments
Guerlyne Bel: Thank you Lana ❤ I made my first frontal wig it was to tight. Now you have encourage me to try again.
Vuji Vibes: Beautiful
Stacey-Ann Ricketts: I have a mannequin but it has hair on it can it still be used to make my wig?if yes how to I go about doing so?