*Very In-Dept* Walk Through Closure Bleaching, Plucking, Install , And Styling Ft Unice Hair
- Posted on 03 March, 2022
- Lace Front Wig
- By Anonymous
Hello my beautiful subscribers (and non subs) ☺️
Wig sales page - @CAwigss
Personal instagram- @holaa_caro
EMAIL- [email protected]
PRODUCTS USED:
Hair bleach: L'Oreal Quick Blue Powder Bleach
40 volume developer
Revlon Men's Series Slant Tip Tweezer, Stainless
curling wand: Remington :1/4 Pro Titanium Curl Wand
Edge control: eco styler
hair moose: lotta body coconut hairs moose
hair spray; PINK shine + hold spray
hair wax: She Is Bomb Collection Hair Wax Stick
●▬▬▬▬▬▬▬▬▬♛#UNice Hair♛ ▬▬▬▬▬▬▬▬▬●
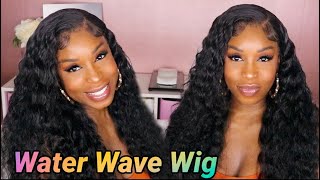
I’m using HD lace closure body wave wig in video: https://bit.ly/3rMnr47
☛Quick doing & trending glueless U/V part wigs: https://bit.ly/3rIoTUZ
https://www.unice.com/ ➤HOT SALE wigs: https://bit.ly/3JrrcC4
Hair details: Glueless 5*5 HD lace closure body wave wig 26 inches
Using Special Code To Get 10% OFF:myunice
Afterpay & klarna & Quadpay & Sezzle, PAY 4 Equal payment Within 6 weeks!
◆NEW arrival precious blonde wigs in UNice: https://bit.ly/3swysWk
Popular Glueless Headband Wig We Must try: https://bit.ly/3gMqa7j
DIY unique wig with bundles and closure/frontal: https://bit.ly/3rOO4FD
Download “UNice” App on your phone ➤ https://link.unice.com/appdownload-you...
Best Price Hair ONLY for ”UNice” App Users ➤ https://link.unice.com/exclusive-youtu...
GET FREE HAIR With Friends Help on ”UNice” App➤ https://link.unice.com/bargain-ytb
Aliexpress TOP UNice Hair store➤ https://s.click.aliexpress.com/e/_pvse...
Amazon UNice Hair Store ➤ https://amzn.to/2zxP2gm
[email protected]: https://www.tiktok.com/@unicehairoffic...?
Instagram @unicehair: https://www.instagram.com/unicehair/
Unice YouTube Channel: https://www.youtube.com/c/UniceHair
Facebook @UNiceMall: https://business.facebook.com/UNiceMal...
#unicehair #unicehdlace #unice
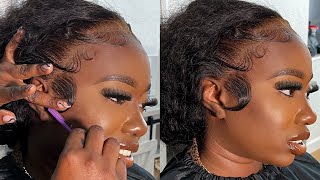
Hey guys, what's good, what's poppin welcome to my channel and welcome to my currently my kitchen so in today's video? Well, i guess i never know how to like do: intros and trailers just so awkward to me like hey, but basically i just got a package literally right and it was another wig, this weight that was going to be from yuni's hair company. I was about to start doing like all the prep that i do normally before i install a wig to make it look like quote-unquote scalp, but i was like. Let me do a little bit of. Let me take you guys, along with me, on the process, to kind of show you how like how much work i put in and like a lot of like hairstylistic people or just youtubers hair influences, whatever put into you, know, prepping a wig to get it to Look like scalp, because i i feel like sometimes a lot of people get kind of confused, not confused, but like myth. Mislead is not the right word either, but like whenever you just watch like a 10 minute hair install video of a girl installing away from whatever company you're like oh. If i order that way, it's going to come like that, i'm going to install like that. No sometimes, especially with most of these wigs, you have to put in extra work just a little bit extra. That'S a lot a lot of it depending on what kind of hair it is type of work to make it like you know, easier to install and melt and look like scalp right, but that's, okay! That'S what i'm here for i'm here to help! You guys learn all these little things. You can be a pro and sling your hair like tang and the rest of them or, like me, yeah, okay, cool, there's, my little spoon, let's hop right into the video so like i was saying i just unboxed it. It'S like a cute little like valentine's day, because that it's almost valentine's day pr box they're getting like a little robe super cute that thing's like an elastic band for your edges. I'M definitely sure this is more for, like pr purposes, you're most likely going to be getting the box and the hair, maybe some other stuff, but don't expect the robe. Okay, that's for me. So this is a closure unit that we're going to be working with today and it is a body wave. 26 inches. I don't know the density off head right now, but don't worry, i'm going to link it all down below how she looking is this hd lace or transparent um? Maybe i feel like these days. Companies are really mixing transparent and hd lace as the same thing, but they're not the same thing: okay, two different things, but i think it's. I guess it's probably hd, but not like a true hd, but we'll see we'll see, but so far it feels really nice and full for sure. I'M definitely sure it's a high density, so looking at it right out of the box, i hope the lighting is good right out of the box. I don't know if you can tell the knots for sure will need some bleaching. You could install this without bleaching. The knots i feel like, but you know me i like to make sure i am getting that getting that realistic natural vibe. So i'm definitely going to bleach the knots. I will be plucking the hairline a little bit. It'S not too thick that i can tell that they do a little bit of plucking, but that's not enough. But if you just want like doing any of the extra, you can definitely go ahead and install this right out of the box. But you're still going to do like tweaking during the installation process, but you know me: i do it all girl but yeah, let's get into bleaching the knots first. Okay, so i've got the squad together and by squat i mean the hair bleaching squad all the products. I'M going to use so for bleaching powder i like to use. I started using this recently. This is the it's like. A blue tinted bleach powder, which you know if you do know, helps with toning the knots in the long term, so they can be less orangey and more of a blonde color and to mix it. I like to use 40 volume developer. I use 40 because it's faster if you're beginner probably use 30 volume, nothing less than 30. In my opinion, 20 is too slow. Anything higher than 40. girl, you're gon na fry, your wig just saying so since i'm doing a closure, i don't need it too much, but i always just do a scoop. So i know bleaching. Knots can be scary, but honestly, if you the more you do it, the better you get at it, one tip, i would say, is first try pouring in your developers slowly because the consistency of your mixture is really what's gon na make or break will not make A break but kind of help you prevent making a big mess out of your frontal or closure so mix it a little bit in all right. It'S nice and you don't want it too, chalky a little bit more in you're. Looking for a creamy, not a creamy, spreadable texture and for me, i've learned these days to really help me prevent bleeding into the actual hair. It'S better that i make it thicker and have to wait. Let it better make it thicker than runnier it's like this see. It'S nice and spreadable, but the same time it's not runny. It'S not like dripping off. If i can still spread it around now before you go in and start applying, your bleach make sure you push back all the hairs in the front. Some ways come like the baby hairs pulled out in the front, make sure you push all of that back if you don't want to mistakenly end up getting bleach on that, because girl, that's gon na, be so annoying to fix, and then i just go in with My bleach mixture and i like to start from the back because the back has where usually the knots are larger, which takes a longer time to lift. So i start from the back and work my way up at the top. I try to apply enough pressure to make sure i'm getting the knots at the bottom, but not too much where now, i'm like you know, actually bleaching the hair if you're a beginner. It'S like your first time doing this and you're like. I don't want to mess up my hair, like i'm scared, but girl. Just do it just try, because the first time i bleached knots, so i messed up terribly like my first wig or closure. I made a mess everywhere like i over bleached out the house y'all, but i learned and now look at me teaching other people how to bleach their knots and there's ways to fix your mistakes. Like sure it's a mistake, but now you probably will learn from that mistake and there's ways to fix it. So just try it. You never know until you try now that our knots are fully covered with the bleach i'm going to go ahead and get some always check before you leave your hair to process. If you got any like bleach on the actual top part of the hair, if you do just get like water like like a napkin and lightly comb it out, but now i'm going to leave the hair to process and i usually check on it. Like i said, a 15-minute timer and i just come back every 15 minutes like 15 minute intervals and check on it to see how it is lifting. Don'T just leave the knots to process for like 20 minutes and walk away, because some hair does process faster depending on you know the quality of it. So don't just leave it because i've made a mistake before so. Just at a time, i always keep checking it like 10 to 15 minutes, come back. I'M just gon na get some foil right here and put that under the lace to help it process evenly and faster, and i'm just going to let the hair sit facing downward. So that way to kind of help reduce you know so that i don't i don't help gravity start to make. It bleed so yeah this way a few moments later. Okay, so i'm just looking at it. I never know if it comes up on camera, but if you can see it basically at the root i can see it's already turned a like copper-ish, like it's kind of like the color of this handle right. You can probably wait a little bit longer trying to be risky and let it get like to a blonde color, but i'm not trying to damage my frontal, my knots or anything because disclaimer disclaimer bleaching is a process. It'S like when you relax your hair. It can possibly damage the hair, make it more weaker, which causes shedding blah blah blah so trying to preserve it. Don'T bleach it for too long cool cool, but now i'm going to go ahead and wash her out as you can see much better. Looking more like it's coming out of our hairline instead of coming out of, i don't know nothing. I'M going to use some purple shampoo to help neutralize more of that orange, some more make it less orangey, more brown, i'm just gon na get a good amount of that rub it into the lace, make sure that not all the knots get it on that. Goodness, i'm sorry y'all can hear the tv in the background and watching friends i love watching friends. It'S like my comfort, show. I'Ve watched it many many times, but i just like to have it play in the background. Just you know something comforting nostalgic. While i do my work, but i'm just gon na make sure all the knots get this in there and then i'm gon na let this sit probably for another 10-ish minutes. Well, until i'm done cleaning up my kitchen so i'll come back to this and wash it out yo, i'm back and i look cuter i put on the little robe they gave me. It has a little niece on it and i've always already had this bonus. The bonnet i wear, naturally, i have thousands of bonnets, i'm always killing my bonnet anywho, it's time to pluck our wig here's. My little canvas head always got to put on candlestick i'm using this little wrapping. That came. You know that comes inside the wig i like to just use. I saved these and i put them on top of my canvas head so that way it's something it turned a little bit so that way i have something white to pluck, on top of which makes the knots a whole lot easier to see. I learned this trick from arrogant hay and i promise you it makes such a difference because it helps me not to overclock, because i can do the knots a lot better. So what i do, i just place the wave right on top of the paper, no pinning down this one's the wig on once the wig is on. The paper won't slide, okie dokie. Luckily, for me, this wig is already parted in the middle, but even if it wasn't parted in the middle, i would already go ahead and part it in the middle, because this helps me know where the middle of the wig is, and you don't want to part You don't want to pluck this part well at least not while you're thinning out the hairline, because if you pluck the middle, it just looks really weird when you're trying to wear a middle part. Like trust me, so save the middle for later, like when you're installing it cool, make sure you get a hot comb or even if you're, using water. You want to make sure you press back the hairline, so you can see what you're working with the company already kind of. Did us a favor here and we did a little bit of light plucking, which is why i said it's totally fine to install this wig. Like this, but for me i know i wanted more plugged, so i would like to i'm going to part out to where, like it's, the thickest, which is you know up here, pull that out. I never like to pluck in the front really saves me from having a balding look later push everything back, i'm going in with my slant tip tweezer. This is my favorite one from revlon, i'm just going to use this tip down till tip pointing forward. I guess the pointiest part cause the slant tip and i just start to like this is so hard to show you guys on camera. I try to make sure i have a good grip too, on the hair, and i just start to you know, pluck pluck in a backwards dragging motion grabbing from the root. I pluck an area skip this part right here and then plug the next line over skip. Pluck skip plug - and i just kind of do this, but you don't want to skip too big of a gap because it's just going to look funny, but basically we're just trying to thin out the hairline to give it more of a realistic look. Oh man. I think i just poked the hole in it, so you want to be careful to not drag too much or use too much tension where you start pulling holes in your knot in your lace, but the same time i make sure you're putting enough tension to pull The hair out from the roots, it's really all just practice, y'all like i had to watch a lot of plucking tutorials and also like a lot of like plucked hairline photos on pinterest to kind of learn what works for me. Another thing once i've already plugged down here, so i'm just taking my tweezer more further up - i'm not plucking down here, but back here now you don't want to pluck in the same area, because you don't want to make bald spots you're just trying to create a More realistic, thinned out, hairline and, like i always say less, is more: you don't have to go ham on the plucking on the mannequin head. Just do like something light and then once you install the wig, you can definitely go back and tweak it. Because now you can see how it looks exactly on your hair, so that's plugged pretty good for me, so you can see it's blending really nicely in the front. I'M gon na do a little bit of plucking in the front just a little bit. Just to you know thin it out bit, but not too much, and that is pretty good for me. You see that great lovely, beautiful and now i'm gon na do the same thing. On the other side thing hot comb press it all back and this scary try to keep them because i found them little. No i'm sharing, i can take it to the parents into perry playing a wedding baby is like i said before, get a nice good, tight grip up here to help the knots come out and also to help slip, everything and then i always also start not as You can see in the middle right here because we don't want to pluck there. I always start a little bit off the center pull skip, pull skip, pull skip right there, but yeah just like the same thing with the bleaching of the knots yeah. It'S scary in your first time, you're gon na over pluck or something and mess it up, but that's fine. Like all the times i over plucked my wig when i was learning girl, i do. I just would cut my lace in the front and start over again granted. I would have like a one inch part, because i've cut off my lace, but hey that's how i learned i'm so slow y'all. I just realized. I didn't even pull out the front. I was so hyper focused on making sure it was on the camera. So don't do what i just did, because if i didn't stop and just realize that i probably would have had that bald spot, so might be my god. Another thing, too, is pluck in front of a mirror or something so you can see like exactly how the hairline is looking like the way i'm looking down on it like this. I can't see the hairline that well, but me i have a mirror in front of me that keep checking to see how it's looking and i guess another tip that why you should do as a beginner instead of like, because now i'm just pretty good at knowing How to go back, but that's kind of hard, just section it off part piece by piece and thin. It out that way, like basically now about to do the next part i'll section it off like this and i'll start plucking on the next thick part of the hairline. This way it's just more time consuming and, as you get better plucking, you can do it the way that i do it, but if you're still, you know trying to ease your way in definitely do it this way to help you control your plucking all right. That'S pretty good for me, since i already plucked the front, i'm not even going to try to plug that front out. I don't want to over plug this okay, so i'm standing up right now, because i want you guys to see the the hairs folding. This is 26 inches and that's how long it is. I am 53, i'm a shorty she's pretty long, but it's kind of thin towards the ends. So i'm just going to go ahead and do a nice blunt chop on the ends first and then i'm going to just cut it to right here and then i'm just going to cut some light layers, not too much layers. Hi, hello me again now it's time to put her on and i already have on a wig cap under my under my bonnet. The reason is for this is because i don't even know why i just happen to have it already on. I have my hair like cornrowed back just for those of you wondering like how do i have my hair under my wigs, i just always have a cornrow, like you know, regular prison braids straight to the back and the smaller your braids, the better like flat twists. Y'All all you flat twist girls, people who just do two big ponytails and just try to put it on it works. But if you want a really flat flat wig your foundation got to be flat. So i think i have like 12 little braids going backwards. So, first i'm going to go ahead and attempt my lace because, like even though it's supposed to be hd, it's still, i don't know if you can still see it. It'S like a perfect match to my skin tone. It'S definitely not giving hd. I don't know if it is supposed to be hd, because if it is it's not i'm just gon na use this concealer from the beauty supply store and it's like a full coverage concealer and i'm just going to use that to buff into my lace. Now, i'm really just focusing on the front part of the lace where the like, you know the lace in my head meet because that's where the blending needs to be the most accurate kind of mesh the most right there. Sometimes i'll also like just put some on top of the lace just to really make sure everything is a full solid coverage, i'm going to blow dryer and just you know, dry up all of that concealer and to make sure it's like properly oxidized. Before i go ahead and apply it on my head to spray down my wig using our bestie right here, ebb and lace spray, i have the black one as well try to grab her from the back. I also have the black one, but i've tried it, and i don't really like this one that much, i feel like there's no big difference, especially like supreme hold, and this is like the extreme hold and they have one more just like a lighter hold. But this is my favorite one i feel like it works the best this one. I don't know i don't like it. I feel like this is just legit for me, so i'm just gon na go ahead and spray this in my lace, keyword on the lace. I try to spray it on my lace, more than i'm spraying it on the hair. This kind of just helps the hair itself from getting too hard jeez i'm running out oops, but once i so to my hand, but won't spray on the lace - okay, okay, there, but once i spray it, i use my fingers as well to spread the product around This also helps with the buildup of residue, because you're making sure it's a nice and thin layer now, with my blow dryer and my rat tail comb just gon na on my cool setting, because using it, if you use a really hot setting to do this process, It'S gon na dry too fast and too sticky, and that also leads to getting residue and all that build up, but using a cool setting. I just like to you, know, use my blow dryer, make sure it all dries and stays in there. I'M going to use these little cuticle scissors. These are like for your actual nail cuticles i like using them for my lace as well, because they're so thin and sharp that i can kind of get the same effect. I would with a regular razor with the jagged cut, so i just use that and make sure i'm like you know, cutting in a jagged motion, because dragon motions just lay more naturally on your head and then use my comb again, because since i had to lift It up a little bit to help me cut it. I just use this comb to help push it back into the glue i'm going to go ahead and just pull out my baby. Here'S not just section them out before i put my elastic band on real, quick and i think i'm going to start. It is, and i spray this ebb and spray on top of the part where i parted, and this just kind of helps, i'm so pretty this. Just kind of helps push the baby hairs down. I'M going to go down with this razor bracer combed whatever, and try to cut out a slanted ankle to give it a bit of a feathered effect. Cutting them straight across just makes them swoop very stiffly like it. Just looks i don't know, it looks weird like very boxy, so try cutting them with a razor comb or like cutting them at a jagged ankle. So they look more fluffy and more, like you, know, natural something. I'M learning a lot with like wigs and stuff cutting stuff and perfectly or just making it look. A little more imperfect makes it look so much more natural because you know your hairline is not like straight across perfectly. We don't have just like hair lines. So, that's why it's important to cut your lace at a jacket angle and also cut your baby hairs at a jacketing angle. Now i'm going to use my elastic band to just hold down the lace and everything before i swoop the baby hairs, because swooping does you know, cause lifting and trying to like sweep your baby. Hairs is already frustrating enough, but when your lace is lifting in the baby, hair they're not are not trying to play, but when your lace is lifting and you're trying to do the baby hairs, i literally want to rip off my wig every time that happens. So i always try to make sure i ensure the lace is like perfectly dried before i go in, and do all that. Okay, one of my toxic traits when it comes to installing my wig is obsessing over the most tiniest details like it's a good and bad thing, because one it's good because it makes my like it helps me get better at each of my installs and they get You know they keep getting better and better, but it's bad because my installs slowly take forever. Even the most simplest install takes me so long, and sometimes even after i've installed the way video i will keep i'll like continuously be tweaking it one thing: i've read recently. Sorry, i'm over here, so you don't mean i'm over trying to make sure these baby hairs are like symmetric like under, like your anxiety, showing itself, because what i'm seeing is, like you know, being a perfectionist. Well, let me i'm using this mousse foam. I love this stuff, like i use it for a lot of my steps in my install i like using this now for my baby ears. Normally i'll use my eco styler gel. If you watch my videos, i always use that that's great for beginners, because it's just like, if you're used to laying your natural edges, it's more more what you know, but i really like using this because it's not sticky, it doesn't interact too much of my lace And the baby hair still look like nice and light and fluffy, but it still like has good hope, but, like i was saying so, yeah nitpicking or just choosing to be a perfectionist over certain steps that are probably unrealistic and, like probably in reality, is not that Deep is another form of your anxiety, slash procrastination, because you're just using that excuse of oh, it's not good enough to keep. You know to keep doing something because in reality, you're scared to mess up. Does that make sense? I don't know it made sense. When i heard it, i hope that makes sense so now, once i heard that - and i realized i do - that a lot especially like my work or just my content, i spent hours and hours nitpicking over one thing or i'll hate it install and be like. Oh that's ugly or it's not good enough, or it looks funny like when, when i show to my friends or just people in general, where i finally post it everyone's like this looks so good like, oh, my god, i'm like! Oh i'm like wait. I was just tripping like this looks fine, it's just me just being kind of, i guess, anxious to put out bad content, so yeah sometimes just get out of your head bruh. Just just do it like nike, you know nothing. I just realized, while talking this out with y'all, my insults actually take me so much more my installs back then i didn't even know what i was doing. I could took me so, let's like what's the word sorry guys, like english, is not my first, my first language so sometimes speaking, i get my words all tied up in my head, but like my installs, when i first started doing hair, when i literally didn't didn't Know anything at all, and i was a beginner like you guys, watching or whatever or beginner just watching youtube videos trying to figure it all out by myself. My installs didn't take me as much time as they take me now like. I could install a whole frontal wave prep and everything in like three hours boom bam, but now that i'm i'm getting so much better at my installs, they take me so much time. Half of it is me paying more attention to details, but the other half of me just obsessing over things. That probably are not even that deep because back then i don't know what i was doing so slap that wig on it go: sis yeah, i'm gon na. Take my own advice, i don't know if they look too big, but you know what i'm from texas so go big and go home. Everything is bigger in texas and so are our baby hairs. If you don't like them, then leave peace out, i'm going to go back and lay your baby hairs down again. Oh okay, now styling time i'm going to go ahead and do some wand curls, but i'm gon na try to do this like try to do the little tiny one curls for more juan carl look insert reference photo. I lost my really big hot comb. My really big curling wand on my trip as well. So i have is this little tiny one and me: i have no patience y'all, i'm always trying to get, especially when it comes to the styling part, because just installing it was exhausting so with styling, i'm always doing big sections. This hairstyle kind of requires small sections. So i'm gon na have to try to be patient and take my time, let's see how much patience i will have during this spray, some heat protection on her. I love this chi heat, protectant and spray. I, like one, protects the hair, of course, and also helps to add shine to the finished, look which i love without it being like oily or weighing it down. It'S very lightweight. This is as small as i can go, i'm not trying to do any smaller. I'M just going to take this, make sure it's hot enough. It'S like a cheap remington one, it's not as good as my other one, but she's gon na have to do. We'Ve had this for, like honestly, who knows how long i'm just gon na do little twisties around the curler to help the curls form better. I always like to hold it for a bit, let it cool before i drop it. This helps like the curl, like fully form you know, and since i want, i can't i'm also going to hit it with some. This, like light, hold another shine spray by pink, it's like a hairspray and it's light. It'S not going to get the hair too crunchy, because i want the waves to like show in this look so give a little sprinty spritz and just let it drop okay, that's what we're kind of going for i'm gon na be here for a minute! So, let's just get into it, i'm gon na keep watching my show y'all can just keep watching me is is is, is, is let's see we're looking like under this elastic band? Oh okay, she's, looking good she's thinking. I need to tweeze a little bit, but now for these curls i don't want to brush them out. So for this part, you got ta use your finger, but i'm gon na use a like this picking part of the comb. I'M definitely gon na have to re-curl this piece she's more of a wave, but i'm just gon na try to like separate everything without like brushing it out. You know i don't want like a brushed out. Look. I also don't want it to look. You know together. So i'm just gon na slowly brush it out and see how the curls form not brush it out. Yeah use my fingers a little bit. I'M gon na cut this okay, but it's definitely it's like it's looking like what i had in mind like she's, giving. I just need to tweak it a little bit, but she is giving um. So i'm just gon na do some tweaking here and there to make it look exactly how i want it like i'm gon na cut the layers a bit more, which piece like i want this just a little bit shorter. I have to just smooth everything, especially here at the top gon na, go into this wax stick and my hot comb and just kind of you know, shape up the hair and smooth it out just kind of give them more of a fluffier. You know, look our cleaning up process, i'm gon na go in with this black eyeliner pencil and just kind of clean up all those like over bleached knots back there to make the part look more defined and clean, and then we're gon na use. We'Re gon na use some concealer a light, shade, concealer and pop that, in our part, so i'm gon na squeeze. I don't want to squeeze my face and pop that right in the middle to make it nice and noticeable. I want too much. Okay, let's try to do this just blend that out. Well, i forgot last step last step the piece, the resistance i'm going to use some more of that foundation i used earlier and just tap that onto where the lace is showing the middle kind of just help. Marry it in with my skin but yeah. This is the final look stop. This is the final look. I hope you guys enjoyed this tutorial. I hope you found this video helpful and i hope to see you in another. One make sure you like comment and subscribe and peace out girl scouts, good, bye,


Comments
Mrs.Chanelle B: Absolutely love this in-depth tutorial! Thank you ❤️
As Told By Chy: Love detailed tutorials girl
Stella: Thanks for putting us on. You’re a queen!❤️
Tanita Beninga: I love your curling videos please do a detailed one ❤️
tiffanyjackson521: Thank you I definitely appreciate the in depth tutorials
Martazja Hegler: You did a great job
Taniayah Jo'net: WE NEED A SKINCARE ROUTINEEE!!!!!
Leilani Moncrea: Hey girl love your videos!! can you give a tutorial on how you reinstall a wig with cut lace?
Jade Starr: Girl you amazing for this
PrettybihhcheyTv: Bye because not me just now finishing your “pluck like tae” video then bout to comment “can you fail how you bleached the knots” ALL for you to already have me down packed you just knew I needed you atp ❤️
Emani Pettiford: I’m getting myself the hair for sure lol
As Told By Chy: Can you do a detailed curling iron tutorial
Malikah Green: Girl atp just go ahead and post this on IG so I can buy it
Hdjhxgzh Thv: You are so beautiful
Nya G: I love this!! Also whats ur first language ?
Tinashe Ruze: 40 mins !!! is it my birthday !!!!! appreciate this
Miss Cherié: Do you live in Virginia or are you from Virginia?you look soo familiar!
Concise Yoga: Love hour videos, but is there a filter here?
Prissykindra: Yes
EssenceofOma: Eeeeeekkkkkkk