How To Pluck And Melt Any T Part Lace Front Wig Very Detailed | Ft. Luvme Hair | Olineece
- Posted on 18 November, 2020
- Lace Front Wig
- By Anonymous
How To Pluck and Melt Any T-Part Lace Front Wig Ft. Luvme Hair VERY DETAILED
Subscribe here help me reach my first 5000 subscribers!
⇢ http://www.youtube.com/c/Olineece
Turn on your notifications to be notified of my next video!
》》》》》》》》》》》》》》》》》》》》》》》》》》》
Hey all!
Thank you all for watching my video! All the specs of this t part lace frontal wig are listed in the video! If you have any questions about this t part lace front wig or suggestions feel free to comment below! Also please feel free to share and like the video if you enjoyed my content! Every like, share, and comment matters!
Love you all bunches and hope your day is going well!
Be sure to wash your hands and stay safe during these troubling times.
Black Lives Matter.
Olineece Croomes
XOXO
》》》》》》》》》》》》》》》》》》》》》》》》》》》》
DIRECT WIG LINK:
Use my code: Olineece20
LIKE MY LASHES?
⇢ https://youtu.be/n38FOqVb-AU
SEEN MY LAST VIDEO?
⇢ https://youtu.be/FZ6zUwjH7Gk
》》》》》》》》》》》》》》》》》》》》》》》》》》》》
SOCIAL MEDIA
⇢ Twitter: @outlabeled
⇢ Instagram: @outlabeled
⇢ Snapchat: @outlabeled
⇢ Business email: [email protected]
LuvME Info
Direct Link for the wig: https://bit.ly/2TRoLRm
Length: 20 inches
Luvme Hair Website: https://bit.ly/2TSIYpM
Instagram: https://www.instagram.com/luvmehair
Facebook: https://www.facebook.com/luvmehair
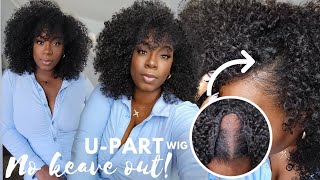
Hey guys and welcome to my channel, my name is alanis. If this is your first time here make sure you hit those big red letters below and subscribe, so you'll never miss one of my videos so today we'll be working with love me here company. Oh i'm! Sorry y'all, i don't know why i did that, but these are all the luxurious items that come in the box. Of course you see your wig, your wig cap um. They even give you this little pouch with a clip, some bobby pins and edge brush and, of course, some information in the back and they're all branded for love me, which i just thought was so adorable, so we're jumping right into this video y'all. I am pulling out this wig and this is their bronze brown color deep, wave, teapart, simple lace, wig. I have this wig in 20 inches and right now on their website. The price is 279.90. Now, if that's a little crazy for you make sure you check in the description box below for my coupon code, you guys, so i really wanted to shout out start off by showing you guys the hairline of this wig. I noticed that the hairline was extremely extremely full and the fact that this is a tea party, lace, wig. You don't really have that much hair, that's actually on the lace to work with. So i really wanted to give y'all an up close and personal view. Now one thing i did love about this wig is how deep the part was, so the part does go really deep into your head and that kind of gives it more natural look and something for you to like work with as far as the part, instead of It being like a 4x4 closure, so that's really interesting and i honestly have never seen a wig like this before the construction of the cap was pretty good, but i did want to show you guys how much hair you actually have to work with on the lace. So, as you guys can see, the cap goes in to the tea party shape and only the hairs that are on the lace. Is that all you have to work with as far as plucking and dyeing the knots and such so, i just want to show you guys like where it cuts off and that's what i'm pointing to in the video. It was a little bit unfortunate, but i didn't the best that i could and i just wanted to give you guys a video about how you guys can pluck and customize your tea frontals, so they blend better with your forehead, but other than that. This wig was super pretty super amazing and super high quality. So let's get into some customization okay, you guys so the first thing that i did was take this bleaching powder and this 40 volume cream developer to dye the knot. Let me tell you: i was so so committed to slaying this wig for y'all, because i just really wanted it to melt, and there was nothing that was going to stop me. So i was definitely going to dye these knots for y'all and try to get it as perfect as possible. Unfortunately, all the knots on this wig are so big and some of the hair took, but the knots didn't really take at all. So i just wanted to let you guys know that if you are planning to dye the knots, save your bleach, cis i'll, show you guys an alternate method and how i got it to match my skin so well in the end, but other than that um. This was kind of a waste of bleach, so, as you guys can see, those are in the knots in the front um after i dyed the knots. I actually let the hair sit in purple conditioner, just to take some of that brassiness out of the wig that you guys saw in the beginning, and it did take the brassiness out and, as you guys can see, there's like more of a brownish color to the Hair than the orangey kind of tones, i do recommend that you guys do that if you're not a fan of those orangey tones in the beginning. So next i'm really going to get into how i plucked this frontal, i'm just trying to show y'all how much hair you have to work with. It'S not a lot at all on the sides. It actually comes closer to the tracks than in the middle towards the part, but you really don't have that much hair. So you want to make sure that you are taking your time and doing the best possible plugging you have ever done and don't rush this process. You guys use a very nice tweezer and also wet the hair just a little bit. I wouldn't suggest soaking the hair, because that allows for easier plucking when you have like a very dense frontal or something of that nature. But since this is the case, we don't have that much hair to work with y'all, so you just want to go in and make sure you are plucking and moving your hands. You guys pluck and move pluck and move. I would definitely suggest that you start behind the hairline that way, you won't have any like super deep or crazy holes, i'm showing you guys in real time, but i'm gon na speed it up some, because this did take a while and make sure after you're plucking That you are combing through your hairs so that you can still see the hair that you still have left next. I went in and i actually plucked the hairline. So for this you kind of have to imagine how a hairline would look and from there you would go, and you would pluck those hairs in that way. So you guys want to make sure, there's not any crazy holes and you're kind of like imagining the exact front of the hairline. It'S good in the fact that these knots are big, because that means a lot of your hair is not going to shed in the front. So this wig will last you a while. But another thing is: when plucking you want to make sure you are going in and getting those knots out, because you can pluck the hairs, but a lot of times the knots will still remain. So that's my biggest tip, you guys biggest biggest tip when you are plucking. This wig is that when you pluck those hairs and you're combing out those hairs that you make sure that you went back - and you got those knots out too, because those knots will still give the impression that your hairline is dense when it's really not and you're. Really just losing hairs so be careful when you have big knots like that, you'll be able to see that, like some of those knots just sit in there and there's no hair attached to them so make sure you go back and do that, like i said you Guys take your time with this process, be strategic in how you want your hairline to look and honestly it should come out. Well, i'm gon na. Let you guys watch that and show you guys some more customization tips after this. Okay, you guys so then i went in and i worked on the part and the part is pretty well pre-plucked. The only thing i would have to recommend about plucking. Your part is that you pluck in a straight line that means for this. You guys don't have a lot of hair that covers the tracks on the sides, so you really want to pluck in a straight line and focus on getting those knots out as well. That way, when you, if you do decide to put makeup on it, um and cover your knots in the end, it'll actually look like you have a part in there. You don't have to do this. If you guys already like how it looks, i did it just so, it would look more laid, and i kind of like my parts on the bigger side. You can always go back in and make the roots darker, because these are dark roots with some powder or with some root spray, but just make sure that you're plucking and getting all the hair out that you're focusing on when you do pluck your part. So next i went in with some wax and this is a crucial part y'all. This allows you to really see how well your plucking has turned out and how that hair is actually going to lay on your head. So i went in with this wax that i got from love me, hair from another video, actually that i've done in the past, if you guys haven't seen that make sure you go check it out, but um. The wax really helps to lay the hair down and i used a super super duper hot comb. You guys let your hot comb get hot honey, because the more that this lays down the better that it's gon na look on your scalp, because you do have those tracks right behind the hairline. You want this hair to lay as flat as possible. So, as you guys can see, i'm really picking up the hair and pushing it against the hottest part of the hot comb, which is the back. I'M gon na use some more products in order to really get this wig laid, but it was just very important to me that we get the hair that is lining up with the hairline super duper flat. You guys don't miss out on this you're gon na want to do this, so this is how the hairline turned out you guys, seeing that you don't have a lot of hair to work with. I absolutely loved this hairline and once i show you guys, the final customization tips for a 13x1 frontal, you guys are really going to love how it lays with your skin. Like i said, we still have those knots to work with so we're going to go. We'Re going to get in there and work with those knots so that it blends well with your skin and you don't even have to use any baby hairs. You guys so finally guys to handle those big knots. I took this airbrushed leg spray in deep glow and just sprayed it over those knots. As you guys can see, it gave me a flawless color that matched with my skin pretty well um. They do have a range of colors in this and you guys can most likely pick it up from a beauty, supply store or walgreens or something of that nature. I also took some powder just to lighten it a bit and went over that as well, which also helped it set. This is how well it blended with my skin, on top of that, the lace is transparent and over that overall, it was a great experience. I ended up installing this wig off camera and these are the finished results you guys, if you like this wig or anything that i did make sure you give me a huge thumbs up. If you haven't already make sure you hit those big red letters below and subscribe, also use my coupon code, if you guys, are interested in buying this wig from love me hair company. I really hope you guys enjoyed this video and i hope really hope you guys are able to plug your 13 by one lace. Frontals too, because this lace, shorter jaw is, is something else. But i love you guys so much. I hope you're having a blessed and awesome day and i hope to see you guys as watchers or viewers of my next video thanks for watching bye. You


Comments
Chizoba Ikejiaku: Thank you for this beautiful! I have a beautiful 13x1 wig and I was literally like “Um, how I pluck this?” ... You saved me!
伊雪南: i’ve never had a t-part wig, and i ordered one so this was really helpful!! i wanted to also ask if you laid the wig down on the side to make it a side part? i thought it would look awkward but it didn’t on you, just asking ! i don’t think i’ll look good with a middle part so this is pretty important lol
Kali Watts: That lace looks so good I was like why she cut the lace so much but the lace was right there
Sandra Conway: So beautiful and perfect timing since I have my first t part wig you are such a blessing
Kimberly Ulloa: Thanks for the help! Have you ever tried to ventilate the wig? You can add more hair to the lace before you cut it. I just did that to mine. It’s easy once you get it and you’ll love having that skill!
Nichelle Loh: U did an excellent job at explaining how to customize ur t parts w less room. I just bought a wig w same issue. So yea I needed this to go about customizing it! Thank u so much !
KRISSY TV: Thank you so much for this video!
Style with Serwa: Dang, I wanted to see the install. Good job!
Paris Dukes: This was super helpful! Thanks!
Mona Lisa: Best t part I’ve ever seen
Sabrevian Davis: Thanks so much for this video! I bought this wig for my mom last week, do you have any videos of you installing the wig to get such a flawless hairline?
Carlisa Mathis: You did an amazing job
Taylor Smith: How long did you bleach the knots for?
Tichina Sims: How long did you let the bleach sit for?
theTJray: Luvme Box came with the goodies! Great video!
Kennedy The Ogre: You look like Jhene Aiko
Lani Brasi: Man I’m pissed off Bc I decided to do my hair before work now it look all messed up and the hat don’t cover eve thing now I wanna take it out but that’s means I got to wash my head oh lord
Notty J: Hi do you need to glue this wig?
singing monkey: Ur voice is so therapeutic sis
Im Pretty Rena: This helped because t parts are cheaper
Jean Bay: I ruined mine already