Aliexpress T Part Wig ‼️
- Posted on 23 September, 2020
- T Part Wig
- By Anonymous
Watch me slay this wig from Ali express making nothing into something!
Adhesives: Laced Up Lace Glue & Laced Up Lace Glue Two
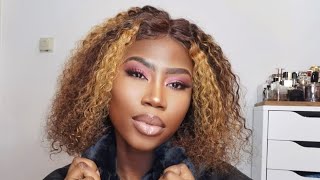
What'S up y'all, it's your girl, p, frank and welcome back to my youtube channel. I know it's been a minute, but let's get into this video quick rant. Let'S talk about this wig and let's talk about how aliexpress played my client. So this was her birthday week and she went ahead and purchased a lace, frontal wig to her knowledge and, as you can see, this is not a lace. Frontal, wig y'all, please stay away from aliexpress when ordering wigs. You are better off ordering from amazon. That'S a god, honest truth. So, as you can see, this is what they sent her. So i told her that i would try my best to make it look like something, and if it's a hit it's a head, if it's a mist, then it's just going to be a miss. Let'S go ahead and jump into this tutorial. First things. First, rest in peace, look i'm just kidding. First thing you want to do is: go ahead and sleek out your clients, edges with gossipy glue, gel or any type of gel in order to protect their hairline from any adhesive that you're about to use you're going to blow dry on cool. Then, as you can see, i'm about to apply the cap now my ball cap method does not require any type of dryer time and it most certainly does not require any type of foundation on the cap. I cut a hole around the ears so that way the cap and lay flat on her edges. My youtube family don't know this, but i officially launched my full product line. I'M going to be showing y'all how to use it today. So i'm starting off by using my laced up lace, 2 lace glue, and this is what i'm going to be using to go ahead and secure her cap. Y'All just know the full product line is the from the lace glues to the foam to the wax. Stick. Just everything about it is just amazing and i'm gon na be making more videos just so that way, you guys can see how each product works, and i also have blade screw remover as well. I did that you want to go ahead and smooth that glue in and again it doesn't take that long to dry, either now you're going to start sewing the back of the cap. You can start sewing from the left ear to the nape area, to the right ear or to the right ear to the nape area, to the left, ear to the left, to the left, to the right to the right now so baby. So so now. This is a close-up of how the wig looks. Y'All y'all see this at least press play, but i still went ahead had the bleachers still, you would still bleach something like this, because there is, you know, a little bit of lace, so i'm gon na go ahead and apply the bleach product wherever the lace is Visible because we're gon na try to make it do what it do baby now, it's time to cut off the excess cap, but y'all since we're here. Let'S talk about how laced up to lace, glue, really melted the out this cap, like that's some lit for refriel, got ta, be very careful when you're cutting off the excess cap, because you could easily cut your client because you have to cut it as close as Possible now i'm gon na let y'all in on a little secret in order to remove that little piece of cap that y'all see along the hairline. All you got to do is take lace up to lace, glue and apply it ear to ear, and i promise you that line is going to be calm now on to the adhesive of choice. Y'All, remember: lace up blades glue, yes, baby, it's back better than ever new formula. When i tell y'all the difference between my last adhesive of the lace-up lace glue was that it was thicker and it required at least 15-20 minute drying time for it to get tacky. This one is a lot thinner and you still only require one coat. Two if you want to, but it's not really necessary and also the drying time for it to get tacky is about 10 minutes. You don't even have to exceed the whole 15 minutes and baby. Just know so this part is your personal preference. You can choose to cut the lace and then apply it or you could apply it and then cut the lace being that i don't have much to work with. I went ahead and i cut the lace first so that way, i could really you know get in the late at least now for the places where i didn't have enough. Adhesive, i'm gon na go ahead and grab my lace-up lace to glue and i'm gon na go ahead and smear that so that way, i can tack down those that extra piece of lace that doesn't have any type of adhesive whatsoever you so now i have to Cut the size of the wig, so that way it's not an uncomfortable feeling for my client again, i didn't have much to work with, but i had to do what i had to do: [ Applause, ], [, Applause, ]. I just got one question: do y'all see the smell do y'all cause? I see this milk and if i see the smell i know y'all see it unless i blind to it. Huh carry on now i'm pulling out hair from the hairline. So that way, i can start prepping for her baby hairs. Once i'm done hot combing, i'm then going to tie it down with a scarf just so that way the lace and the glue can get a second to last melt. Now i know a lot of people on youtube: don't show y'all what they do to the back of the wigs, so i'ma go ahead and show y'all what i do to the back of my wigs. It doesn't matter what type of wig a client brings me, whether it's a full lace or a lace, frontal wig, the back is getting so baby unless you request for it to be glued down. I'M sewing it down, and i also do this because i know how irritating that glue gets in the back and it lifts very very quickly when it's with done with adhesive and also it. I feel like it's pointless unless you're going to be wearing your hair in a ponytail like a high high ponytail or a bun, then there's no need for you to glue down the back and it also lasts a lot longer when the back is sewn. I also do this if the wig is too big for my client, then i go ahead and i create multiple stitches so that way the wig can lay as flat as possible fyi with my stitch method. If my client wanted to put her wig in a ponytail or bunny, she still can on to laying the baby edges. I'M gon na go ahead and use gorilla, snot in the yellow tube, as well as a razor comb to go ahead and start forming the baby hairs. So [ Applause, ], [ Applause, ], be bye. Now on to the finishing touches, do y'all see this hairline ain't? No way we thought this hairline was gon na. Look like this, especially with a wig like this. Now i'm gon na go ahead and define her part out of finishing touches and yeah y'all. I did that. Y'All can officially call me the finesse queen of places. All the products used in this tutorial will be listed in the description box. Y'All check out my website, www.pretty p-r-e-t-t-y franklin, f-r-a-n-k-l-i-n dot com and be sure to check out all my products from the lace glues to the on the go lace, glues, foam lotion, wax stick lace, remove everything all that go ahead and like this video, if you haven't Done so subscribe to my youtube channel, if you haven't done so, leave me a comment if you choose to and i'll respond, thank y'all for watching until next time you


Comments
Haylee Akins: She just didn’t pay attention to what she was purchasing. I been ordering from AliExpress for years , never disappoints but to each it’s own . You slayed this
Teyannia Black: That looks amazing
Patrice Monay: omg i just ordered that same wig & didn't pay attention to it saying it was T - PART not full lace front .. i hope my stylist can slay it like you did once it gets here .
Linda Mosley: Hi!! How long do you usually leave your bleach on?
Kyah Marie: Wow
Rodnesha Hilliard: Link please ❤️
Destiny williams: Can we get the vendor of this wig please?