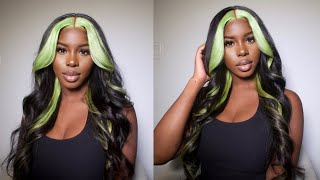
Watch Me Slay This Colored T Part Wig *Beginner Friendly* Ft. Eullair Hair
- Posted on 06 March, 2021
- T Part Wig
- By Anonymous
♡ WATCH ME SLAY THIS T PART WIG! ♡
promo code: eullair2021
eullair official website: https://www.eullair.com/?utm_source=Yo...
T part orange 350# color body wave 20 inches 180% density wig:http://bit.ly/3iC3Ugh
Wigs under 89$:http://bit.ly/39MrItS
Colored wigs:http://bit.ly/3qGZmYT
Lace Front wig:http://bit.ly/3iyjM3H
eullair hair aliexpress store: http://bit.ly/3c2Kct0
Instagram @eullair:
Business email: [email protected]
--------------
Hope you enjoyed. If you did, don’t forget to give me a thumbs up, and definitely,
Don’t forget to subscribe!
Socials:
Instagram: terahtiana
Twitter: terahtianaa
Snapchat: terahtianaaa
————————
Send me stuff!
P.O Box 480368 Charlotte North Carolina, 28269
___________________
Business Inquires:
Email: [email protected]
————————
Hello y'all welcome back to the channel, it's your girl, tara, sarathyana and i'm back with another video. As you can see, this video is brought to you by euler hair. Thank you guys so much for working with me, but this is what the package looks like. It is a tea party, wig guys, not a frontal, but although it may look like a frontal, so this is what the inside of the cap looks like, as you can see, there's only a middle part and some parts for the edges. It also comes with elastic bands and clips, like that's a three-in-one wig. It also comes with a beauty, sponge and, of course, wig caps, because you cannot do a wig without a wig cap. So the first thing you need to do when you get a wig is wash it condition it detangle it all that you don't have to blow dry it. It just depends on the style that you're doing i am going to straighten it. So i need to blow dry to make sure it's really really bone straight once you finish blow drying the hair you're going to want to prepare your hair for the wig cap, so i'm just going to take some got to be glue and gel my edges down. So none of the lace glue - you know snatches out my edges. So then i'm going to put the ball cap on then add some got to be glued to the edges or the side. Whatever you want to call it just because you know oh the ear tabs. Yes, the ear tabs will lift up. If you not use got to be glue, then you just want to use the got to be spray on the rest of your hair, because it got to be glue, is a little thick cut out your ear holes and i use a bandana just to you know, Make sure it's nice and flat and dry once you finish that you want to get your styling tools and flat iron it i just you know, took that out of the video, because i think everyone knows how to flat iron, and if you don't. I have a video linked down below or up above, but it's an old video anyways, i'm going to take my hot comb and really like work its way through the wig just to make sure everything is nice and bone straight and flat because you don't want any Lumps and bumps next i'm just going to carefully carefully squeeze the edges. You do not want to over tweeze this, because this is a tea party wig. It is not a frontal, so you will run into some tracks if you try and over tweeze it. But then i'm gon na take out some hair for the baby hairs and then just tweeze that and y'all. This looks fast, but you really want to take your time and be careful because once the hair is gone, that hair is gone next, i'm just going to take some mousse and really just you know, flatten the flyaways and get this wig looking extra good extra clean Once you have styled the wig next, you want to put it on your head and begin to cut the lace and the wig cap. At the same time, i like to do it at the same time, just because this is a new wig and i haven't, you know, adjusted it to my hairline, but you just want to keep putting the wig on your hairline, seeing where you need to cut the Lace and also where you need to cut your wig cap, it's kind of hard to explain so hopefully you can just watch it just to see, but i am not gon na lie guys. This week is a little too small for my really big head. If you're new to my channel - or i mean, as you can tell, i have a really big head - i'm six feet. Y'All, i don't have a small head, so this wig was a little small, but i did make it work. Anyways back to the video you just want to apply some foundation on the wig cap and on the lace just to really get the melted. Look after that, you want to apply your lace glue to the wig cap. I do about two layers because i don't want to like make it look too gooey. So basically i just apply one layer with the popsicle stick and then i go in with another layer once that layer dries. Then i like to apply the wig and i do small sections just so. Every part of the wig that you apply can be perfect. I don't know if that makes sense, but this is just how i learned to do it and it just stuck with me. So then, i'm just going to take the end of a rat tail comb to really apply the lace once the lace is glued down. I like to go in and take the end of a rat tail comb and just pull out some of the baby hairs that you guys plugged. Then i take some free spray just to make sure the baby hairs lay in the direction i want them to lay. Then you know i'm just making sure the wig is straight, because i'm only focusing on the baby hairs right now. So when i'm doing my baby hairs, i just like to you know, brush them down and then take the razor comb just so they're, not too long. So they can look a little more natural, even though this is colored hair. I still want it to look natural and look at that. It looks like it's coming out my scalp period, okay back to the video sorry so yeah i just like to take the razor comb and then shave it to my liking and then begin styling. It like it's just regular baby hairs, but so far this is what the wig is. Looking like, y'all, it's not too bad, but it's gon na look better! Just keep watching till the end. A pro tip that i learned when doing baby hairs or whenever you install like a new wig or any wig, i like to lay the hair down and then the baby hairs and the way i want it to lay. Then i like to apply a bandana just to secure the lace overnight that i'm going to go to sleep. This is what the hair is. Looking like, cute cute also put a bun on go to sleep. This is what the hair looks like the next morning. Then i'm just going to straighten it. You know just get out any other lumps and bumps that could have occurred when i was sleep now really on to the edges, you're just going to want to brush them out. I like to apply mousse first, so i can know what direction the edges are going to lay because if you start with edge control, it's just going to lead to a lot of build up, and you don't want that so start off with mousse, get them laying How you want and then go over it with edge control just so it can stay after the edges are laid. I just like to use some concealer and put it on the lace, so you can really blend it into your skin and it can look as natural as possible, but this is the end of the video guys. This is the finished. Look. I really hope you enjoyed it if you did leave a comment down below what you think of this hair. Also make sure you check out the description box down below to get more details on this hair and all that good stuff. But thank you guys so much for watching i'll, see y'all in my next video


Comments
Jenna Walcott: So pretty!!!
j6282: Slay boo
ghectorGabrielle Hector: Early