How To Install A Kinky Straight U-Part Wig + Blending Tutorial Super Natural Ft. Rpg Show
- Posted on 24 January, 2021
- U Part Wig
- By Anonymous
Hey Beautiful People!
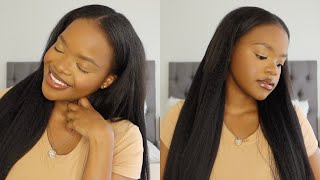
In this video I’m showing the full process of how I install, blend and style my kinky straight u-part wig.
My goal was to create a super natural, glam style that doesn’t cause damage to my hair or require a ton of heat. Being a commercial model I’m always looking for new ways to reinvent my look in a natural yet on trend way. What are your thoughts on the look? Cute or nah?
Where are you getting your Upart wigs from? What styles would you like to see a demo of?
S/n does this look remind you of Kenya Moore from RHOA?!
-XO Stephanie Renee’
Hair Length: 16 inches
Hair Density: 150%
Color: Natural Brown
Texture: Kinky
Nadula vs RPG Show: https://youtu.be/bZVqULmNQ1Y
Pros and Cons of RPG : https://youtu.be/bZVqULmNQ1Y
Use my link for $100 off your first purchase with RPG
https://www.rpgshow.com/vipshare-c-353...
Connect with me: @steph.com_
https://instagram.com/steph.com_?igshi...
Easy Guide to Installing a U-part Wig| Super NATURAL ft. RPG Show
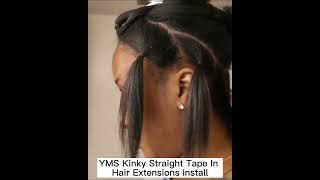
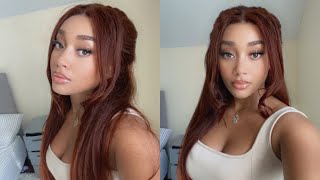
Hey everyone and welcome back to my channel my name's stephanie renee, and i'm going to be showing you guys how i installed this u-part kinky wig, how i blended it with my natural hair and what part i left out and how i did the barrel curls. I'M excited to show this with to you guys and if you've seen my other videos, you've also seen the comparison between the doula and the rpg show kinky wig, which is this one and you've also seen the whole conversation about what i thought about the texture. After my first install so this video is going to be all about just the how to so i'm going to go back in time to before. I did this and pop it on the screen, all right, so first start off by sectioning your hair. The way you want it, i'm going to do a middle part, so first i'm prepping where that middle is going to be, and then i'm sectioning out my side leave out as well as the middle, the? U part area. This is what you're going to leave out. So, as you can see, i do like to leave out the side. I think it makes it easier to kind of play with it and if you want to pull it back or do something fun, you can, of course, if you'd want to leave this styling longer. You would want to do braids around the perimeter as well as maybe just the whole thing, just to make sure that it will be super secure, but i went ahead and just put a bun in it. Like i told you guys, my hair is blow dried and lightly flat ironed, so i went ahead and used those six clips that it comes with. These are the massive clips, as you guys can kind of see, so i'm tucking those on to my hair. I wanted this to be super easy for beginners as well, so you can see that i'm just i just popped them right in there. The six clips, as well as in the back and i moved on, i'm going ahead and sectioning the areas that i'm going to be wand curling. My wand is at 350 degrees, i'm using a remington wand, probably about 30 bucks max from like a walmart or meyer. So super super basic and then i leave it on the wand for 15 seconds each so that they are evenly curled. You do want to pull the sections in even sections. If you can, i really didn't spend too much time making sure they were, even as you can see, but you do want them to be even and if you curl them all the same way. It does look nice as well. Although you'll see me curl them any, which way, because i tend to like a natural kind of random pattern, but that's just preference so you're going to see me move from the bottom to the top doing these same motions uh taking the section out combing it throwing It on the barrel curl and leaving it for 15 seconds and then releasing it. You can also do a side part on either side. You would just have to position the? U part wig either each way, and then do your? U part just like i did, but on the side that you'd want your part to be the one thing that i don't love about, this u-part wig is: do you see the flap? That'S sticking up on the on that side. Yep. That part is sticking up, because i don't have braids in so those big clips. Don'T really have anything to really really hold on to. So i think i'm going to end up installing, like some smaller little clips from a beauty supply store there just to make it so that it's super secure, even when i don't feel like putting the braids in. But that's my only thing that i think the company should change, but besides that um super easy, as you guys see to install so like i said you can't do braids underneath it would make it more secure and that's of course, an option. I did not, and then i also wanted to say uh the way it looked when i first put it on it had a little bit of a wave in it. That is because i did this style before and i did not wash it afterwards because i only wore it for like half of a day, so it doesn't come like that. It comes more like in a just straight blowjo blow dried um texture. So what you're? Looking at is like a stretched out wave and yours won't look like that when you first get it, but i did want to do this style and show you guys how i did it. So that's why i'm going back through and rewinding it all. So, that's that that's pretty much the steps you pretty much get a workout and this whole process took about 45 minutes, which is why i sped it up because nobody got time to be sitting around for 45 minutes watching me. Wand curl through this thick thick hair, and if you are doing this along with me at home, uh, definitely stick with it guys it is going to be worth it on so foreign. So hey pep, hey all right! So here is the important part. First, go ahead and put your part exactly where you want it and then turn your curler down to the temperature that you would normally curl your hair with and then we're going to go ahead and just section out those parts just like we did on the u-part. Wig and barrel them, i usually hold it a little bit less than the 15 seconds combing it through with parts of the: u part, wig, hair and then just letting it fall where it may repeating this process through all the leave out. Next, i'm going to go ahead and grab a fine-tooth comb, just one that is really um going to touch all of the pieces of hair so that you're able to smooth. So i'm going to go around with my fine-tooth comb and just smooth smooth, smooth kind of pushing the two hairs together and then go through with your hand, kind of hand combing through just to make the curls look a little more natural and effortless. And then, after that, once you get it exactly how you want it, you are all set, and that is the end of the process. Do hey guys. So welcome back. I guess you just finished watching the video of me installing this u-part kinky wig. So i basically just wanted to check in and let you guys know that after i stepped at the bathroom, i did go ahead and do a little edge control with my argan oil edge control here. So i just looked that up, but pretty much besides, that you guys saw the total install. So i'm out here, i'm feeling, like you, know, kenya more with this full full full hair, um, totally filling myself. So you guys, let me know what you think. If there's any tips or tricks that you think would make it look better, i'm going to show you guys the back again. This is the 16 inches from rpg. Show the? U part wig kinky, so you guys, let me know what you think if you have any feedback for me, please comment below go ahead and like and subscribe my page and follow me on instagram at steph.com, underscore i'd love to hear you guys, thoughts and look forward To seeing you in the future, so you

Comments
RPGSHOW LACE WIGS: It blends perfectly with your natural hair So gorgeous!
Gloria Damisi: My 1st time seeing a U part wig. You did such a good job in installing it, and I love how it blends so well with your hair
The Preheim Pack: I love how it’s literally undetectable. So pretty on you!
Sassy Colouring: It looks great on you, I love watching videos like this where your steps are so clear and easy to follow- thank you!
DJoy Clarkson: First time seeing a u part wig. You did a great job blending it. It looks very natural
As told by Bree: It blended together so well. It looks so natural. I’ll gave to check it out.
Liza Masil Relaxing & Calming Music: You have done a great job styling and fixing your hair and added that U-part wig. You do it like a pro. I like the final look, it's pretty nice.
Gianni Milan: So natural! Needed this tutorial
Shelethia Tre'nae: This hair looks amazing. It’s so full of body and curls. Lol at you referencing Kenya Moore
I Put The O in Mom: I love a good upart wig. I prefer them over other popular wigs. Looks nice and natural on you.
Tiffany Matthews: Love it ✨
Jasmine Fountain: Love it! Super cute!!!
Jessica Rojas: Crazy to think that this is a wig looking amazing
Stella Tigre: Wow this is beautiful
Taneisha Johnson: What cap size is it?