How I Install My U Part Wig To Fit My Head (No Braid Install) | Luvme Hair
- Posted on 03 March, 2020
- U Part Wig
- By Anonymous
Hello Beauties!
Thank you for taking the time out of your day to read my description box. Below I will list information on products used in this video tutorial and links to other videos of mine related to this one.
If you like my content, make sure to SUBSCRIBE to my channel and hit that bell so you get notified when I upload my next video.
My LuvMe wig unit details are below ⤵️✨
Length: 20 inches
Type: Virgin U-Part Wig
Texture: Body Wave
U Part Wig: http://bit.ly/32I2TeW
Luvme Hair Website: http://bit.ly/2J9gSlr
Facebook: https://www.facebook.com/luvmehair/
Instagram: https://www.instagram.com/luvmehair/
More Info: I washed the wig unit and let it air dry overnight. I used a wand curler on the natural curl pattern to add more definition to the video.
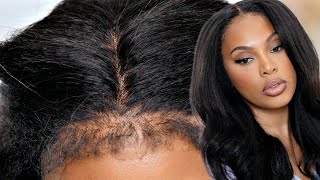
IMPORTANT Please measure your head and order the right cap size to ensure the wig fits your head.
Watch my U-Part Wig Playlist & Learn How To MAKE YOUR OWN WIG! ⤵️♀️
Click Here: https://www.youtube.com/playlist?list=...
Let’s KEEP IN TOUCH ⤵️
MY WEBSITE: http://www.biancacharisma.com
MY INSTAGRAM: http://www.instagram.com/biancacharism...
MY FACEBOOK: http://www.facebook.com/biancacharisma...
MY EMAIL: [email protected]
Hey ladies Bianca charisma, here and today I have a love me, hair tutorial, for you guys. This is my second love me hair tutorial for a! U part, wig, and this time I'm gon na show you how to install it with your hair straightened. So this is a: u part, wig, I have the body wave. They sent me these goodies, so I got a comb. I got a wax stick. I got this cute little clip hair clip and I have a flat iron which, how do you get a flat iron when you order a wig like that's so amazing that these companies, especially love me hair, will send you all these goodies along with your? U part wig to help you with the install, so I think that is great. What I am doing right now is: I am just parting, my hair, as you can see, I already parted myself a side part, and then I just put the: u part wig. On top of my head - and I am measuring my hair, so I want to have some leave out in the front, so I'm measuring the cap to see where my leave out how much leave out I should have out and then what I'm doing is taking the End of the comb - and I am just kind of pretty much combing, my hair in the u-shape that the wig already is in so I'm kind of using the wig as a way to outline the u-shape in my hair and the fact that my hair is already Straight makes it so much easier for me to you know pretty much create a? U that is going to. You know fit along side with my: u part wig, so I just kind of secure my hair at the top, and now I'm gon na secure the rest of my hair into a ponytail. I'M gon na do a low ponytail and then I'm just going to braid. My ponytail up and then I'm going to just pin it to the back of my head now, since my hair is pretty straight, it's going to lay pretty flat when I apply to: u part wig, so I'm not really afraid of having any lumps or bumps, because There is so much hair on the unit in my hair is pretty much just flat, flattened with these bobby pins that I should be doing so, I'm taking the? U part wig it has clips inside. It also has a clip at the bottom. It'S got a strap. It'S got a whole lot of things in order for you to keep it nice and secure on your head. Now, when you get to u part wig, you guys, it's gon na have like this little thing that connects the? U, so you can cut that right off? I'M just clipping the: u part went to my head just like you would clip in extensions, and I'm clipping that as close to my hair as possible as close to the? U and you see, I'm pulling it it's not going anywhere, it is nice and secure. I'M clipping the back, it is all good and yes, so if you feel like you, have a tiny little lump, I feel, like you know, just in case it might have looked lumpy in the back. What you didn't, I just clipped a little bobby pin in the back to secure my, u part wig, so I did that right under the hair through the neck and into my my hair. So you guys it's really easy you. That was an optional step, but I am just combing my hair, I'm parting, it back to that side, part and I'm blending my hair with the. U part wig and now I'm taking the wax stick and I'm just going to go ahead and evenly distribute that and kind of finger comb it through my hair to the wig to make sure it all blends. Well and after that, what you guys can do. Is you can Wan curl or flat iron, your hair with the hair, but I wasn't really going anywhere, so I didn't really want to do that stuff. I wanted to avoid any extra heat, so my hair is pretty blended already, so I'm gon na just go ahead and take my baby hairs. You know my edges blend that out really good with my. U part wig and you know just make sure it all looks natural make sure it all looks blended and I feel, like I love the look. You guys make sure that you check my description box below to see all the details on this hair. Make sure to give me a thumbs up if you like this method, and this look and I thank you guys for watching, and I will see you guys in my next video
Comments
Nana Scott: Did you have alot of space in your wig?