U-Part Wig With Closure - How I Installed My Russian Hair
- Posted on 22 July, 2014
- U Part Wig
- By Anonymous
Here's the process of how I made my Russian hair unit! It's not really anything special but I got a lot of requests to film it! Enjoy!
Hair Specs
Virgin Russian Hair
16"-18"
3.5 bundles
I got these bundles from Nky, she has some left over hair from her last run of her custom wig orders. If you're interested email me :-) There's only like 6 bundles left, so first come first serve.
The link to where I bought the closure
My Blog
http://divineafricanqueens.com
My Instagram
@naijagoddess
My Twitter
@TheNaijaGoddess
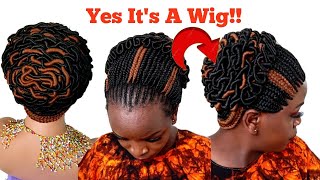
All right so here the bundles of hair that I use. I have five bundles here, but I didn't even use five bundles. I use three bundles and like a half of the fourth bundle, and then I use my dove argan oil and fee shampoo to wash so. Here'S my closure that I got from eBay and I'll put the link of where I am the link of the eBay seller when I bought the UM cause you're from, but this closure is superb quality. The best closure quality I've ever user experienced before and it was relatively inexpensive, so, as I said, I'll have a link down below. So I just took the cap, and this is the top I got for me. The beauty supply store. This cap is so good. It fits snug on my head and it's like a good cross between a dome cap and a mesh cap, so I just put them my cap on where on my mannequin head and try to find out where I want my deep part to be so. I just took my closure and just measured exactly where I want my closure to land, and then I just took like um like a red lip liner pencil and I just marked where the middle part is onto the cap. So I can just have it as a guide for when I'm sewing down my closure and stuff and, as I said, I'm doing like a deep side part with a lot of volume in the front. So here I'm just taking like my lip liner and just making that line of where I want the middle part from the closure to be at so I can keep it in the right place yeah, but this closure, I'm not close to the cap that I use So good so here I quote: I'm so down my closure and it's not like it's not gon na be at the center, but I just put it like that, so I could still it better and stuff but slowed it down and that cut a little bit of The lace in front by well I'll cut the rest of it off later and then to do my special effect to give a lot of volume in the front. I just square it off a section in the front and I'll show you guys how. But what I plan to do later, but this is a section where all lay the hair on the West diagonal so that I can or not like vertical, going up going up and down. So I can give a lot of volume in the front without having to worry about like bumping it with like a curling thing or whatever so I'll show you how to do this a little bit later, so I've stood on all those all the bundles three bundles. I'Ve sewed down, you know two bundles I've sewn down. So I one more button to go before I start doing my bump in the front but um my did this. What do you call these bundles have beards on them, so the beards show anytime. I do the flip over method cuz, I didn't cut any Wes so far, so I just cut those beards off and it was really easy to cut off and then yeah. So I have one more bundle to go and I'll fill in this space in the middle and then then the fourth bundle is what what is what I'm going to use um to do the thing in the front. So now I have all the bundles that I've used. So this is three bundles and then I'll be starting. The fourth bundle - and this is a space that I look left off to do my Terra, Monet cuz - that's where I got it from volume bump in the front thing. So I just measure on the space with the track that I need and then cut it, and it's the only time where I've cut the wefts now and I'll be cutting west from here on now we just took i'm the weft and then measured it and then Cut it where I want it to be cut, and then this is like the most the longest part, because you have to lay the tracks down so close to each other. So I've already said on the first track and then this is me slowing down the second track. So when I sold on the second track, I catch the previous track in my needle. So I don't sew them together, and this is what gives that volume in the front, and so after you've finished like slowing all this stuff down. And when you flip the hair back over. It stands up on its own and what gives it the ability to stand up is you sewing the track on both sides and I'll show a clip of how Tara Monet did it and I'll put a link down below of the whole video of how she did It, but this is where I learnt it from, and this is what she does to give that big volume in the front when you do like a deep side banging stuff. So it's true, it's not hard, but the tedious part of just doing it close to each other. So it takes a lot of tracks to fill in the front. So now my big is complete and you can see in the front how I have that volume up there, and this is exactly how I wanted it to look. It'S the volume and just standing on its own, and then I didn't show how I cut the mesh tap the mesh cap under the closure to expose it, and then I put a flesh-colored stocking under the closure. So it can help with you know, making it more natural and stuff like that. But I forgot to show that part sorry about that. But I hope you guys understand and I feel like you should so now, I'm just taking on the hair and then I sewed down the one side, the shorter side, I've wrapped to film that part, but I still down my wigs like just in the front. I don't sew the sides of the back. I just saw the front down just to keep it secure in this cap is a very nice cap, so even just having it on my head. If I want take it off every day, this is a good cap and it's really tight and it's good, but I need to sell my wigs downs because it makes me feel better, so I've already sewed the first part down yeah best items. This is the other side I'm sewing down, so I just Park the hair, where I feel my hair braided underneath and that's where I'll start stitching, and I only put on the one side I put like three stitches on this side of how you put like four Or five stitches - and I just put that's just enough just to keep it secure and on my head but, as I said just part the hair and then I find where my braid is underneath and then just starts selling and um. And even if we, I didn't even think of like sewing like my braiding pattern, but it's not even like it's good, because I can't braid like that. Well, so it would have been an atrocious fight if you guys saw my braiding pattern underneath if I just did enough to have two braids going from from down each side of the part of the closure, so I can sew it down and I'm actually natural. I haven't even like talked about my hair in a while stuff like that, but from November 2012 to May 2013 I didn't have relaxer and I grew my hair out and then I yea within this year March 2014. I cut off all my role, my relaxed ends. So that's when I've officially been natural and my hair has been growing really fast and I'm not sure exactly what I'm doing, and I said before in many videos before, like. I don't know exactly my plans for my hair and stuff, but for now it'll just be under my units or braid it up and just under they're growing and I'll. Give me give me more time to figure out. You know what exactly I'm gon na do, but back to my slowing down my wig to my hair, I think I just fit it yet. I'M done now I did like. I don't even count how many such as I did, but I did something and it's secure. So um, I think, that's all for like the actual wig making and then sewing it down, and this is the method I've been using for a while. Now I just sew my wig down in the front. I don't do the sides on to the back. It'S just enough just to keep it on my head and you know, make it really secure and then I'm even like so like right there and in my forehead area cuz it wasn't necessary. So now, let's move on to getting the cord. You look a little more natural, so the closure came as a straight back part and I like to make it like a curved part to make it look a little more natural. So I kind of take some hair from one side and bring it to the other side. The one thing about doing that is that you can still see the straight part underneath that hair you brought to the side. So what I did was I took like a black eyeliner pencil instilled in that part that the closure came with it's darken it up and like under it, and you can still see the line going straight back. So I just took my eyeliner and I'll fill in that space. The next thing I showed that didn't, I show ya, so I did that and then after I filled in that space, I took my curling wand and put it down there like put it on the part. So I can like help train the hair to lay exactly how I want it for this day like that and the curling one is the only toy I had that gets super hot. So this is like the easiest and fastest way to like tame your hair and your parts and stuff like that. And then, after that, I took my Mac Pro Longwear concealer and I just filled in the space, because I don't I didn't bleach an ox or anything like that. So I just put concealer on there, and this is the only time I ever put concealer cuz, that when I make my my units I just put concealer and I put eyeshadow on top of it and it stays on there. I don't need to keep doing it. Every time I like everyday and stuff like that, unless, like I wash my hair and many times and it starts to fade - and I just reapply it, but it's just good enough, so I just did it just to make it closer to my skin tone and then There'S other parts that need to be like laid down like you can't kind of see in the crown of my head, how it's kind of like bumped up. I just take my my curling wand and I just um lay it on there for a couple seconds to tame it and then um, that's how it is and just keep playing, and I do I'm just keep playing with it. So I can get it exactly. How I want and stuff like that, but this is how I make my units and you have any other questions or anything can just um ask me down below for like of what supplies I using all that stuff. But I have a picture on Instagram and I'll share it here with you guys over the final final. After, like I got myself looking decent, I was rough doing my hair, but um yeah. All information from the video will be down below see you next time. Bye not fluently. If I can speak once in C, however, alright say something:


Comments
Leanne-Sarah: I love the hair! when you get a chance can you tell Nky to do an office tour, I really liked the layout. Also, if Christine could do a medical school experience video like you did for pharmacy? Keep up the good work with the videos and more vlogs!
Travonda W.: I have been searching and searching for a video like this..THANK U!!!
STYLESBYLIFEBEAUTYNMORE: This video was just what I was looking for how to achieve the volume
Temi A: Hey girl!! Do you remember the name of the cap you got or have any recommendations for caps for people with big heads because it's a bit of a struggle for me to find good wig caps.
Adaeze Onyeama: Thanks for uploading!
Amanda DIOR: Did you ever get the closure to lay flat?
Janet A: That takes skill! What products do U use for ur natural hair? Mine refuses to grow lol
adrienne jackson: Are you sewing it to braids at the end? Im trying ro find a tutorial on how to sew a wig to your hair
Dorisa: please where do you get the cap? all the caps I bought so far are small.... Good job :))
Jessica Mpamugo: Hey Lady! Could you please provide us with the link to Tiarra Monet's video clip that you showed? I followed what you were saying, just wanted the full length visual. Much appreciated :).
makeupologyuk: Thanks for your upload, the link you provided to tiarra monet video looks different from the one show in your video. Is the right one?
catmo59: Those beards were horrendous. Great job with everything though
stylishcharm: I like this hair lol. Where is the wig cap from?
Tomi Ajifolawe: Hi, Could you please post a link to tiarra monet's video? Can't find it
zay zay: looks way too heavy and tooo much hair density is off!!!