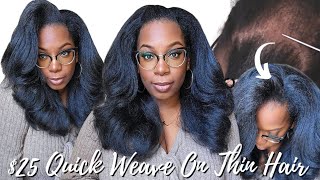
Middle Part Quickweave With Leave Out On Natural Hair Ft. Affordable Amazon Human Hair Bundles
- Posted on 05 May, 2021
- U Part Wig
- By Anonymous
OPEN ME
Hey Babes,
IN THIS VIDEO I WILL BE SHOWING YOU HOW TO MAKE A NATURAL QUICK WEAVE U PART WIG, ALSO SHOWING YOU THE UPART WIG INSTALLATION FT. REUSING SOME BUNDLES I GOT FROM AMAZON PRIME 2 YEARS AGO ! The name of this company on amazon is called QI YING BEAUTY .
HAIR DETAILS
3x18,20,22 INCHES BRAZILIAN STRAIGHT HAIR (the company is currently out of stock)
https://youtu.be/xtnnQ-1n6no (MY ORIGINAL REVIEW VIDEO)
❣️ HAIR
https://amzn.to/2SpS3Jq ( CURRENTLY OUT OF STOCK)
❣️GHOST BOND LACE GLUE
❣️SALON PRO HAIR BONDING GLUE
❣️SALON PRO 30 SEC WEAVE WONDER WRAP (Hair bond/glue protection)
❣️BLONDE WIG CAP
❣️NAIROBI FOAM MOUSSE
❣️GOT2B GLUED FREEZE SPRAY
❣️CHI SILK INFUSION
❣️APPLICATION BRUSH
❣️HOT COMB
❣️SCISSORS
❣️WIDE TOOTH COMBS
*ALL PRODUCTS WERE PURCHASED WITH MY OWN MONEY*
About Me
Height: 5’5
Age: 27
Ethnicity: ✨ MELANIN MAGIC BABY ✨
: IPHONE 11 PRO
Editing Software: IMOVIE
Lighting:
Neewer Ring Light Kit:18 https://amzn.to/3o7uSi2
ESDDI Softbox Photography Lighting Kit 800W https://amzn.to/38Yw5C2
Music by Liles Music - Night Life - https://thmatc.co/?l=20FA12FC
Music by yitzzak - Forbidden Fruit - https://thmatc.co/?l=67DC073E
Thanks For Watching
❤️❤️❤️❤️❤️ S U B S C R I B E ❤️❤️❤️❤️❤️
What'S good babes and welcome back to the channel so getting right into this video? Look, how beautiful and natural this install looks. This is actually a u-part wig that i created at home in less than an hour using some hair that i found from amazon prime. This is actually here that i reused and i had it from maybe a year ago. So if you want to see how i got this supernatural install using a wig that i made at home definitely stay tuned, all right, babe, so jumping right into the video. This is the canvas head that i'm going to be using to construct my wig. This canvas head can be purchased on amazon. It will be listed in the description box below this size. Canvas has, is a 21 inch canvas head. So please make sure that you measure your head out properly and use the proper size. Canvas head or your wig will be too big or too small, and we don't want that. We don't want no wig, that's too big or too small, because it ain't gon na sit right. Okay. So this is the gnome cap that i'm going to be using. I am using a mesh dome cap. You can get this from your local beauty supply store. This is the brand that i'm using, but the one that i have they have one. That'S specifically for you per wig, so go ahead. Grab the mesh dome cap make sure you grab the one. That'S specifically for you part wigs. It'S going to have that cut out at the top there. Now this mesh dome cap, i love because it's super breathable super affordable and it has strings drawstrings in the back that you can tighten the wig up right now, i'm just showing you how i use the canvas head to help me determine where to place. My cap on my canvas head to make sure it's centered on the wig correctly, and i'm also making sure that my wig cap is flat. You want to make sure, there's no lumps or bumps or spaces on your wig cap, while it's on there, because it's just not going to fit right so make sure it's flat onto your canvas head, make sure you got some t-pins and stuff to hold it down And you'll be good to go so right now you see me, take the wig cap back and i am putting a plastic bag over my canvas hand, because i want to protect the canvas head because we're going to be using a glue to construct this wig today. So right now, i'm just showing you where i have my pins at and i'm also again showing you how i cut the plastic bag off the front and i'm still making sure that my wig cap is on there in the right position on the canvas head and We'Re ready to start laying our extensions so before we do. Please do not skip this step. Go in with some hairspray make sure it's very strong hairspray i like to use, got to be and spray all over the wig cap spray all over it all over it. All over it do about and let it dry and do about three layers, because that's going to help make our wig hold better hail longer and it's going to help our extensions glue to the mesh dome cap a lot better. So i just showed you the hair. The hair is purchased from amazon and right now you just see me going in and measuring out the track, applying my glue and then putting that onto the canvas head onto the cap, pushing it in with my fingers, and you want to hold it on there for About maybe 10 seconds when you're doing this method, simply because we are working on a mesh dome cap and it doesn't have a lot of material there to adhere to. But if you let us, let it not cool, let it dry, let it get tacky. When you put it on there, you should be good to go with none of the extensions being loose or coming off of the mesh dome cap easily. So again, you just see me measuring from nape to nape on one side of my neck to the next other side of my neck left to right right to left. However, you want to go it's up to you and i'm just doing this as if i'm doing a quick weave on my own head or on somebody else's head. So i'm going to let the video continue to play, because this part is pretty repetitive and self-explanatory and i hope you guys enjoyed the video. I hope it was helpful if you would like a more detailed video of me. Making a wig definitely drop me some comments and i'll leave a detailed video, because right now this is just me showing you the basic i'm leaving out a whole lot of detailed information. But if you want me to do a detailed video, i will - and i also have some videos up already of me - making wigs um, not a. U part wig, but i have some videos up in me making wigs but anyways. You guys thank you for watching and stay tuned to see how this turns out y'all, i absolutely loved this wig. This is, has turned into my everyday wig, so yeah. Now i want to get into this hair. This hair was purchased from amazon honestly y'all about a year or maybe even two years ago. I want to say i made a wig with this hair. The hair is actually called ki ying beauty on amazon. The brand is called king beauty on amazon and i'm not gon na lie. I really didn't truly love this hair, but it wasn't bad either for the price. I don't think it was worth it. It claims that it's virgin hair. I don't believe that is virgin hair. I think it's more so human hair or really likes really high quality human hair, but the hair is nice. The um bundles were full, but the ends of the hair do get thin and the hair does not hold a curl very well. I don't care if you use hairspray or whatever the curls will fall. It did not um, tangle easy and it shed shed was minimum but didn't tangle, a lot at all which i loved, but it definitely does get frizzy like if you go outside and it's humid. The hair is going to frizz up or not frizz up, but like poof up because of the humidity, but other than that. If you want to give the hair a try, definitely recommend giving them a try for the price is super affordable. But if you're looking for like version here, something that's going to last, you a super long time with everyday wear, i wouldn't get it. I'Ve completed our wig now this is my little ratchet braid pattern. I know i'm not a good braider, and i have my leave out on the sides and my leave out on the top here is the wig that now that it has been finished constructed something that i did off camera was i added combs on both ends of The wig that you can see there you can get those cones from your local beauty supply store wherever they sell. You know, hair and extensions and wigs. You should be able to purchase these combs, but i got those and i actually hot glue those on to the wig. You can hot glue them on there or you can sew them on there. You can also use the combs that are actually clips like the combs that are on clippings when you buy clip-ins, but i don't get those because those can be very, very, very, very tough, on your hair. So just be aware that you decide to get those combs, but these ones do the job, and i actually prefer these are a lot safer for your hair. So definitely get those and be sure to hot glue, those on the end of the wig or you can sew them on there. I chose the hot glue as you can see, because this is quicker now we're going to get into laying our wig down i'm going to go in and go ahead and flat out flat iron. My leave out guys please use heat protectant on your hair. When you put heat on your head, i can't stress it enough. I always use heat protectant and i use some off camera and right now you see me sticking those combs into my little ratchet braids that i did this part. I do want to point out. Do not do the braid pattern that i did i mean you can do it and get away with it. But if you want a more slim seamless blend with your leave out, you should put two braids directly on the um directly next to your leave out. So, right on the sides of your leave out where the part is you want to have two berries there, that you can stick the cones from your wig into and that will make your leave out blend so much flawless, so much more flawlessly and seamlessly. I hope that makes sense, so your you part, wig should be as close to your leave out as we leave out ends and begin as possible to make your leaf god blend flawlessly um. So right now you just see me going in adding in some quick curls. I just wanted to style the hair and give it some life make it look cute and then the next part you'll see me doing my leave out as well again use heat protectant, and i hope you guys enjoyed the rest of the video and enjoyed this um Tutorial in an installation video you guys, let me know some comments. What you want to see from me and i'll see you in the next one, don't forget to stay beautiful and stay blessed, and this is the finishing results guys. I love this. You probably so much it looks so freaking natural, like this look like it's my hair, like i absolutely love it so hope you guys enjoyed the video. If you want to see a more detailed video, definitely drop me some comments and i'll be sure to post another detailed one, but in the meantime, y'all stay beautiful, stay blessed and safe out there.


Comments
PARIS G: Best tutorial I’ve ever seen! Thank you so much for sharing
Ms. Tee: I absolutely love this look! Your hair is flawless!
Vanity’s Lavish Life: Cuz this turned out so pretty I’ve gotta try it!!!
Deloris Fultz: That's so beautiful ❤️
Lisa Williams: Hey sugar kcmo is in here your number one fan is here beautifully done
Brown Skin Beauty: Came here to show you some support
Lyntona Rodgers: You kno you gotta make me one ..right ..beautiful