U-Part Half Wig Leave Out Installation (Step By Step) | Moramode
- Posted on 28 March, 2021
- U Part Wig
- By Anonymous
Hey guys, in today's video I have a U-PART / Half wig installation with LEAVE OUT with NO GLUE, NO SEWING and NO LACE! This was super fun to install and it was my first time. I'm showing you step by step of the installation process and basically how to get long hair instantly, within 10 minutes! This video is in collaboration with Moramode who kindly sent me this U-Part wig to try out. I really loved how it turned out and I hope you guys do too!
Moramode: https://moramode.com/
https://moramode.com/premium-illusion-...
#UPARTWIG #moramode #wiginstallation
Link to my Amazon recommendations: https://www.amazon.co.uk/shop/sharleen...
Thank you for watching, I hope you enjoyed this video!!
If you did then don't forget to hit the like button & subscribe to my channel ✨
FOLLOW ME
♡ Instagram: https://www.instagram.com/sharleennxo/...
♡ LinkedIn: https://www.linkedin.com/in/sharleena...
UPLOAD TIMES
♡ Wednesday @ 6:00pm (GMT)
♡ Sunday @ 7:00pm (GMT)
MY EQUIPMENT
Camera: https://www.amazon.co.uk/dp/B088L48MNP... *
Ring Light: https://www.amazon.co.uk/dp/B01N0OJPXC... *
SD Card: https://www.amazon.co.uk/dp/B07YFGGPH3... *
*affiliate links, which means I earn a small commission when you buy through the link, however, this is at no extra cost to you!
Business Enquiries Only: [email protected]
u part wig,upart wig tutorial,upart wig,half wig,moramode,wig installation,step by step,beginners wig installation,beginners wig tutorial,sharleen abigail,easy wig install for beginners,leave out,how to style natural hair,how to get long hair instantly,wig,human hair wig,half head wig,installing a u part wig,how to put on a U part wig,quick u part wig installation,10 minute wig installation,no sewing wig install,No lace,no glue
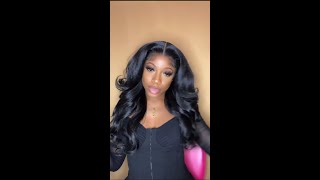
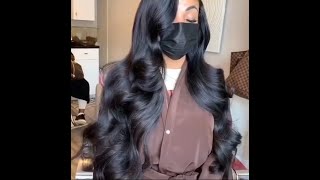
Guys just look at this: it just looks like i've got long hair when really it's a u-part wig from more emotions, hi guys welcome back to my channel, i hope you're all doing well. If you're new, here hello and welcome my name is charlene. I do all things makeup, hair and fashion. So if you are interested in that sort of content, then don't forget to hit the subscribe button and also like this video. If you do enjoy it, so please excuse my hair. I just did it like this, so it will be easier to work with in this video, and this video is in collaboration with maura mode again, and i've worked with them in the previous video put it on the screen. So you can go and check that out. So they kindly sent me a u-part wig and i've never tried one of these before so i was definitely interested in trying it out and i'm going to be doing a start to finish install. So this is, if i'm looking like this previously, i would have just braided my hair off camera, but i'm going to show you step by step of how to install this up wig. This is going to be a first time trying it so you and me together. So, let's get straight into it, so i'm going to talk about the packaging again, because laura modes just hits it right. The packaging looks so sleek in this white box and it just says more mode, the perfect illusion, so their hair products are quite expensive. I'M not gon na lie, it is human hair and it is really high quality human hair, and i think i would purchase it myself because you are paying for the quality like if you feel the wigs and the hair. It just feels amazing and the colors are really unique and they're all personalized, and this one is the bella color. So i'm going to show you in more detail, so i think this is the closest match to my hair. I do have about 100 different shades of blonde and brown in my hair, so this one kind of reflects that it might be a little bit off, but i'll, try and blend it as well as possible and the smell again guys. It'S so good. I wish you could swirl it through the camera, i'm gon na ask them what shampoo or what condition they use, because it just smells amazing. So to start off, i'm just gon na take out my hair and i'm hoping that it's a little bit damp. Still. I washed it last night and then just put it in the braids, so it would preserve it a little bit and i used some purple shampoo just to tone down the gingerness, because my hair was looking really ginger. So i'm gon na part my hair into two sections, just passing it down the middle, then i'm just going to take the u-part wig and just see how it fits around my head, like how much hair i should leave out my head's looking a little bit more Gingery then, i'm just gon na section it where the leave out is gon na be so i don't want too much because of the color difference. So i'm just twisting this section off and then i'm going to part the sides, i'm just tying the back section off and then i'm going to plait these sides just to keep it out of the way. I really should have watched some tutorials on how to install u-part wigs, but we're just gon na see how it goes. Then, i'm gon na take some hair out at the back of the hair. I think just underneath just in case. I want to do like a ponytail or something. So let's do that. I'M then just going to pla this bit. I don't know how i should do it, whether i should do vertical braids or just do a little french braid. I don't know if you want this to be a super, easy install. You could literally just do two french flats, which i might just do now and i'm hoping that will look flat. I'M gon na do four. Instead, this is making me want to get braids that look like this. You know like the flat ones. I might do that and film the process for you guys if you are interested. So this is how it's looking, i just pinned all of the braids up. Then i'm gon na go and straighten the bits that i've left out. Let me turn the straightener on. I can't even remember the last time i've straightened my hair, i'm kind of excited to see what it looks like. Okay, so i've finished straightening these parts and i'm just gon na tie it up again and then i'm just gon na put on the u-part wig. So i'm just tightening the strap. So it's at the tightest it's just got clips. So i'm gon na clip the top bit first. So so far, it's looking like it's blending quite well with my natural hair. So let's take this bit out. I'M gon na take some edge control and just apply this to the top of my hair. Then i'm gon na go back in with the straightener and just touch up my hair, so i'm going to try and do a different hairstyle a bit, but this is how it's looking so far as you can see. It'S just my hair. That is a bit too blond on the ends, but i'll, try and blend that in a little bit more, i really like you i'm going to try and do a half up half down, but let me just show you how this looks. The hair is super high quality. It feels really nice and soft. It'S super long as well. I didn't realize how long it would be, but yeah, let's do a half up half down, so i think yeah. This hairstyle definitely helps for it to blend a lot better. It just looks a lot more natural and yeah. This looks really pretty so i'll do some full length, so you can see what it looks like all the way down to the ends. This would also look really nice with some curls. I think i'm going to keep it straight. Can you even put a little scrunchie? Does that ruin it? I think i prefer it with that so guys that is it for this video. I hope you all enjoyed it. If you did, then don't forget to give it a big thumbs up and hit the subscribe button as well, so you see more videos from me and don't forget to check out more remotes for high quality, wigs. That, honestly, just look amazing i'll put all their links and their instagram in the description and yeah i'll see you guys next time, bye,

Comments
Alemarie : This wig is so beautiful.
AJ: Your natural hair is so prettttyyyy
L N: Hi, did you say this is the Bella?