No Lace! No Glue! *Best* U-Part Wig For Natural Hair | Yolissa Hair | Tanaania
- Posted on 12 August, 2022
- U Part Wig
- By Anonymous
NO LACE! NO GLUE! *BEST* U-PART WIG for NATURAL HAIR | Yolissa Hair | TANAANIA
●▬▬▬▬▬▬▬▬▬♛Yolissa Hair♛▬▬▬▬▬▬▬▬●
Video Wig Shop Now➤https://bit.ly/3Ry1qAL
Hair Info: #yolissabodywave #upartwig 20inches
❤ #yolissahair Official Website:➤https://bit.ly/3Ppvixh
Yolissa Hair New Comer? Look Here!
Get ❗️$150 Coupon Package❗️Join in Yolissa group:➤https://bit.ly/3momOuu
Follow Yolissa Hair On Social Media
Instagram: https://www.instagram.com/yolissa_hair...
Facebook: https://www.facebook.com/yolissa_hair/...
✔Wholesale Contact +86 15803834514
Thank you so much for watching!
Dont forget to SUBSCRIBE so you don't miss out!
Shop My Amazon store link:
https://www.amazon.com/shop/tanaania
Keep Your Vagina Clean, CLICK BELOW
https://sweetcookies.org/?p=HkANqW1FP
Follow me:
http://twiter.com/tanaaniatracey
Snapchat: Tanaania
Share this video with your friends and drop video suggestions you want to see below!
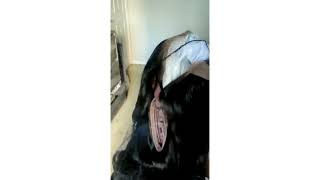
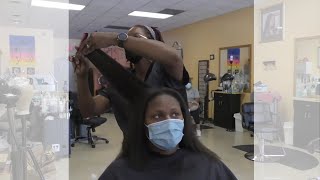
Hi guys welcome back to another video, so today we will be checking out yolissa's, hair 20 inch, bodyweight new part wig. So if you're interested in seeing what that wig looks like please keep on watching this video and guys remember to download the link app. The fast and easy way to safely send and receive money on your mobile phone available both on google play and the apple store also follow them at link jamaica on instagram boss, yeah guys. As i was saying before, we are going to be checking out yo lisa. Here'S you part week now i haven't installed a new part wig in a very long time. You know being that i've been doing so many weeks with us. It'S a joke, but yeah guys we are going to be checking out their body wave you per wig in 20 inches now. I hope i remember how to install that. You part wig, but the good part about upart wigs is that they're pretty easy to handle pretty easy to install, so it should be like riding a bike. You know it's one of the easiest hair pieces to put on and it is usually like very quick, very simple straight to the point. So inside your lisa's package, we have a pair of lashes. We have a satin headband, i believe yes, definitely a branded headband, so that just keeps you lace intact. We also have a set of wig caps and then we have our body wave u-part wig in 20 inches. So, let's see so, let's remove the mesh cap. Oh the quality, oh so here we have it guys. The curls are so pretty, and this wig is definitely true to length, i'm definitely getting 20 inches, but the curls guys - and it's really silky. I love this so far. So as usual, guys with our u-part. Wigs, of course, we have the band that joins the. U part in the middle here, you're just gon na go in and click the band and then attach the clips that are in the wig. So you know you have clips on each side that, apart clips to the side of your head and then clips towards the back to fasten the u-part wig to your head, so as i was saying, you can either have your hair cane rolled or you can have It out like mine, it really doesn't matter to me for some people they handle the you part wig better, when your hair is cane road. So you just leave the middle part of your hair out and you just judge how much hair you want to leave. On top of the wig, like i said, i have no hair left out, but i'm going to show you guys how i just part along the hairline here and along where i want the wig to lay and just do the general installation. Let'S do a close-up, beautiful, beautiful hair quality could tell that this wig from you lisa here is definitely top-tier quality. The curl pattern is beautiful. My hands run freely through the hair. There is no shedding at all absolutely and it is full from the root to the tips and typical with you part wigs. As i was saying before, we have the middle piece here that you're gon na just cut out and cut the excess off so that you can lay along your hairline there. We have clips on either side one there one there one towards the back one towards extreme. Back there, and then we have the ones that are on this side yeah, so nice breathe of a cap constructed very well and of course they have their elastic bands on the inside. Just in case, you want to tighten the wig anymore, so let's get into the installation of this beautiful wig from yolissa here. So of course, guys, as is customary with you part, wigs, you're gon na go in. If you don't have cane rows, like myself, you're gon na go in and just part out the amount of hair that you want to leave on top of the wig to cover the tracks there. You can part some from the top and then along your hairline. So i'm just going to take you guys throughout that process, so i don't want too much hair on top, because my hair is not permed at the moment. So it's not the flattest that it could be. So i'm just going to leave out a really really small amount of hair, so this is as about as much of the hair as i'm gon na leave out now, of course, you can go in and eat and find the part if you want it really doesn't Make any difference because it's not like anybody's gon na see the part, but i mean if you are one of those girls who you need like really really neat, then you can go back in part here. So this is the top and we just go ahead and secure it right here and then you can leave some hair out along the side depending on the style or how. Naturally, you want it to look. So you could just leave some hair out at the front here to go along the front of the wig so seen that guys right, that's one side, we're gon na go ahead. Take some just a little, as i said, take a little from the other side. There. You go there, you go and then i'm just gon na pull the rest of my hair back, and this is just gon na go under the wig. This won't even show at all just put my hair back so a little on the top little on the sides. Yeah right side left side, so a little on each side, little on the top and then we're going to go in now with our yolissa hair body wave, you part wig. So let's clip the elastic that joins the two sides, so just cut it and cut it. Like this one side, then we're gon na go ahead and cut off this side. There you go so we just released it. So that's how it looks now without it holding both sides, then we're going to take the wig from the back. Well, actually, let's open the clips first, just so it's easier to snap it along the part, so i'm not going to use my side clips just as yet, but i'm going to open them. I just want to fasten the clips along the part here. First, i want to get that lined up properly before i go into the side, so bring the wig from the back to the front. Here we go so we're going to push them down into the sides here. So i have one down. You got the back one down, let me snap it in there we go, then let's do the other side, so you can just pull the wig. If it feels a little tight, you could just pull it along push it in. So second side is down. Like i said, the back is already fastened. So let's snap that one down too and then we're gon na, do the sides so we're just gon na fastly click to have along the sides here. So those are down snapped next side there. We go so everything is snapped down. So, of course, this wig is very quick, so you could literally buy this wig from your lisa here to wear in the mornings like to work or if you have to run like some errands and you don't need like a full wig or if you're, a girl Who is not interested in like frontos closures? This wig from your lisa here is definitely for you again. It is really really quick and easy to install. You can go ahead and check their links in my description box below, but let's continue doing our little installation here. So again, all our clips are fastened and snapped down, you know, so they can pull off, and then we have just a little bit of hair along the front and some hair along the sides. That just goes over our way. Just like this again guys, like i said my hair is not permanent. Of course, there's a little bit of got to be glue still along my edge. So look when you leave the hair out along the front it just kind of blends over the front of your u-part wig. Nobody can tell like if my hair was clean right now, and i'd be like this, like you guys could not. Even let me know that this is a wig, so she'll look the same on the other side, as i was saying, and then we're going to go ahead and just part the hair, so it lays on top of the wig. So here we go so this is how your hair should just lay on top of your lisa. You part week now, of course, i'm doing a center part. If you want - and you have like mastered your you part wig, you could always put it to the side. You know get a little side, part look out of it, but that's when you have been using your um, you part wig for a little while now and you're more experienced, you know, so we go ahead and we use our hair and cover the wig towards the Back and we cover the wig track towards the side, so i'm gon na go in with some oil and my flat iron and just blend my leave out with the olisa wig and get back to you guys so guys. I just installed my elisa hair 20 inch body wave. You part wig, i flat and my hair on the top and on the sides, and also just added a little bit of baby hair with some hair gel, nothing too much. Of course, i am in love with this wig just for the fact that it took me less than five minutes to do this installation and it looks so natural. The hair quality is so sleek, it's so shiny guys. I mean if you are definitely a girl on the go or just a girl who likes quick and easy installations. This yolissa wig is definitely for you. I never even had to add any curls. This is a natural curls of the hair. I just went in and brushed it out and i think it blends so beautiful with my black hair, oh my god, the color blends so beautiful. I wasn't even sure if this was a one b. I don't know what i had ordered, but clearly this is a number one. I love it guys. Tell me what you think in the comment section below go ahead and like this video as well share with your friends. Don'T forget that your lisa here's information will be in my description box below you can go ahead and check this week out and any other. You part wigs that you lisa here might sell. I am in love, it is pretty guys i mean my fart is on. Show, but that's not bad, because it looks really good so again, guys like this video share with your friends and subscribe to my channel. I will see you guys next time bye, you


Comments
Tameika Wint: ❤️❤️ Never worn a wig but I enjoy your reviews.
Nikki 101: You did great
Tameka Brown-Thomas: Hey T. Just some feedback with the best intentions. I typically REALLY enjoy your videos as they felt organic. It appears to me that most of your videos now are ads. I haven’t really been watching. I think you can continue to get all the coins from these sponsorships but do it in a more organic format. For example, if you had a vlog and happened to incorporate this install and feedback at the end of the day, this would feel more palatable. I really hope that you are not offended as I genuinely wish you the absolute best and will continue to support your channel. Maybe look at how many ppl watch these videos in it’s entirety.
Jessica Haynes: I wish I have a wig never own one before
Kimmy Kim: Wonder if T can sponsor me one of these wigs for my BD the 26.
Kelly-ann Grant: All these wigs look really quickand easy a wonder if can get sponsor fi one a den wig here.
Kimmy Kim: ❤️❤️❤️❤️❤️❤️
God above everything family: Hi young you tuber here