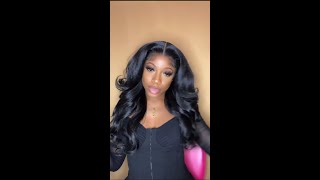
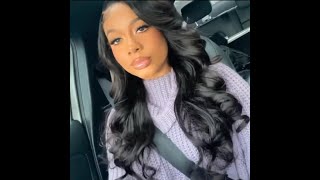
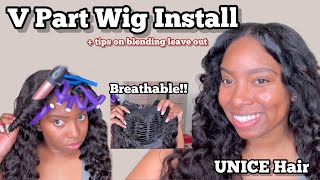
Quick & Easy: Half Up Hairstyle Using A V-Part Wig | Unice Hair
- Posted on 29 June, 2022
- U Part Wig
- By Anonymous
Hi guys ! in this video i will show you how to create a half up half down hairstyle using a v-part wig! this is a quick and easy way to switch up your style for the summer time.
#halfuphalfdown #vpartwigs #curlyhairstyles #unicehair #summerwigs
Get FREE Music for your Vlog!
https://app.hellothematic.com/?via=ker...
Music by HOAX - Grow - https://thmatc.co/?l=82B99832
Shop My Amazon Storefront:
https://www.amazon.com/shop/kerenortiz...
Hair information:
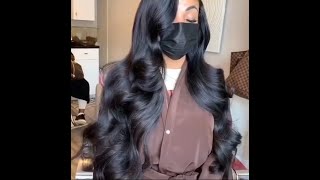
Inch:20 inches
density:150% density
WIG LINK: https://shrsl.com/39jd5
Using Special Code To Get 10% OFF:myunice
BUY IT ON PRIME GET IT IN 2 DAYS! :
WATER WAVE: https://amzn.to/30Kbcd2
KINKY TEXTURE: https://amzn.to/3DDBv3r
UNICE WEBSITE: https://shareasale.com/r.cfm?b=157516...
Hey guys welcome back to my channel for today's video, i am going to show you how to do this half up half down hairstyle with a u-part wig before we start, i want to invite you guys to subscribe to my channel and hit the notification bell. If you are interested in seeing more hair videos like this one, okay guys, so the first step is to separate the hair that is going to be loose for the parting. This is going to be the hair that it's not going to be under the wig. So you really want to make sure that you have a nice clean part and then you also lay it down as flat as possible. So if your hair is thick, i suggest going for a thinner part. It is going to be easier to blend with the wig. Now, for the remainder of the hair, i am going to split in two sections and i am going to braid the hair as thin as possible. Make sure that the braid is very nice and tight. If you have to add some moisture back into your hair, then definitely do that. Ideally, you want to braid the sections with your hair as damp as possible. We are going to be applying the wig cap in this area and we want it to be very flat. Now i'm just braiding the other side, once you're done, braiding just secure the hair together, i am just going to use some bobby pins and pin them in place. You guys can also use a hair net. It is very good for flyaways now. The next step is to clean all of that front area up here on the half up half down this is the part. That'S gon na actually have my hair, so i want to make sure that it's really laid flat. I love to use the eco styler gel. You guys can find it anywhere either in a beauty supply or on amazon. I absolutely love this gel because it really flattens my hair and it doesn't create a lot of buildup. Now something really important that i learned with this transformation. You want to make sure that this section right here is not too far up in the front. You want to push it back a little bit more. We are going to be mixing some of the hair of the wig and we are going to overlap it or place it in front of this section. I'Ll explain a little bit more in detail later, so that you guys can get an idea just keep in mind. If your hair texture is different from your - u part, we are going to blend some of the wig with our natural hair. Next, i added some edge control for that extra hold. Now it is time to put on the upart wig, i'm going to link down below the wig that i am using in this video. But most your part, wigs have this many clips. We are going to be using all of them for our transformation. Every clip is necessary in order to have the wig stay in place. Ideally, you want the opening of the upart wig to surround all of the crown area. You are going to clip the wig in place from ear to ear. The clips align really well, as you guys can see here, there's no major gaps in between as long as you guys go very close to that upper area. It'S going to look very natural when securing the wig really make sure that you grab those additional pins. I usually like to grab and pull them really really far up in the front, make sure that they're really stuck in there, because you don't want the wig to move next, i am going to grab some curl defining cream. I really love this one from afro sheen and i am going to braid some of my natural hair. I do have the option of letting the hair loose and just curling that up, but when my hair dries it just puffs up too much. So i went ahead and i braided my natural hair in order to blend it better with the wig. So before i start braiding, i'm just measuring up and seeing how much hair i want on this upper half. The key is to grab a little bit over an inch of hair from each side of the u-part wig, we're going to actually blend that with our natural hair, i'm going to loop it over the scrunchie, as you guys can see here, i'm just trying it out. I'M also going to grab some hair from the surrounding back area, because the whole idea is to hide my hair in between the wig. This is also going to apply additional security and make sure that the wig does not get pulled down. This step is the key to this whole transformation. You guys this hair lasted me the entire day. It did not move, and it was all because i was able to really grab the hair from the back and the sides just push it over the front. This is why i had told you guys to make sure that, when you secure your little ponytail that it's not too far up, that is because we're gon na be pulling some of the wig hair in front of our hair tie to have extra security. So that's pretty much it for today's transformation. I will be sure to link down below this hair for you guys in case you are interested in getting it anyways. Thank you guys so much for watching. If you enjoyed this video, don't forget to like subscribe and comment and i'll see you next won't time.
Comments
dixiekongfan1: i like how it ended up looking, mines don't usually come out that good. nice video