Diy | Detailed U-Part Wig | Minimum Leave Out | Flip Over Method!
- Posted on 12 January, 2022
- U Part Wig
- By Anonymous
Hair | 4 bundles of Indian deep curl from Beautyforever hair company.
Watch quality | 1080P
Thanks so much for watching!
Be sure to like comment and subscribe!
SHOP PRO BEAUTY TOOLS | Use 30% Discount Code: SEEYT30
https://www.seecosmeticsllc.com/
FOLLOW ME ON IG :
https://instagram.com/sigmone?igshid=1...
https://instagram.com/seecosmeticsllc?...
FOODIE PAGE:
https://instagram.com/sigfooddiary?igs...
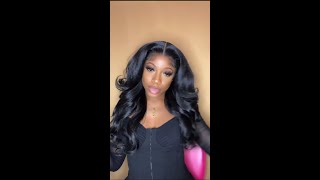
Hmm, okay, so first i use a large size, dome cap, i'm going to insert the image of the dome cap. I use this one says jumbo, but i actually used a large size dome cap to make my flip over u-part wig. I use four bundles of indian deep curl hair by beauty forever, so i'm gon na install all four bundles once i get all the way. Halfway to the top, i go ahead and mark the cap with white eyeliner pencil to help guide me in the way i want to lay my tracks, so you want to lay your tracks opposite from the way that you want the hair to fall and be kind Of like the volume side, i do not recommend this method. If you do not like cutting your wefts, because you will cut your wips to do this because you will be, you will be stacking the tracks on top of each other. As you can see right now, i flat iron it first to get it pressed out, and then i cut the wefts. I personally don't get a lot of shedding. I don't know if it's the type of hair i have, it doesn't vary by the vendor, but i cut my wefts and i don't get a lot of shedding so, but if you don't like cutting your wefts, i do not recommend this method. So what i'm going to do is i'm just going to begin sewing the tracks with the way i place the white eyeliner pencil in that direction, because that helps guide me and lets me know which way i want it to lay, because i'm going to flip those Tracks over and then my park will be on the opposite side, so how i start sewing. I sew through the weft two times and i do a knot and then i start doing the constant. So this first track that i laid down. I don't really think it's a good representation, but i do know some people who not each time they go under and you kind of see me doing that. But as i go on, i'm not going to continually not each time, i'm just going so through close together, and that will be me laying each track close together. So i laid it probably about 10 small wefts, like i laid about 10 pieces down in the front, and you guys will see me do that. But i kind of kept this part a little detail. So you can see, and once i get to the end, i go back through the width and i tie a knot. I love doing my u-part wigs this way. I like big volume, hair. I, like i just like big hair in general. I'Ve said this plenty of time, so i hope this video is very easy for you to kind of follow through. If you like this method as well, and now you see i'm not tying a knot each time i'm just going through sewing close closely together and if you don't know how to sew honey, i don't know what to tell you. This is a detailed tutorial on the process. It took me to make this wig, but as far as how to sew i mean you can kind of see what i'm doing you want to take the needle under the weft and you you can kind of see like and then once you get at the end. You take the needle through the width not under, but through it, and then you tie a loop around the needle and you make a knot as such and i'm just going to go ahead and speed it up. You see how it flips over. It looks seamlessness. So i'm just going to like speed this process up and i'm gon na continue to keep stacking the tracks. Like i said i used about, i use anywhere between eight to twelve. I, like my hair, to look completely full, so yeah. I definitely use a lot. I stack a good amount in the front and i'm just gon na go ahead and speed up like i said we all love a good time lapse moment. I know i do because my attention is going to be all over the place like girl hurry up, but for those of you that, like a slow down video, i did try to slow a couple of parts down. So you guys can get the gist of how i am laying these tracks. Okay, so after you're done sewing your pieces in in the front, you just want to continue to sew around the rest of the bundles that you have until you meet the area at the top of your head as i'm doing as such. At this point, i get all the way to the parting side of the u-part wig and i just continue to keep continuing sewing until you have the part that is either big enough or small enough for you, like i said i like a minimum leave out. So i'm going to really try to focus on closing this park area down part area down as making it as small as possible, because i don't want a large leave out and for my leave out, i use biz wax. I do have 4c hair. If you look at some of my older videos like you've, seen my natural hair in other videos, so i use biz wax because it helps my hair not convert. I don't know i just prefer to use bis wax on my leave out and it blends like a charm and once again i'm at the top of the hair. So once again i am cutting wefts again. I know a lot of people who do cut the wefts of their hair of their extensions once they're at the top of their sew-in, but it's a preference if you can find a way without cutting your wefts, do it like. I said i am not a professional. I don't even know if i've said that yet, but i'm not a professional, i'm not a beautician. I do not do hair for a living. I just like to experiment - and you know if i feel like i can do something i put my mind to it and i just do it so, as i said, i'm still trying to get my parting as close as i my preference, so i am still going Around my part and making it a little bit more tight for my preference um and i'm sorry about the lighting, it's not the best. I was trying to use natural light and, for some reason, this part of the clip looks kind of smoky um like i had a hair, dryer or something going on, but my apologies for that um. We'Re gon na finish showing this out, like, i said, sew under the weft. Once you get to the end, i take my needle through the weft and loop around to make a knot, and it looks like i looped around twice the more security hey do what you got to do. So i think i have the parting as close as i like it. So now you guys can see the full flip over method. It looks so good. The hair looks so good. It looks so full like i like my hair to look. I love the fullness. I love the flip over effect, it's just so cute. If i can make. I need to make like five of these wigs a short one, a medium lift one, a straight one like i love the flip over method. I just love it all right. So now i'm not done like i said i like a natural look, the hair, as you can see, already, has this natural color to it. I'M going to try to lift that color a little bit more. So i'm going to use my 20 developer with some clairol bleaching powder and, like i said you guys, i am not a professional. I don't know how many times i will probably have to say that throughout this video i'm not a professional. I am not using gloves. I don't recommend that you do this at home, especially if you're not comfortable or you've, never done this before or i just have like somebody with you while you do it, but i've done this before so i kind of already knew the outcome of what i, what I'M doing right now, so my goal is to get the color lifted to like a like an ombre brown um honestly, i definitely should have sectioned the hair off, but i was just i don't know just kind of rushing. I don't know what i was doing. I had no reason rush. I had nowhere to be, but all in all, you still can kind of see the color in some lighting where i lifted the color, but i kind of just skimmed, through with the brush and my paddle brush to slap this bleach on the hair and get it Lifted, like i said, um just disregard the fact i don't have gloves on i'm not in a ventilated area, just disregard all those laws of beautician. Right now, like i said, i'm not a professional hairdresser. This wig is for my personal self. I like how it looks on me if you like the way i i'm doing it, i'm constructing it feel free to try this method. Only thing i will say about. I left the bleach on this hair for about 30 minutes. I probably could have left it up there longer so that the hair, the color, could lift a little bit more because, like i said i feel like it could have took a little bit more, but it didn't it didn't take as much as i would like it To have taken, i felt like it could have lifted a little bit more. So honestly, i'm just picking through the hair super ghetto. Look at this! What the girl section that hair out you go back and look at yourself you're just like! Why did you do that? But honestly, i'm i'm honestly proud with how this wig came out. I love it. Super cute super full super luxurious, just juicy curls um. I actually want to try a wand curl this wig, but that's for another day. Another video, like i said, i'ma let this color bleach stay on this hair for about 30 minutes could have let it stay a little bit longer, so it can lift some more, but it is what it is. Next, i'm just gon na wrench this hair off. I just happen to have some shampoo and conditioner from the shimmer line. I'Ve seen people use it on some reviews that i watched on youtube here on youtube and it worked for them. I'Ve been using it on my wii for some time now: um, it's good for color treated hair. I haven't had any issues out of it. I'M going to use that the conditioner to give this wig a good wash. Then i'm going to go back in with some more of that shimmer conditioner and the treatment um. I can't think of the name, but i'm going to show the treatment, the white and green bottle i'm going to show the treatment. So i'm going to use it and i'm going to brush through my wig really good very thoroughly and i'm going to actually let this treatment and conditioner sit on my wig for maybe an hour hour and a half and then i'll come back and rinse. My wig off cold water i'll go through like cold hot cycles, um, but i'll keep wrenching in cold water. Until i don't see any more product, the water runs clear so and that that really works for me to. Let me know like i'm, not getting a lot of product build up on my wig, like i've really washed my rig good. I just keep wrenching and washing until i don't see any product um coming out in the water, so yeah and that's all i'm doing here and brush it and make sure everything is staying. Detangled and if you guys know a good detangler um, a leave-in conditioner that you use on your weave, because you please leave a comment below um, so i would love to try some new products on my hair extensions. I'M just gon na wrap this in a towel. I mean not a towel but a t-shirt and then i'm going to continue to detangle my wig and let it air dry i'm going to actually throw some curl cream up there by pattern and continue to just detangle at this moment. And i let it air dry for maybe three to five hours and that's the pattern leaving cream and that cream is really good for, like twist outs and stuff like that. But i haven't tried to do a twist out on this wig. I just kind of let it air dry and have its own natural curl pattern, but it came out super pretty. I like. I said i really love this method in this wig, so i'm just gon na continue to keep detangling the hair and once again let it air dry for three to five hours and it'll be semi-dry, but i'm to go ahead and add my wig combs to the Wig and i'll show you here the wig combs that i use. I do not use wig clips because it broke my hair out before i just use cones with my braid pattern that i use on my um to install my wigs. My, u part wigs, i have one perimeter braid, that's going around my leave out and then i have like four to five big braids and my hair outside of the skinny perimeter braid, but it fits those that perimeter braid. Those two combs that i have going around the parting area. It fits right into those um braids and i put a comb around my temple of my head. I put three combs in the back one in the center one around the back temples and i believe, that's all the combs i put on the wig, which i'll show you guys everything that i'm saying here shortly. But i use the same sew-in method that i use for the tracks for to sew through the velcro part of the wig comb sew through the velcro sew through the velcro. And then when i get to the end. I sew through again make a loop and a knot and, like i said, i'm just gon na speed. Through this add all the wigs i'm gon na continue to let the hair air dry for a couple of more hours. I think i put it on later on that night or either the next day and you'll see my wig pattern. You see my braid pattern and you'll see me use the biz wax. I put like a little bit of the biswag, especially on my ends. It'S really my ends that, like to resort back to curls and i'm going to add a wig bang, a wig band as well to help secure because, like i said this is a large wig cap, but my head cannot fit a small or that one size fit All or medium so having a wig band helps it stay a little bit more secured on my head and if i still feel like, i need some extra security. I just take two bobby pins and i tuck it right behind my ear and, like i said, my wig is not going anywhere and i'm just going to get that band tied on and i will go ahead and cut my parting area for my u-part wig and I'M gon na get this buggy on my head and i'll. Let you guys just see your rest just see the rest. I love this method. I hope you guys enjoyed this video um. If you do try this, let me know how it turns out for you in the comments. Please please please leave some comments below, especially if like if you have any good products, i can use on my hair for detangling purposes in the comments, or you know, like a light, a light serum or oils. I'Ve been using the pattern um serum from the same line. You saw that cream was from, but yeah leave, comment product suggestions below um or any any suggestions you have regarding this video. I would love to interact in the comments. It was super easy to install this wig. I have access to my scalp. I can take it off whenever i want, but yeah. I hope you guys really enjoyed this video, like i said, like comment below subscribe hit that notification bell, so you don't miss upload here. You can see it's in the natural state, no edge control. I love this state right here like freshly washed, but yeah, like i say, always, peace, love and blessing. See you next time.


Comments
Natalya Zav: Interesting process. Will definitely try it out