Make A U Part Bob Wig In 30 Minutes! (Feat Eva Wigs)
- Posted on 16 February, 2015
- U Part Wig
- By Anonymous
Promo Code: EbonyCPrincess4u = $35 Off from EvaWigs.com!
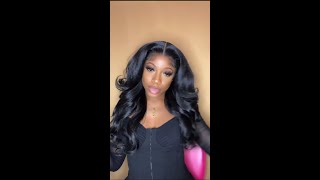
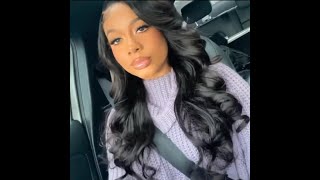
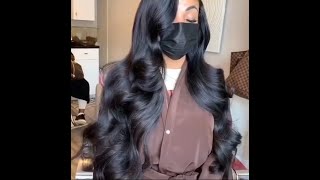
I used three bundles of body wave, Brazilian hair in natural black in lengths 10, 12 & 14 inches to make this u-part bob wig. Specs:
Product link: http://www.evawigs.com/hair-extensions...
sku: hwwv003
Hair color: Natural Black
Hair Type: 100% Chinese Virgin Hair
Weft 1 Length: 10 inches
Weft 2 Length: 12 inches
Weft 3 Length: 14 inches
Hair Texture:Silky (Non-Yaki)
Longing 4 Length: http://www.longing4length.com
Socialize with me:
Facebook Page: http://facebook.com/LongingforLength
Twitter: http://twitter.com/ECPrincess1
Instagram: @EbonyCPrincess (http://instagram.com/ebonycprincess/)
Friend Me on FB: http://facebook.com/ECPrincess
Pinterest: http://pinterest.com/longing4length
All right, I received three bundles of hair from Eva wigs calm and, as I don't care, I received a net at least half a Y tooth, Eva wigs, calm, shower comb and some long bobby pins, which is nice. My hair has been steamed process to achieve this body. Weight texture, as you can see, mi 3 bundles are 10 12 and 14 inches, which is perfect for a bob style. So this is a closer look at the weft of the Eva wigs hair. It is double wefted, as you can see, and the beards are fairly undetectable, which is always great. If you don't know what weak beards are. You can google it or look down in the description box for a longer explanation, so just to get started on the wig. I decided to make it in a slight L shape because I wanted the bang to come around my head and I'm using a spandex dome cap, as you can see, and my Styrofoam head has been modified to reach, make sure it's big enough to you know fit My big head and to make this week quickly, I decided to use a hot glue gun and there are tons of tutorials on youtube on hot glue gun. Wigs, I'm two of my favorite channels for u-part wig making are the brilliant beauty and hair de la creme. So if you've never seen any part wig or a wig making video definitely check those videos out, I am just blowing along and, as you can see, I'm doing the fold-over method. I am trying to get this done quickly and it easily as possible. So I didn't even put my webs so the one thing about the way that I make my units, especially me having a larger head is, I do not glue along the scenes of the cat, as you can see, so I just put the bundles in the back And then, when they get close to the top, I either cut the bundle or will start the new one once I got around about halfway up over the scene. This is the pattern that I began to use. I started going almost and I don't know almost in the box, I guess around starting at the area that the part is in and again I was not cutting my webs. So yeah made this wig super quick. As you can see, I kept going around in that fashion and then once I got up to the front, I ended up having a gapped area and then that's the only area where I did cut the web and I go them horizontally or perpendicular. I don't know what you call that, but you can see that I have several individual wefts there that were cut and glued and then once the hair falls over it'll be fine, so just to hide that little area I'm going to place one more track of hair Along the L part or you area where my hair is going to be left out and that is going to you know, make sure that everything flows seamlessly. So I went ahead and glued the hair there. I used white eyeliner to create that area so that it would be my guide for what the area that I wanted to leave out and what I was going around just in case you guys wanted to, and when. I was completely finish. This is what looked like and the hair the Butte, the texture of it is beautiful. I mean I could have done this in a layer style, starting with you know the longer lengths or left it just like this, but I did want more of an exaggerated bob. So I pulled it back the back half and began to cut straight across in the back now, this hair being so voluminous and full. It took me a while to cut your cross and I wasn't the most precise as I could have been so I had quite a bit of shaping to do after I started the initial bob shape and I probably wasn't the best I could have taken my time. A little bit more by you know going in sections instead of all at once, but it's okay, I made it come together and then just kept, shaping it and cutting away the area to make it even and give me a little shape in the front there. As you can see - and I did get that asymmetrical - look that I wanted and just kept, you know cutting away and shaping it to make sure it was the way that I wanted to look already, and then I placed the wave on did a little bit of Styling and to check out how I blended out my hair and just swooped it in the front and finished off the styling. You can check out this video, but this is the finished. Look. I really really love it and I didn't curl the back of the hair. This is the natural texture of that body, wave hair. So thank you guys so much for watching take care and stay blessed.
Comments
LongHairPrettyNails: So cute! This wavy texture is gorgeous. I love the fullness.
Velicia Hiley: Ebony, you are very skilled. My goodness. When you said hot glue gun, . Lol yea. Man, you are making me want a wig now. You did a fantastic job , the whole process was seamless. Bravo
Niki K: Really cute u part! Did you add clips or combs? Can you show how you did it. Thank you!
Traycee Simmons: I Love it !!!!!!!
itsxymomma: Love it sweetie
Christinia Peake: I would love to make this. Just because it look fun and interesting. This is a nice video.
SW33TSPARKL3: Very cute
_Heaven_City_: so which one was used first because I got confused?