How I Make My U-Part Bob Wig + How To Cut A Bob
- Posted on 16 January, 2015
- U Part Wig
- By Anonymous
❌ Email : [email protected]
━━━━━━━━━━━━━━━━
Instagram: DejaMajorr
SNAPCHAT: @Maeleece
TWITTER: Dejamajorr
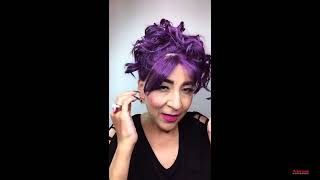
Hey beauties on this video, I'm gon na be showing you guys how you can create your very own. You part Bob wig, so let's get started first, you're gon na need some scissors, a comb, a hot glue, gun the hot glue sticks. Of course, your hair and then I chose to use a kid's, don't cap for a little bit more of a snug fit, of course, as you guys can see here to save time, I already pre-cut and measured the hair. Now what I like to do when using my hot glue gun, is work in sections. I placed a little bit of the hot glue on the West at the time. I chose to go this way, because the hot glue does tend to dry a bit fast. So you kind of have to move quickly, applying a little bit of the glue to the West at a time allowing you to dry and then moving on to the next section doing it. This way really lets me know that the hair is dry and that it's secure that way, I won't have any tracks slipping at the edges or you know any loose, sweats or anything so just moving section by section. I continue this message up to the temples of my hair until I get that u shaped pattern, I just continue to add the webs to the cap until I get to the temples just to create that you shaped pattern so once you've completed that you shaped pattern, It should look something like this, so here's where we will start to create our bangs. What you want to do is once again pre cut and measure the hair. Once I have the length of the web that I need in order to do the side part. What I do is, I start placing the tracks going horizontally. That way the banks will fall in my face. So from that, you shape, you want to place the tracks directly across leaving a little bit of space in between that track, coming upward and then the horizontal track that you're placing. I really hope that this make sense if it doesn't just watch this tutorial and trust me, you will get it I'm leaving that little bit of space because that's gon na be our leave it out. I want to try to leave on as little hair as possible. So that I don't damage my hair at all, I stopped about halfway from placing my tracks going horizontally. I didn't want to go too far up because I didn't want a big bulky bang once I've got the amount of bang piece that I want. What I do is I cut smaller tracks and I go back again going vertically, as you guys can see here. What I'm doing is I'm actually closing the, u part, wig and then we're going to actually cut that extra material and then that's when you can sew it onto your braid and then flat on your leave out. So this is basically what the wig ended up. Looking like from there like, I said you just cut that mesh material and then you can sell the unit on from there so now getting into the actual shaping portion of this video. What you want to do a session that you're off into four different sections. I have two ponytails in the back and then two on the side as well, which ones do is cut downwards once you are done cutting this is pretty much what you should get as a basic guidelines, but then what I do is kind of clean up. The cut by razor and getting using my shares to go in might be if you'd, like a more crisp cut a mark sharper cut than what scissors can give you. What you can do is go in with some haircutting clippers. The Clippers will just give it a more sharper edge and just make it look a whole lot more neater, a lot more neater than what you can get from just using basic scissors and razors. If you find yourself having trouble creating the Bob, and you find that you end up creating these harsh cuts, what you can do to make this a little bit easier is use a razor comb by just gliding the razor comb down the hair. It creates soft layers and the hair instead of just using scissors. I use both Fraser combs razors and my shears as well. To get this desired looks once I was done, cutting my bob. This is pretty much what I ended up with just to give you guys an idea of what it should look like from here. What you would do is go in with your flat iron, curl and flip, or feather your hair, how you desire? Okay, let me first start off by saying that this hairstyle was not what I was really going for. I wanted a big fluffy. You know voluptuous balloon choice, but I'm sure it's Bob and this nurse I'm kind of turned out nothing like it. It looks really natural. It looks more like my natural hair, which is good for some people, but you know I wanted something flowing where I could swing, even though it's about. I really wanted something like that, but I ended up getting something more natural. One thing that I could have done in order to get that style that I wanted was to actually place more hair on the cap and should I saw I did hot glue, the hair on to a kids. Don'T cap, I decided to use the kids don't cap because a lot of times what I find is that the regular dumb caps are too big, and I end up with that extra material in the middle and a kids don't Pat, born better trust me. This is a u-part wig, so I can't take it off as long as I don't slow it down at the moment. I don't have it so down, because I just want to put it on to kind of see what it looks like before. I actually you know, slowed it down to make sure that I really liked it and I was comfortable with it um. I didn't go into great detail about how I cut the hair, but I will have a great tutorial for you guys in the description box, basically showing you how you can. I will turn around to show you guys, basically what it looks like in the back. This is the left side. This is the right side and I really wanted to go for like the stack vibe. Look, we'll just basically works a little bit higher in the back and then gradually goes down into like that asymmetrical bob. Look. But anyway, this is pretty much the complete look of my bar um. As you guys can see, this side is a little bit short. This side is a little bit shorter than this side. That was basically what I ended up doing, because I just wasn't feeling the whole vibe I feel like it wasn't thick enough. I may go in and do like some purple highlights or something like that and just add some more hair, because I just don't feel like it's thick enough. For me, it looks a little bit too much like my natural hair did, and I come it's okay. If you, if you're, really into that natural look, but it wasn't really what I was going for still turned out cute though, but if you guys, like this tutorial, go ahead and give me a thumbs up, I really hope that you guys enjoyed this tutorial. I hope it was helpful to somebody I hope, to see you guys soon. Bye,


Comments
shante B: It looks really nice and you made it look so easy to do very nice tutorial.I wanna try this for real Thankyou.
SicNtiredOfDisBS: I really like it it looks sooo natural
Jessika Gaines: it came out really pretty !
MissGirl: Yes ma'am, I like!! Lol. Ugh I wanna attempt this so bad but I have an undercut so I don't think it'll work ): tfs though. Slayed as usual.
CallMe_Shay: Good job
Milli: Its really cute you look beautiful
Jessica Rae: that turned out sooo cute. im horrible at cutting so i know i could never attempt that lmao