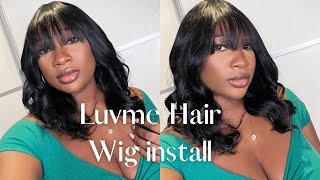
How To Sew In U-Part Wig! - Beginner Friendly
- Posted on 30 January, 2019
- U Part Wig
- By Anonymous
This is my first video of 2019 & I wanted to make some dope content for the new year and help my girls out who want to know how to sew in their u-part wigs! Please let me know what you think. Thanks for all the love and support. xo.
Social Media:
Website: http://www.clareabrianna.com/
Instagram: https://www.instagram.com/clareabriann...
Other Videos:
Outre Batik Peruvian Try On + Review: https://bit.ly/2u9XZqj
How To Get Natural Hair Bone Straight: https://bit.ly/2KIKB3b
$40 Thrift Store Haul: https://bit.ly/2zfbef8
Get To Know Me Q&A: https://bit.ly/2KHDN5Y
$1 Eyelashes Application: https://bit.ly/2KK0qtU
Morning Skin Care Routine: https://bit.ly/2NZZBMb
How To Revive Old Weave: https://bit.ly/2OwBXaC
How I Started My YouTube For Only $100: https://bit.ly/2N37Rth
iSee Hair $50 Bundles: https://bit.ly/2AoF7qp
iSee Hair 2 Month Update: https://bit.ly/2zoTTOk
If you have any questions comments or concern you can head over to my IG @ClareAbrianna. Please comment below what you think or if you have any questions. I respond asap!
How'Re you guys so today's video I'm gon na be teaching you guys how it's pretty much. So in your! U part, wig I've been doing this, for I want to say about five six months and I use this method every time I do so. In my new part, wigs, it's gon na be quick, simple! I'M gon na make this as easy as possible. So if you would like to know how so it in please keep watching so so I already have my leave out right here and you want to make sure that when you create your leave out that your wig fits your leave out part because you don't want To obviously make your league not fit because I've had that happen to me, so just make sure that your? U part wig fits your leave out part. Make sure you my triple check that, because again, like I said I made that mistake before you do not want that to happen. The next step I'm gon na do is um. I leave a little bit of my edges out, so I'm just gon na take like a tiny portion for my edges like a tiny, tiny portion. You don't have to do this, obviously, but I do it because I don't you know just in case the wind blows up. There is something there to cover my tracks. I start braiding put moisturizer in my hair and the reason why I do this is because, when the braids I braided underneath my wig, I want to make sure that they're moisturized I'm not dry they're, not brittle okay. So the next step is you're going to want to make an anchor braid and what an anchor braid is is it's the braid that is going to be sold on to so when you sew in your do part way, that's the braid! That'S going to be sold on, so you don't want to make it too thin, but you don't want to make it too thick either. So I'm just gon na Park that really quick sprayed this tanker braid, we'll make sure it's super tight when you braid it as well. When I get to the end, I end my braids with rubber bands so that it does not come loose under my hair, because that would be really bad. So I end up with rubber bands. You guys don't have to do that method, but I highly suggest that you just make sure that your ends will not come loose. This is the first braid again. This is the anchor braid. I'M gon na end up putting it back here. So don't worry about it. Dangling right here for right now and then I'm gon na do the same thing on the other side again so for the rest of the brains. They don't have to be perfect, don't make them too chunky, but they don't have to be perfect at all. They don't have to be tiny like this. I think I usually do like four to five and that's it. I don't do anything crazy, just make sure that it is as flat as possible. You want to make sure that it is as flat as possible once you're done, braiding you're going to take just like one side of the braids and you're just going to flap them together. That'S are you gon na do is slap them together and I usually end it off with another rubber band at the end. Just make sure that these grains are colliding together, go to the other side and make sure that the anchor braid is behind the ear and then you're going to collect again tie all the braids together. The two braids you're, actually just gon na sew them up to make sure that they are sewn up. You don't want them hanging down. Of course, there's different ways. You can sew it. I usually just do an X, so I'm just gon na start threading that or just sewing it up when you click it shouldn't. Take that long we are all done, sewing our braids up and everything is flat and neat. You can go ahead and start stringing. Your threaded needles, the beautiful thing about you part wigs, is you only need up to maybe four or five, depending on how long you string them. Sometimes I only have to use two or three so make sure you string those needles, so you don't have to stop pause and keep going back, just kind of string them beforehand. So everything will be like a one-step process. So are you gon na do is literally like just anything. You'Ve got a little big thing, so you can see you're just gon na you're gon na go underneath you're, not gon na go back on top of it ever just. Do it one time make sure it says like as tight as possible and then we're going on to the next cornrow make sure it's up as much as possible. So, where you leave that's going to be go underneath back, wrap right around we go to the corn roll. Oh once you get to the last braid just slide it up as much as possible again go underneath the braid! Sorry, I'm looking down it's because I'm looking at my new earth go through the braid through because we pull it through the string possible as close as possible. Now we are moving on to sewing in the sides of the? U part wig. So what you want to do is you kind of just want to tie up your wig and your hair. So now what you're going to do this arseling in the sides of your you can't wait as you can see. That'S what the anchor braids are for. That'S what we bring this before we're going to pull them up and just sew it right on that anchor braid, it's very repetitive, so just keep sewing along this Tinker breeze and make sure you're pulling it up as much as possible to make sure this is the. I don't feel super tapes on not necessarily our heads and gon na make sure that we is not now we'll be going to the back of the week to be so long. So I'm just gon na show you guys how I do that you're pretty much. It'S going to loop it through the back and you're just going to keep looping it through looping it through, and it becomes very, very repetitive finish up this last anchor braid we're going to finish, sewing it in and then we'll finally be done. So, let's just finish this last anchor braid those knots just go back in and just be carefully cut them and, as you can see, it blends perfectly over the u-part wig it's flat and is ready to go. Of course, I have to straighten and blend my hair, but that is all for this video you guys, if you want to see how I blend my natural hair with this wait, stay tuned for my next video and watch part two of this video. I hope you guys really got something from this video. I know that you part wings are very simple and if they do a lot of money - and it's also nice to be able to sew it in yourself. So if you guys have any questions, comments or concerns, you can contact me at my Instagram at clairaut Rihanna or go to my website www.rinaldin.com, and I hope you have a blessed day. Bye,


Comments
Kiauna !: Beautiful sis Definitely trying this technique.
CurlyGem: You make it looks sooo easy but thank you for this video beautiful
Those2! REACTS: Love it
T. Green: Did you cut the clips out before you sew it in?
Pretty Brown: