How To Make Your Synthetic Wig Look Natural (Very Detailed) | Freetress Equal Letty Review
- Posted on 26 February, 2018
- U Part Wig
- By Anonymous
HOW TO MAKE YOUR SYNTHETIC WIG LOOK NATURAL (VERY DETAILED) | FREETRESS EQUAL LETTY REVIEW
In this video I show in detail how I make my parts look natural along with review this synthetic wig from FreeTress Equal. I'm showing what I do when my parts are not blending well. Also the Letty wig does not have a lace front, only lace is in the part. It's very gorgeous wig, and the curls are very soft and natural feeling.
Link to Wig: http://amzn.to/2EXaVnD
NEW TO YOUTUBE? PICK UP MY GUIDE TO REACH 1K AND GET MORE VIEWS: https://mailchi.mp/ad7b5933b0ee/new-yo...
Serious Business Inquires: [email protected]
Follow Meehh:
Twitter: https://twitter.com/XOXOSHEBA
Instagram: https://www.instagram.com/xoxosheba/
Intro: "Say It x Sam Ward https://soundcloud.com/samwardgotit/sa...
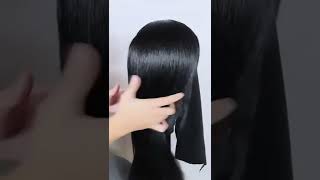
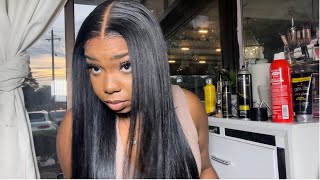
Focus on focus, hey guys, welcome back to my channel xoxo Sheba. Today'S video is a wig review mixed in with a wig tutorial right. Keep it interesting. The way we're gon na be working on today is from free trust, equal, and this is their wig. Lady. Now, with making this part look natural, the thing that's a little bit different than your average weight is the fact that this has no lace front like at all. This is just a lace in the part I did not cut off any lace, it just doesn't have any, but before we get into the video, you guys already know that you know don't forget to Like comment and subscribe. Okay guys so looking at this part here, these bright hairs that you see they did give us a little bit of baby hair to work with so we'll use that in a few, but right now we're gon na focus on this part. As you can see, the part is not it's not horrible, but it could be a little bit wider and more prominent. So I'm gon na pluck a few hairs out of that. So it can look a little bit better. It was plucking your parts, you really just kind of go within where your parting spaces, like this middle area, and pull out the hairs yeah. So, let's plucking your part. What you want to do is go through right in the middle of your part, where there's like extra hairs and stuff, and that's where you want to pluck out so it kind of like gives you a runway. I guess of parting space for lack of a better term. You can tweeze, but I found that tweezing is a lot harder than just plucking with your hands. One of the things I do to make sure I don't rip. My lace is one you don't want to take too many hairs at a time and number two hold your finger down on the lace and then pull it out. So that way it keeps your lace from my really tugging, while you're pulling out these hairs. You definitely want to widen your parts when you have a thicker wig, because the closer your part is when you have these thick wigs, the more unnatural that it looks so right here in this front area. I see it's like a really dark line, so I'm really gon na like pluck some hair off this area because it kind of shows off that line of demarcation, and this is the area where you're really trying to blend your lace with your scalp. So you really don't want anything kind of block in this front area outside of your baby hair, but like right on this line, you kind of don't want that. I don't know how well you can see this, but having those hairs right covering the edge kind of really shut off that line of demarcation, and this is right where I really need to blend my scalp. So I need that free and clear to look nude. Okay, let me explain: what's going on so what I'm doing is I took my guys to be glue and I just flicked my edges, because I'm going to be using a little bit on my edge with this one for baby hair, so this week does have two Comes in the front one in the back and it does have adjustable straps what I'm doing right here. What you see me doing is just laying my edges so that they'll fit well on the wig. Now I'm going to go ahead, I'm not got to be doing this in a sense that it's supposed to stick down with I gots to be glued. However, I am going to go ahead while the glue is still tacky from be laying my edges. I'M gon na go ahead and put the wig part down so that it lays as far as possible, because this is a softer lace and, as we all know, if you are a synthetic person, you know that soft lace is like more comfortable, but it doesn't lay As flat, so that's what I'm gon na do and then also, if you can tell that's why I parted it. A little bit is because I'm gon na have it a little bit behind my hairline, because I'm gon na use my hairline for edges this week is big-headed friendly. So if you have a larger head this week, will be just fine for you. If you have a smaller head, it's gon na take some adjusting like for me. I probably should have adjusted this a little tighter and then the combs there. Also, when I say in the front they're also more like here and here, not necessarily here here so the more cuz, I feel like it - dried just its head right in there, alright. So now the best way down, I'm just gon na, go ahead and tie my scarf so that it we can secure it. I love the texture of this way is very soft, but it also has that yaki coarseness to it. It'S it's. It'S a very nice texture and like it doesn't shed like it seems like by the time you get to the bottom cuz. This is a long wait y'all. This is a pretty long week. It feels like you're gon na like have some shedding coming off in your hands, but you're. Not so that's awesome, it does tangle just a tad, though just to let you all know, but I mean that's to be expected, so I'm gon na let this settle for like 15 minutes number and come back and finish work along this way, all right Joe. So it's been 15 minutes, so it's actually been 20 minutes. So now I'm gon na take this off and see what's poppin, oh, it's kind of sticking as well. Now here we are, but I feel like I don't have enough - there's not behind my hairline enough right here to make it many cents will push it back. Just a tad like these little side pieces and don't want to lay yeah I'll push it back. Just a tad bit, so I can go one more edge going so now, as you can see right here, it's looking a little more natural, but we still got this whole area going on. So imma grab my powder, so we can make that more like a more brighter part. So, for the part I'm going through with my pressed powder, I use the dream: matte mousse, another treatment mousse. I used the Maybelline Dream powder and the color that I use on my scalp is going to beige because, as you can see already thing, my scalps a little light skinned. So all I do is just like dip it in there and put it in the part. The whole purpose is to make it more scalp light and to also make it bolder. So that is a clear separation like there's a part here, because you know like it's a thicker way, so you need a little more umph to be like yes, it's here, there is a part. It'S not invisible and they're really focusing right in here trying to disguise that low line of demarcation and don't worry, I'm gon na clean this up. It'S not gon na just look like a bunch of junk. In my part, I'm gon na clean at it. So once I feel like I've got enough pressed powder. What I like to do is go through like this and kind of blend and then to fix where you know, I got a little too happy. I go through with eyebrow powder, it's just wet and wild. It'S the cheap kind of used it before in my videos, but what I go through is I kind of go through and fix where I went too wide and just kind of like be perfect. This line of demarkation, because your hair line is not a perfect line straight off your scalp, so just trying to make that have the illusion that it's a little more unperfect. And if you use too much of this, you can go back with your pressed powder and just do it again like you can go back on top of these forever and pretty much okay. So I'm not exactly happy with how that looked like, I feel like it. Could be a little better, so it I just did since the wig part didn't stick like I wanted it to to my scalp. I just push that back and I'm gon na add some powder under the part, and what this is gon na do is gon na help me camouflage that line. So I'm just making this where my parts gon na go a lot more bold, and this is something like this is a throwback for me, this is something I used to do in the beginning that I had stopped doing it cuz. I didn't really have this problem, but since I have it now, why not go back ain't like you can already see like we're, not done yet, but it just makes it blend a little bit better, like I'm kind of creating a hairline under my hairline when I'm Creating a part under the part, this would be easier if I already had a part right here, because I don't I'm trying to just make this as seamless as possible. There we go yes, see, that's already like more seamless than what I had going on before. Okay, yeah - that is much much better see like I was saying, is like right there, where the wig stops. That'S where you don't want people to see. Is that line right there when you're pushing your hair behind the hairline, we're gon na use your own edges? That'S the hardest part is that you really have to make that part blends, but when you put that powder under there and then go over top, it does make it a whole lot easier to go ahead and use your own edges instead of making baby hair. So you guys this is what the part turned out to look like, and that is how I spelled my lace parts when I don't have any. You know lace in the front or anything like that, and also just in general, if you're, having trouble trying to like fix your mind demarcation. That powder under your part is a major key okay. So if you remember nothing else from this, video remember in that part, spec that I have on this wig, though, is that it is super long like if you pull it. It goes down to hip length and I can't even show you guys hip length like it's a good 30 inches and it is gorgeous. So, if you're looking to pick her up, I was definitely link her down below in the description box for you. Thank you guys. So much for watching, don't forget to Like comment and subscribe and don't forget to hit the bell see you never miss the upload from your fav, and I will see you guys in my next video bye.

Comments
XOXO SHEBA: *Synthetic wig tip for anyone new and/or confused* The point is to make an illusion with your part. If someone is all in your personal space they will always see the lace, the point to make it so that when people are a normal distance from you it looks like scalp. Hence why I back up at the end so you can get both views. How to wash your synthetic wigs with detergent and fabric softener https://youtu.be/kZCiumOhlio
Ronni j: LOVE THIS WIG YESSS ...YOU DID A WONDERFUL JOB MAKING IT LOOK LIKE A SEWIN
Debbie Debeaux: Great instructional video. I'm new with the wigs and thought I'd mess it up if I just went in and started plucking my parts.
Tiffany Davis: First I want to start off by saying you are absolutely gorgeous love this unit, I did purchase this unit today and I’m going to try to do the parting myself, lord help me lol thanks for sharing love
Benita B: good job. luv the wig on u. I can see the weight loss too. congrats!!
Cristian quinones: You completely did that
Kesha Wearing: Cute
Elisha Smith: Tysm
Alexis G: The blending was a fail