Diy| Diva Queen Virgin Human Hair U-Part Clip Wig Kinky Straight 22" | Samsbeauty.Com
- Posted on 04 February, 2022
- U Part Wig
- By Anonymous
PURCHASE: https://www.samsbeauty.com/service/Div...
ITEM: DIVA QUEEN VIRGIN HUMAN HAIR U-PART CLIP WIG KINKY STRAIGHT 22" | SAMSBEAUTY.COM
WEBSITE : http://www.samsbeauty.com
VIDEO BY: @Brianna Rashay
FOLLOW US
Instagram: https://www.instagram.com/love_samsbea...
Snapchat: https://t.co/p3mjU3WdCi?amp=1
Twitter: https://twitter.com/samsbeauty
Facebook: https://www.facebook.com/love.samsbeau...
Style/Texture Kinky Straight
Material Brazilian Hair
Hair Length 16"
Finished Hair Length 22”
Hair Color Natural
Hair Quality 100% Virgin Hair
Cap Size Average Size
Unit Weight 174 (+/-5g)/piece
Can be [√] dyed [√] permed [√] bleached
Chemical Processing None
#samsbeauty #upartwig #vpartwig #humanhairinstall
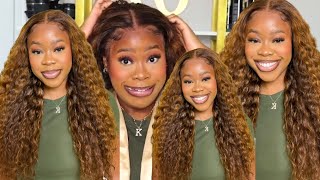
Hey guys, what's up welcome to another video on my channel, so today i'm going to show you guys how you can have highlights without the damage and the only way to do that is to add extensions. But guys don't worry it's a lot of natural extensions that you can use, and this is definitely one of them. It'S a kinky straight. You part wig from sam's beauty and i'm just showing you right now how to go about adding the highlights. So basically, i'm just using my bleach in developer, i used um, regular white bleach and then i went in with my 40 volume developer. I just mixed that in and i'm using the bob and weave method, the in and out method or whatever you want to call it to do the highlights, i'm not using any foils or anything, because i don't quite want them to be like too precise. But that's up to your discretion and you can kind of see how the finished results is to you know decipher whether you want to use this method or use foils, because foils will make it. So it's just more neat and you won't have any access going on to any other hair besides the hair that you want it on. If that makes sense, so i'm just going to do this process on both sides and in the back, just kind of taking chunky sections in doing the highlights and excuse my face guys, i make all kind of faces when i'm doing hair or doing my own hair. So yeah excuse my face, but yeah guys it's pretty self-explanatory. It didn't take long at all, and this hair looked pretty good, so foreign after letting the bleach sit for a bit. This is how it turned out. I did go in after i was finished. Just to add some lighter highlights because i didn't leave it on long enough for the first time, so i just went in to add the lighter pieces, as you guys can see, and i really like the way that it turned out but again guys. I tell you this at the end actually, but i'm going to tell you this now as well. If you want lighter highlights or to kind of pull more cooler tones, then you want to use bleach that is blue or purple, and that kind of just cancels out the like orange tones and you'll have more of a cooler tone when you're doing this. So i'm just going in and straightening this hair out. I did blow dry it because that made it easier for me to go ahead in with the flat iron and also it just kind of gives it more body when you use the blow dryer. But i also went in with the straightener and you'll see in a few minutes. It looks so good, it's really weightless and it just overall looks really really good. This hair took great to the dye, took great to the blow drying great to the flat ironing. So definitely, if you guys want to experiment and do more colors with this hair or you know, add your own highlights and your own twist to it. I think this hair will withstand the test of bleach and heat. So i really like the way the highlights came out, and this is how they look. So, as you guys can see, i did um go in again with the lighter highlights, and i really just like how it looks. I also wanted to do some sort of the ombre at the bottom, so that's kind of what you see down there and i'm just gon na go ahead and detangle my hair and put it up and get it ready for the u-part wig. So i'm just showing you guys that you know you can have hair and you can definitely put your hair up so that you can get this highlighted. Look you do not have to compromise your healthy hair for highlights. Please do not do that so on this u-part wig i am going in and cutting off the straps in the middle and of course you want to take those off, but you can just use them at first to see where you want it to go. So that's basically what i'm doing now, but i did go ahead and cut them off and i'm just kind of like mapping out where i want my part and going ahead and parting. So you want to make sure that you leave enough hair out to cover the area. That is a hole in the u-part wig, or should i say the u in the u-part wig, i'm also going in and taking out my edges so that it can cover. If you want to swing your hair, you'll have your hair out in the front so that none of the cap is showing, and you will see in the end of the video that i should have brought more edges out on the side where the hair is coming Over at, but it's okay um, but just for your reference definitely want to leave out enough edges. So i'm just going ahead and putting one big braid in the back and putting a scrunchie over it, and that is going to prepare me to put the wig on. It was flat enough, as you guys can see, i will show you guys like the side in the back, and it was flat enough for this install. So this? U part: wig has clip in clips all around the front and everywhere, where you want to attack the the wig down. So it's pretty comfortable and it's very secure. So you have enough clips there to go ahead and secure the unit and then also they are clipping clips, so i'm definitely familiar with clipping clips and i know how to work them without pulling out any of my hair unnecessarily. So, like i said guys, i'm going in and pulling out my edges, you will need more edges out than this. If you want to swing your hair, pull it back and do different styles, but for the video purposes i'm just going to show you guys this process. So, of course, get your part where you want to lay your edges, and this is the finished look so stay tuned, guys, okay, guys. So this is the finished result. If you hear some noise, it's raining, but i have had a long day of filming. So i definitely wanted to show you guys the finished results, but look at how this color came out. It came out really really good and, as you guys can see, the highlights look really good and this wig, let's talk about it, looks so natural like. I should have left a little bit more edges out right here, but i didn't it's: okay, um you all! I think you all get the gist of how this is looking, so it just looks super natural for one. I absolutely love how kinky straight hair looks when it is pressed out, because it still has texture, which that is how my hair is looking right now as well, and i just did like an ombre at the bottom. Give it a little bit more color and highlights throughout. Hopefully you guys can see this like. I feel like in some light, so you can see it some lights. You can't, of course you can make your highlights a little bit lighter if you want to. I would also recommend using the um lightener that has toner already in it like a purple or a blue um tint to it, so that you guys can have your highlights already toned, because this hair kind of pulls more orange tones, which you know, if that's the Type of look that you're looking for go for it, but i feel like a more so toned blonde, looks better in my opinion, but yes guys. I love this look and if you want highlights without the damage, this is the way to go. As you can see, it's a protective style, it's super flat. It looks super natural, it's weightless literally. It looks so good. You can also get this same. Look using clippings in your hair. Guys, if you want to add a few highlights or different colors, you can do pink, blue. Whatever color you want to um you can use clip, ends to kind of put them in between your hair to kind of make the illusion of highlights or color. If you would like so that's also another alternative from a full upon wig, let me know what you guys think um. This actually came out better than i thought it would, but i really like it - and i hope you guys, like it too, so comment down below what you guys think of this video and as i've stated before guys, i always say with color pick your poison. I have chose relaxers, so color is not going on my hair, but as you guys can see right now, it's looking real natural and i'm absolutely in love so comment down below. Let me know what you think and i will see you guys in my next video. Remember do what you love and love what you do.


Comments
Fatima Kamara: We need this back in stock sams !!!
Carlandia St fort: What they mean by finished hair length 22”